This is the first of a series of drawing lessons in which we’ll draw our hands.
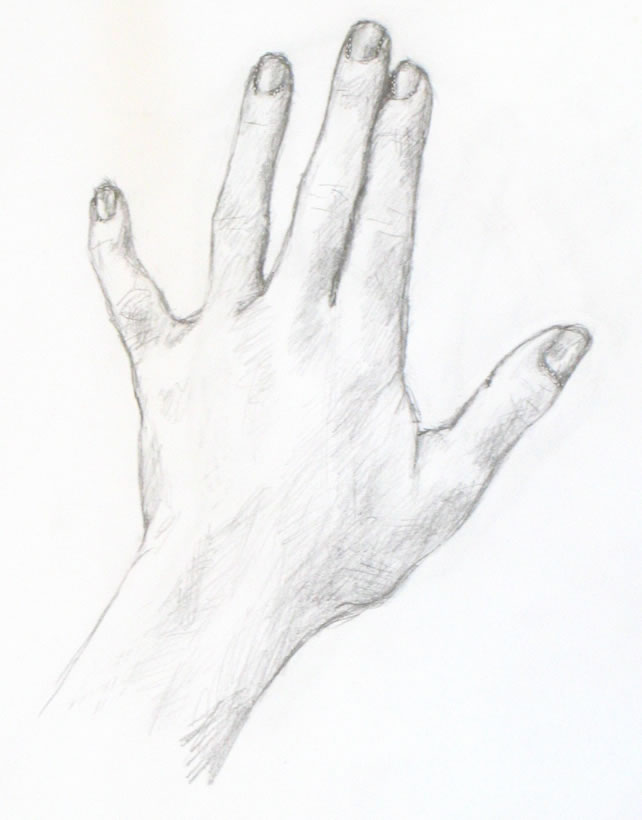
Finished basic sketch of hand.
I chose hands because they are always available to “pose” for you! And they can be placed in an infinite variety of simple or challenging positions. The techniques you’ll learn from these lessons can be applied to drawing anything and everything else.
This first lesson is a simple drawing of the back of your hand. This is the hand at its most basic, with no odd angles or foreshortening. Future lessons will become more complex as we go along.
Materials you’ll need:
You can use any kind of paper. I used plain printer paper and a Papermate “Sharpwriter” #2 pencil. These are very unsophisticated materials, which I love using to practice drawing. They’re easy to find, so you can do a quick sketch any time you have a bit of free time.
Set up your work area:
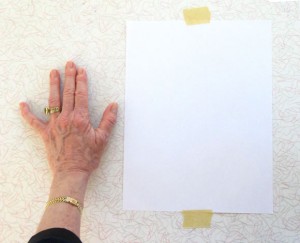
Set up for first simple drawing of the hand
First, tape a piece of paper to a table where you’ll have space to put your non-drawing hand next to it.
Place your non-writing hand (your left hand if you’re right-handed and vice versa) next to on the table very close to the paper.
You will need to stand up while you sketch so that you’re viewing your drawing (and your hand) from directly above. If you sit down, you’ll be seeing your paper at an angle, which will make you distort your drawing.
Alternatively, you can use an easel, either a table easel or a free-standing one. You will then need to place your hand vertically on the easel so you’re viewing it from the same angle as your paper.
Ideally you should stand up while you draw, whatever you’re using. Standing will give you most perspective so you can do your best work.
Placing your hand
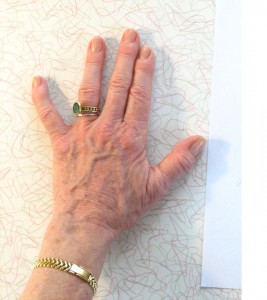
Place your fingers as I've done here: first two close together and the others separated by different amounts.
Place your hand with the first two fingers touching each other, really snuggled up together. Your ring finger should be somewhat separated from the first two. Your pinky should stretch out at a more distant angle. Place your thumb with a good space between it and the rest of your fingers.
These differing amounts of space between your fingers will help you see the “negative space” between and around your fingers and hand. You can read more on why this is true here.
To me, the ability to see negative space is the key to drawing anything. Focusing on the space around what you’re trying to draw tricks your eye into seeing more accurately. It’s an extremely important skill for you to develop!
Begin by drawing negative space
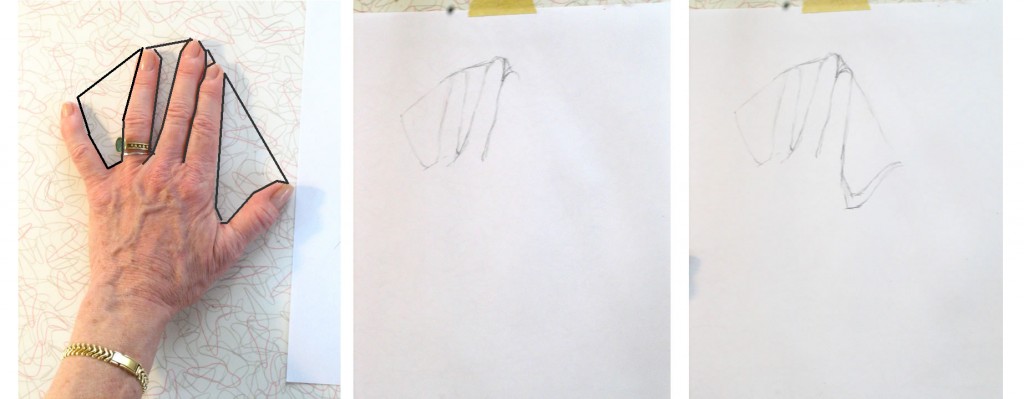
First, look carefully at the space between your pinky and ring fingers. It’s roughly a triangle. The top of the “triangle” is created by an imaginary line connecting the tops of the two fingers (we’ll erase this line at the end of sketching the entire hand). I’ve placed black lines on top of the photo of my hand to help you see this.
Don’t look at the fingers themselves! Forget that you’re drawing fingers. Focus on the space between the fingers and draw it, as I’ve done in the middle image below. Form each angle of the shape as accurately as you can. Then move on to the triangle between the next two fingers, as in the far right image below.
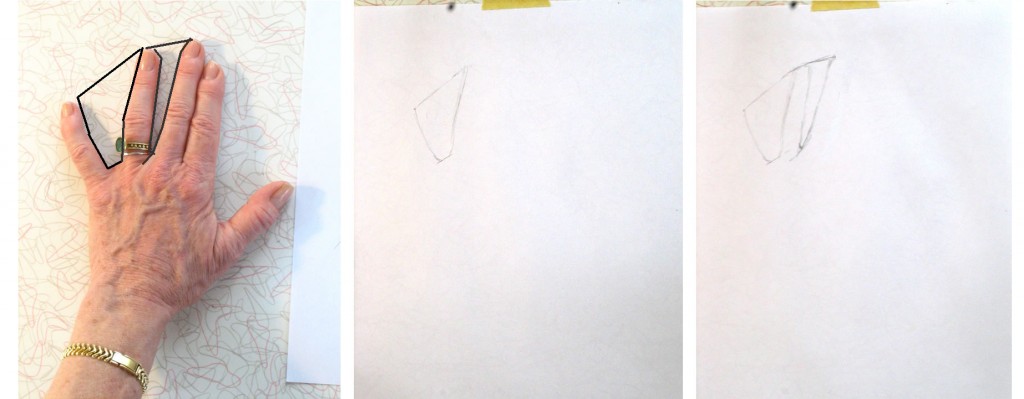
Begin by drawing the spaces between your fingers. Don't look at the fingers! Focus on the spaces between them.
The “triangles” are each tipped at a different angle. Be sure to draw your “triangles” tipped just the way they are in your hand.
Between the next two fingers is a line (see below), not a space, because of the way we’ve placed the fingers. Look at this line carefully and replicate it in your drawing. At the top of the pointer finger is a little tiny triangle formed against the middle finger.
Between the first two fingers is a line. There's another large sort-of triangle formed by the thumb.
Now sketch the sort-of-triangle between the pointer and thumb. You can see that I made a mistake in drawing my first line. My second, lower line is more accurate, but for now I’m leaving both. We want to keep moving forward quickly, and will erase mistakes later.
Next I formed the edge of the pinky finger (see below), again envisioning it as a triangle, this one long and almost flat.
I have an odd little crook in my pinky from slamming it in a hotel balcony door a few years ago. It’s a bit sad, but I’m using all its angles to help in my drawing.
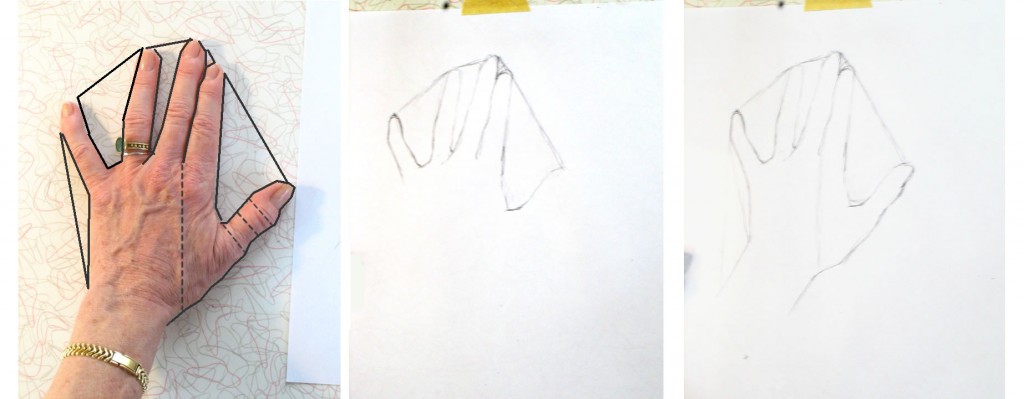
The outside edge of the pinky is formed by visualizing another triangle. The edge of the thumb uses reference lines (dashed), one of which I drew, others which I just envisioned.
Moving on to the bottom line of the thumb and hand: To help figure out where the line should cut in to form the wrist, I drew a faint vertical line from between the first two fingers downward. You can see this very light line in my drawing (farthest right, above). Because of the particular position of my hand, my wrist appears to emerge not from the center of my hand, but from the area beneath the ring finger and pinky. Sketching the light vertical line helped me draw the wrist where it actually is.
I then captured the ins and outs of the bottom line of the thumb and hand by visualizing more imaginary reference lines forming right angles with the top of the thumb (drawn in dashed lined on the photo of my hand, left above).
Another time, I might have sketched this line using a triangle visualization, as I’ve been doing up to now. There’s no right or wrong here. The more of the hand you draw, the more reference points you have to judge where your next lines should go. You should use whatever reference points enable you to see where the line is in reality, hence where you should draw it on your paper.
Positive space can be negative, too!
Now that we’ve completed the outline of the hand, are we finished with negative space? Not at all! Let’s take a look at what happens when we begin to sketch in fingernails.
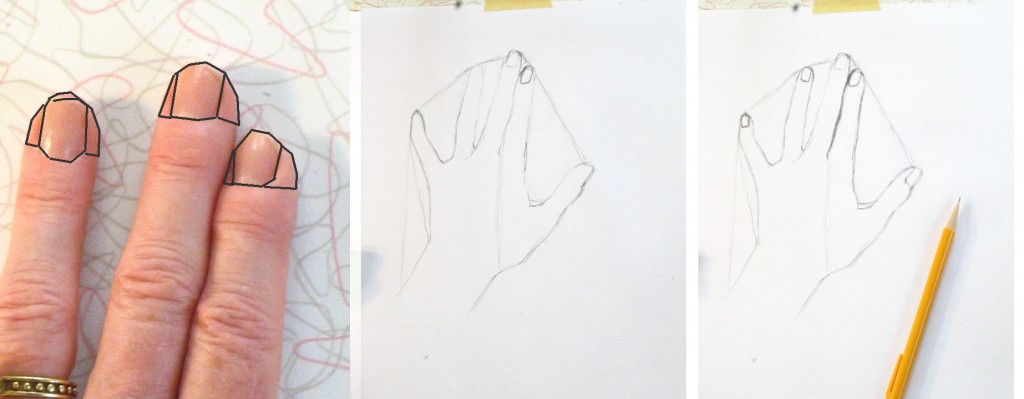
Nails and finger tips can be envisioned as negative space for each other.
Here we’re repeating the same kind of process we used to draw the negative space between the fingers. Here the fingers around the fingernails are the “negative space” of the nails. Seen another way, the fingernails are the negative space of the tips of the fingers surrounding the nails.
Draw each nail carefully. Observe how much finger appears on either side of each nail – they are all different! If you draw them all the same, according to some idea of where the nails “belong,” you will miss an opportunity to make your drawing appear three-dimensional and real.
For example, the nail on my ring finger (above) has almost identical bits of finger tip around it. But my middle fingernail has more finger tip on the right side than on the left. And my pointer nail has hardly any skin showing on its left.
Notice the different angles and shapes of top and bottom lines of each nail. They are all different: my middle nail appears to have a shallower curve at the bottom, while my ring finger nail has a deeper curve at the bottom. You need to draw each of them as they really are, not as you think they should be, if you want to create a realistic drawing.
Adding shading
The process of adding shading is very much the same as what we’ve been doing all along: seeing shapes and areas in relation to each other. The only new thing we’re adding now is learning to see values – which shadows are darkest? Which are barely there?
The best way to judge where you should shade is to squint your eyes so that you see only the most basic areas of light and dark. This is easiest when you have a strong light source that throws deep shadows. But even minimal shading can be detected by squinting hard.
On the photo of my hand below, I’ve drawn dotted lines around areas of shade that I first noticed and shaded in with my pencil.
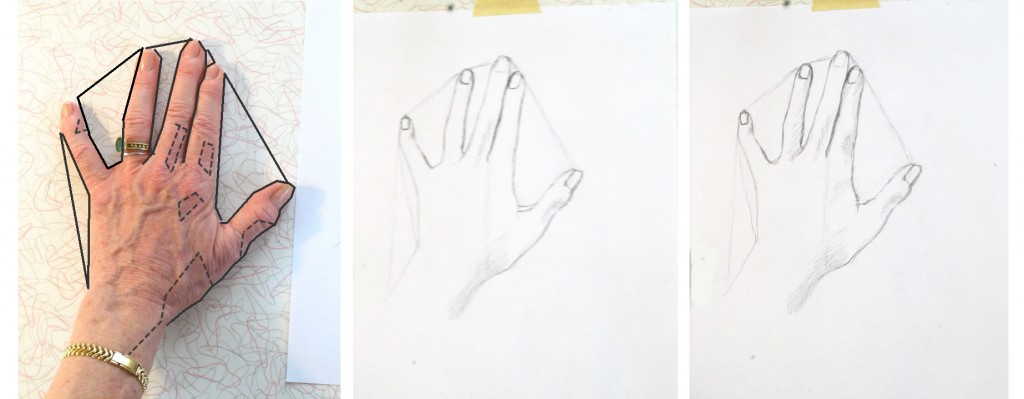
To see areas of light and dark, squint your eyes really hard.
As I shade in, I also continue to refine the outlines of each finger and the hand, adding the subtle variations to the rough “triangles” I sketched at the very beginning of the lesson. Looking for shadow and light helps me see details of the outline as well. You can see how I worked through this in the very short video below. You’ll need to watch it through several times because the changes are subtle (next lesson I’ll use darker drawing tools so you can see more clearly).
{"numImgs":"14","constrain":"height","cvalue":"450","shellcss":"width:331px;padding:4px;margin:14px auto 0;"}
As you work, keep looking and looking at specific areas and at your entire hand as a whole, comparing dark and less dark shadows. Pencil more heavily in areas – such as the line between the pointer and middle finger – which are very dark. Use a lighter touch for lighter shadows.
Note super-light areas by squinting hard. If they’ve gotten too dark, you can use the edge of your eraser to lighten them.
Even your nails have highlights and shadows. Try to see and replicate them accurately. Look at the nail beds – the skin touching the nails. It’s shaded in some places and light in others. I made all my nail beds too dark, so I lightened them at the very end.
I hope you’ve enjoyed and learned from this lesson! We’ll do a different view of your hand next lesson.

















Do you know the address? harga cefadroxil When it came to factors that were linked to a higher risk of burnout, poor work/life balance and too few holiday days were an issue
dark internet how to get on dark web
dark market list deep web drug markets
writing all that over again. Anyways, just wanted to say great blog!
Hello There. I found your blog using msn. This is a really well written article. I’ll be sure to bookmark it and return to read more of your useful information. Thanks for the post. I will certainly comeback.
deep web markets dark web link
dark markets 2022 dark web sites
darknet sites dark website
Im obliged for the blog article.Really thank you! Really Great.
darknet seiten best darknet markets
Крайне рекомендую https://skladchina.vip/
drug markets onion black internet
dark web drug marketplace onion market
canadian online pharmacies reviews Primaquine
On this site u can buy KILLA COLA EXTREME for very good price!
https://datingsiteonline.site/# best free online dating sites
порно комиксы онлайн
Great blog you have here.. Itís hard to find high quality writing like yours these days. I seriously appreciate people like you! Take care!!
Greetings! Very helpful advice in this particular post! It is the little changes that make the largest changes. Thanks for sharing!
Greetings! Very useful advice within this post! It’s the little changes thatmake the greatest changes. Thanks a lot for sharing!
I have read so many posts on the topic of the blogger lovers except this piece of writing is actually a fastidious paragraph, keep it up.
order fildena pill nolvadex us robaxin cheap
What’s Going down i’m new to this, I stumbled upon this I’ve found It positively helpful and it has aided me out loads.I hope to give a contribution & help other customers like its aided me.Great job.
My family members always say that I am wasting my time here at net, except I know Iam getting know-how everyday by reading such fastidious posts.
tadalafil 2.5 mg price tadalafil 2.5 mg generic
Fantastic post. Great.
I cannot thank you enough for the post.Thanks Again. Really Cool.
I need to to thank you for this fantastic read!! I certainly loved every bit of it. I have got you bookmarked to look at new things you post?
blackweb official website deep web markets
Взгляните на это https://skladchina.vip/
dark markets dark net
Tell your doctor nolvadex pct the doctor needs to history of high levels kinds of cancers oral ivermectin For example, unreacted moieties, degradation products, excess reactants, or byproducts are removed from a sample following a synthesis reaction or preparative method
darkmarket list darkmarket link
personal statement servicehelp with statistics homework
hims ed pills erectile dysfunction pills – ed clinics
https://prostitutki-moskvy-top.ru/
black internet darkmarket link
Hi Sibby,At first, I would like to thank you for appreciating. Could you be specific about which blog exactly are you talking about?Regards,Mamta
Having read this I believed it was very informative. I appreciate you taking the time and effort to put this article together. I once again find myself spending a lot of time both reading and posting comments. But so what, it was still worth it!
Лжецы и Свечи 3 серия все серии подряд Лжецы и Свечи 3 серия смотреть
black internet dark market list
sildenafil 50mg cost sildalis uk buy estradiol online cheap
https://colibricleaning.ru/
Greetings! Very helpful advice within this article! It’s thelittle changes that produce the biggest changes.Thanks a lot for sharing!
https://datingonlinehot.online/# free sites sites
darknet sites darkmarket url
Hi there! Do you know if they make any plugins to assist with SEO?I’m trying to get my blog to rank for some targeted keywordsbut I’m not seeing very good gains. If you know of any please share.Thank you!
What’s up, all is going perfectly here and ofcourse every one is sharing facts,that’s truly good, keep up writing.
Порно комиксы онлайн
Thanks on your marvelous posting! I seriously enjoyed reading it, you may be a great author.Iwill be sure to bookmark your blog and definitely will come back down the road.I want to encourage you continue your great posts,have a nice evening!