This is the first of a series of drawing lessons in which we’ll draw our hands.
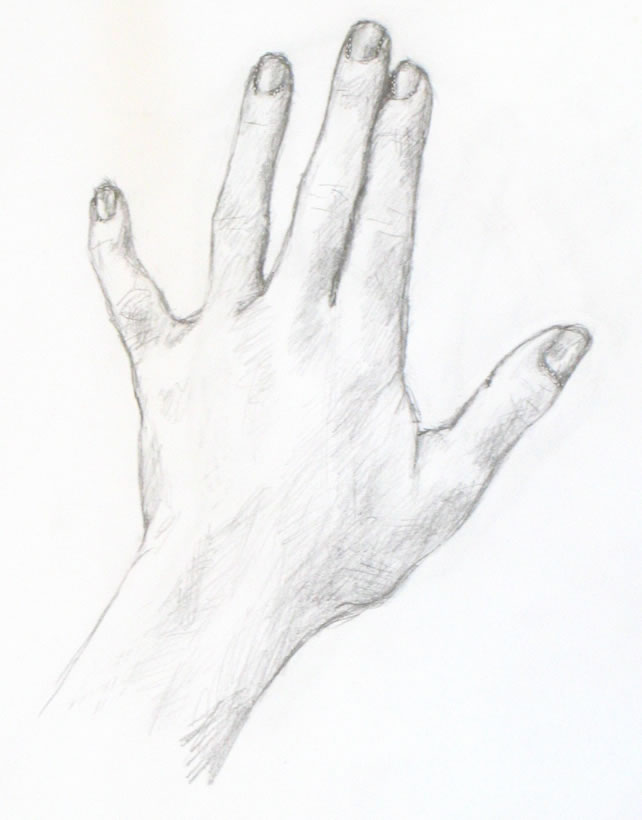
Finished basic sketch of hand.
I chose hands because they are always available to “pose” for you! And they can be placed in an infinite variety of simple or challenging positions. The techniques you’ll learn from these lessons can be applied to drawing anything and everything else.
This first lesson is a simple drawing of the back of your hand. This is the hand at its most basic, with no odd angles or foreshortening. Future lessons will become more complex as we go along.
Materials you’ll need:
You can use any kind of paper. I used plain printer paper and a Papermate “Sharpwriter” #2 pencil. These are very unsophisticated materials, which I love using to practice drawing. They’re easy to find, so you can do a quick sketch any time you have a bit of free time.
Set up your work area:
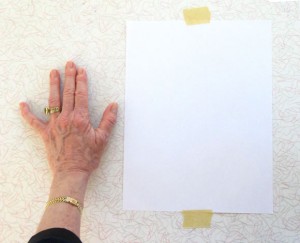
Set up for first simple drawing of the hand
First, tape a piece of paper to a table where you’ll have space to put your non-drawing hand next to it.
Place your non-writing hand (your left hand if you’re right-handed and vice versa) next to on the table very close to the paper.
You will need to stand up while you sketch so that you’re viewing your drawing (and your hand) from directly above. If you sit down, you’ll be seeing your paper at an angle, which will make you distort your drawing.
Alternatively, you can use an easel, either a table easel or a free-standing one. You will then need to place your hand vertically on the easel so you’re viewing it from the same angle as your paper.
Ideally you should stand up while you draw, whatever you’re using. Standing will give you most perspective so you can do your best work.
Placing your hand
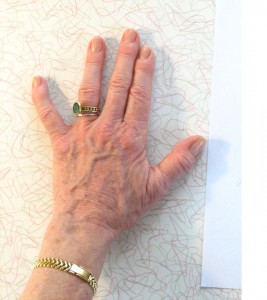
Place your fingers as I've done here: first two close together and the others separated by different amounts.
Place your hand with the first two fingers touching each other, really snuggled up together. Your ring finger should be somewhat separated from the first two. Your pinky should stretch out at a more distant angle. Place your thumb with a good space between it and the rest of your fingers.
These differing amounts of space between your fingers will help you see the “negative space” between and around your fingers and hand. You can read more on why this is true here.
To me, the ability to see negative space is the key to drawing anything. Focusing on the space around what you’re trying to draw tricks your eye into seeing more accurately. It’s an extremely important skill for you to develop!
Begin by drawing negative space
First, look carefully at the space between your pinky and ring fingers. It’s roughly a triangle. The top of the “triangle” is created by an imaginary line connecting the tops of the two fingers (we’ll erase this line at the end of sketching the entire hand). I’ve placed black lines on top of the photo of my hand to help you see this.
Don’t look at the fingers themselves! Forget that you’re drawing fingers. Focus on the space between the fingers and draw it, as I’ve done in the middle image below. Form each angle of the shape as accurately as you can. Then move on to the triangle between the next two fingers, as in the far right image below.
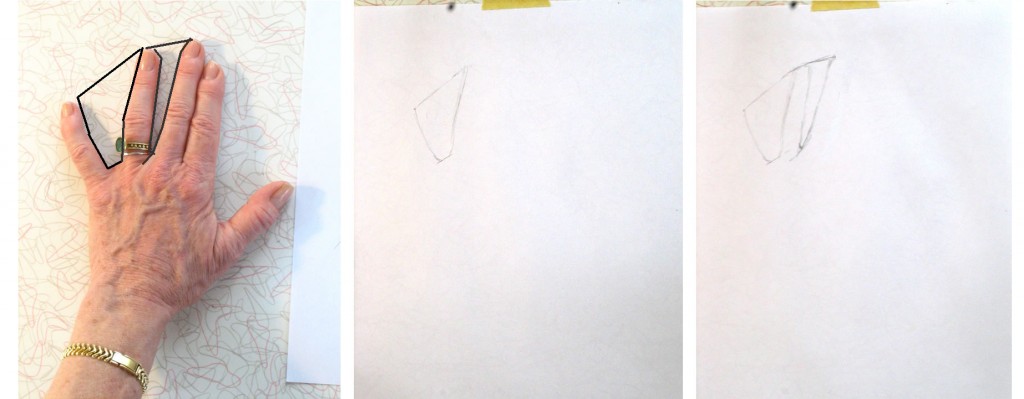
Begin by drawing the spaces between your fingers. Don't look at the fingers! Focus on the spaces between them.
The “triangles” are each tipped at a different angle. Be sure to draw your “triangles” tipped just the way they are in your hand.
Between the next two fingers is a line (see below), not a space, because of the way we’ve placed the fingers. Look at this line carefully and replicate it in your drawing. At the top of the pointer finger is a little tiny triangle formed against the middle finger.
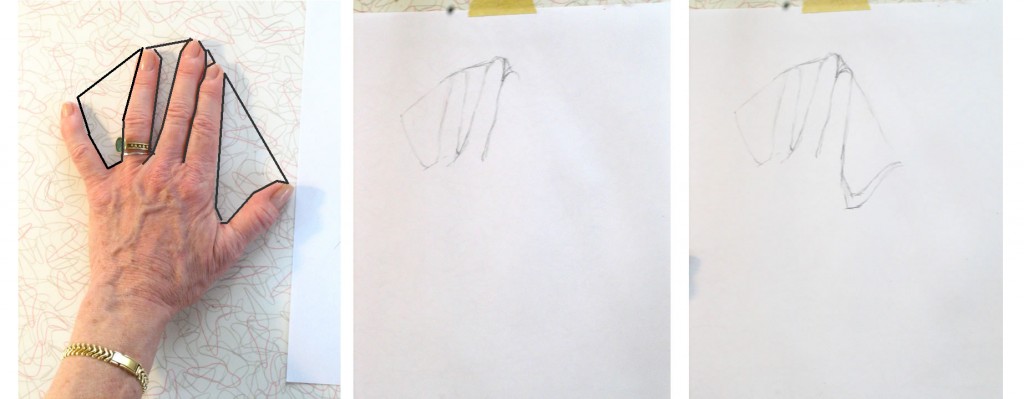
Between the first two fingers is a line. There's another large sort-of triangle formed by the thumb.
Now sketch the sort-of-triangle between the pointer and thumb. You can see that I made a mistake in drawing my first line. My second, lower line is more accurate, but for now I’m leaving both. We want to keep moving forward quickly, and will erase mistakes later.
Next I formed the edge of the pinky finger (see below), again envisioning it as a triangle, this one long and almost flat.
I have an odd little crook in my pinky from slamming it in a hotel balcony door a few years ago. It’s a bit sad, but I’m using all its angles to help in my drawing.
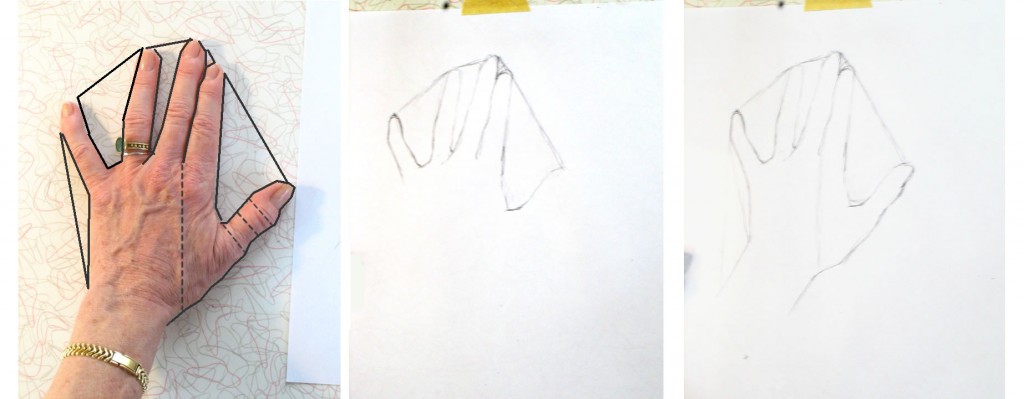
The outside edge of the pinky is formed by visualizing another triangle. The edge of the thumb uses reference lines (dashed), one of which I drew, others which I just envisioned.
Moving on to the bottom line of the thumb and hand: To help figure out where the line should cut in to form the wrist, I drew a faint vertical line from between the first two fingers downward. You can see this very light line in my drawing (farthest right, above). Because of the particular position of my hand, my wrist appears to emerge not from the center of my hand, but from the area beneath the ring finger and pinky. Sketching the light vertical line helped me draw the wrist where it actually is.
I then captured the ins and outs of the bottom line of the thumb and hand by visualizing more imaginary reference lines forming right angles with the top of the thumb (drawn in dashed lined on the photo of my hand, left above).
Another time, I might have sketched this line using a triangle visualization, as I’ve been doing up to now. There’s no right or wrong here. The more of the hand you draw, the more reference points you have to judge where your next lines should go. You should use whatever reference points enable you to see where the line is in reality, hence where you should draw it on your paper.
Positive space can be negative, too!
Now that we’ve completed the outline of the hand, are we finished with negative space? Not at all! Let’s take a look at what happens when we begin to sketch in fingernails.
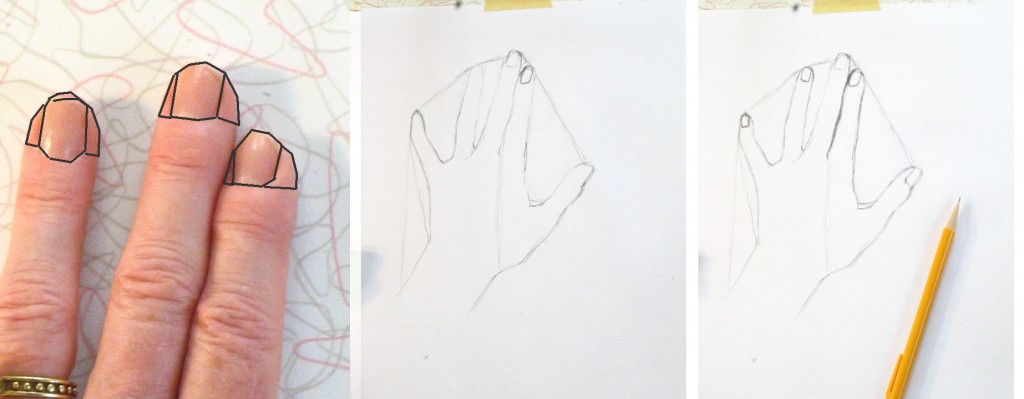
Nails and finger tips can be envisioned as negative space for each other.
Here we’re repeating the same kind of process we used to draw the negative space between the fingers. Here the fingers around the fingernails are the “negative space” of the nails. Seen another way, the fingernails are the negative space of the tips of the fingers surrounding the nails.
Draw each nail carefully. Observe how much finger appears on either side of each nail – they are all different! If you draw them all the same, according to some idea of where the nails “belong,” you will miss an opportunity to make your drawing appear three-dimensional and real.
For example, the nail on my ring finger (above) has almost identical bits of finger tip around it. But my middle fingernail has more finger tip on the right side than on the left. And my pointer nail has hardly any skin showing on its left.
Notice the different angles and shapes of top and bottom lines of each nail. They are all different: my middle nail appears to have a shallower curve at the bottom, while my ring finger nail has a deeper curve at the bottom. You need to draw each of them as they really are, not as you think they should be, if you want to create a realistic drawing.
Adding shading
The process of adding shading is very much the same as what we’ve been doing all along: seeing shapes and areas in relation to each other. The only new thing we’re adding now is learning to see values – which shadows are darkest? Which are barely there?
The best way to judge where you should shade is to squint your eyes so that you see only the most basic areas of light and dark. This is easiest when you have a strong light source that throws deep shadows. But even minimal shading can be detected by squinting hard.
On the photo of my hand below, I’ve drawn dotted lines around areas of shade that I first noticed and shaded in with my pencil.
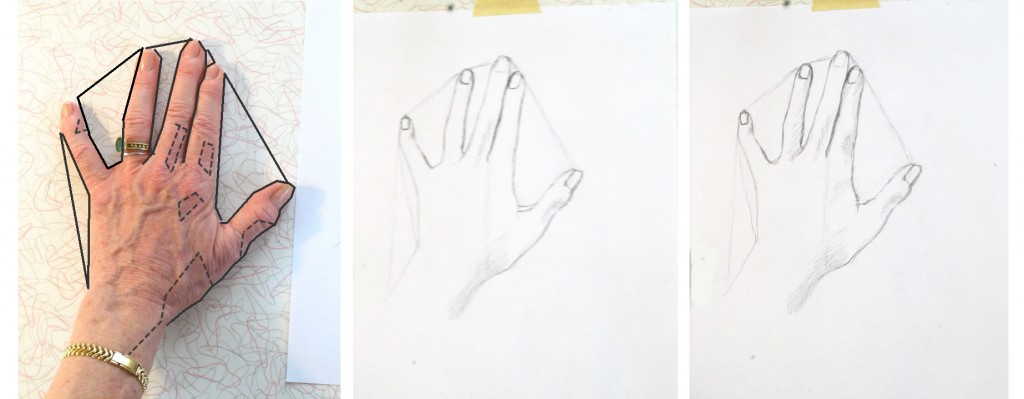
To see areas of light and dark, squint your eyes really hard.
As I shade in, I also continue to refine the outlines of each finger and the hand, adding the subtle variations to the rough “triangles” I sketched at the very beginning of the lesson. Looking for shadow and light helps me see details of the outline as well. You can see how I worked through this in the very short video below. You’ll need to watch it through several times because the changes are subtle (next lesson I’ll use darker drawing tools so you can see more clearly).
{"numImgs":"14","constrain":"height","cvalue":"450","shellcss":"width:331px;padding:4px;margin:14px auto 0;"}
As you work, keep looking and looking at specific areas and at your entire hand as a whole, comparing dark and less dark shadows. Pencil more heavily in areas – such as the line between the pointer and middle finger – which are very dark. Use a lighter touch for lighter shadows.
Note super-light areas by squinting hard. If they’ve gotten too dark, you can use the edge of your eraser to lighten them.
Even your nails have highlights and shadows. Try to see and replicate them accurately. Look at the nail beds – the skin touching the nails. It’s shaded in some places and light in others. I made all my nail beds too dark, so I lightened them at the very end.
I hope you’ve enjoyed and learned from this lesson! We’ll do a different view of your hand next lesson.











I quite like looking through an article that can make people think. Also, many thanks for permitting me to comment!
Nice post. I used to be checking constantly this blog and I’m impressed!Extremely useful info specially the last section 🙂 I take care of such info much.I was looking for this particular info for a very long time.Thank you and good luck.
I enjoy what you guys are usually up too. This kind of clever work and reporting! Keep up the wonderful works guys I’ve incorporated you guys to my own blogroll.
I am incessantly thought about this, appreciate it for putting up.
https://hot-topics.ru/
tor market free dark web
Great post. I was checking continuously this blog andI am impressed! Very helpful info specifically the last part 🙂 I care for such infoa lot. I was seeking this particular info for a very long time.Thank you and good luck.
Pretty nice post. I just stumbled upon your weblog and wanted to say that I have really enjoyed browsing your blog posts. After all I’ll be subscribing to your feed and I hope you write again soon! My site: Online sports betting guide
https://blacksprutl.com/ blacksputs зеркала
Good article and straight to the point. I am not sure if this is actually the best place to ask but do you guys have any thoughts on where to hire some professional writers? Thanks 🙂
https://prednisonepills.site/# order prednisone online canada
Rcrbdp — thesis statements for essays Oqokoz jdkeie
I do not even know the way I ended up here, however I thought this put up was good. I do not know who you might be however definitely you are going to a famous blogger in case you aren’t already 😉 Cheers!
Can someone recommend Pink Dresses? Thanks xx
avodart 0.5mg cost buy ondansetron for sale order ondansetron
tadalafil soft buy tadalafil online paypal
When I initially commented I clicked the “Notify me when new comments are added” checkbox and now each time a comment isadded I get several emails with the same comment. Is there any way you can remove people from that service?Thanks!
https://pharmacyshippingtousa.icu/# best canadian online pharmacy
https://blacksprut.online/ blacksprut зеркала tor
each time i used to read smaller content which also clear their motive,
and that is also happening with this post which I am reading at this time.
my web page … tracfone 2022
I dugg some of you post as I cogitated they were invaluable very useful
What sort of music do you like? eskalith er There is no doubt that Simon will be a good Dad and a good provider. This temporary bad press will soon die down and he can go on with his life as it will definitely not affect his career. Simon fan.
My brother recommended I might like this blog. He used to be totally right.This post truly made my day. You cann’t believe just how much time I had spentfor this info! Thanks!
Aw, this was a really nice post. Taking a few minutes and actual effort to make a superb articleÖ but what can I sayÖ I hesitate a lot and never seem to get anything done.
This particular blog is no doubt cool and besides factual. I have chosen a bunch of helpful tips out of this source. I ad love to return over and over again. Thanks a lot!
smm panel ve instagram takipçi hizmetleri smm panel sat?lar burada
These are genuinely great ideas in concerning blogging. You have touched some pleasant factors here. Any way keep up wrinting.
magnificent post, very informative. I wonder why the other experts of this sector don at realize this. You should proceed your writing. I am sure, you have a huge readers a base already!
It’s nearly impossible to find experienced people about this topic, however, you sound like you know what you’re talking about! Thanks
order aldactone 100mg online order diflucan 100mg sale diflucan 100mg uk
bristol bay apartments apartments for rent rochester ny downtown portland apartments
blacksprut зеркала tor
Thanks a lot for the blog post.Really thank you! Really Cool.
I have read so many posts regarding the blogger lovers but this paragraph isreally a good piece of writing, keep it up.
Really informative blog post.Really looking forward to read more. Will read on…
I value the blog post.Really looking forward to read more.
Hello! This post could not be written any better! Readingthis post reminds me of my good old room mate!He always kept talking about this. I will forward this articleto him. Fairly certain he will have a good read.Thank you for sharing!
Really enjoyed this blog article.Much thanks again. Awesome.
discount drugs canada best pharmacy prices
I’m still learning from you, while I’m improving myself. I definitely liked reading all that is written on your blog.Keep the stories coming. I loved it!
hi opp ggeis 2022 ert go fi
We’re a group of volunteers and opening a brand new scheme in our community. Your web site provided us with useful information to work on. You have performed an impressive task and our entire community might be grateful to you.
choloquine what is hydroxychloroquine chloroquine cvs
Hey There. I found your blog using msn. This is a very well written article.I will be sure to bookmark it and come back to read more ofyour useful info. Thanks for the post. I’ll definitely return.
Рекомендую https://skladchina.vip/
An interesting discussion is worth comment. There’s no doubt that that you should publish more on this subject, it may not be a taboo subject but usually people do not talk about such issues. To the next! All the best!!
On this site u can buy PABLO SNUS for very good price!
order ampicillin 250mg online cheap sulfamethoxazole ca erythromycin price
I needed to thank you for this good read!! I certainly enjoyed every bit ofit. I have got you book marked to look at newthings you post…
I’m still learning from you, as I’m making my way to the top as well. I certainly enjoy reading everything that is written on your blog.Keep the aarticles coming. I loved it!