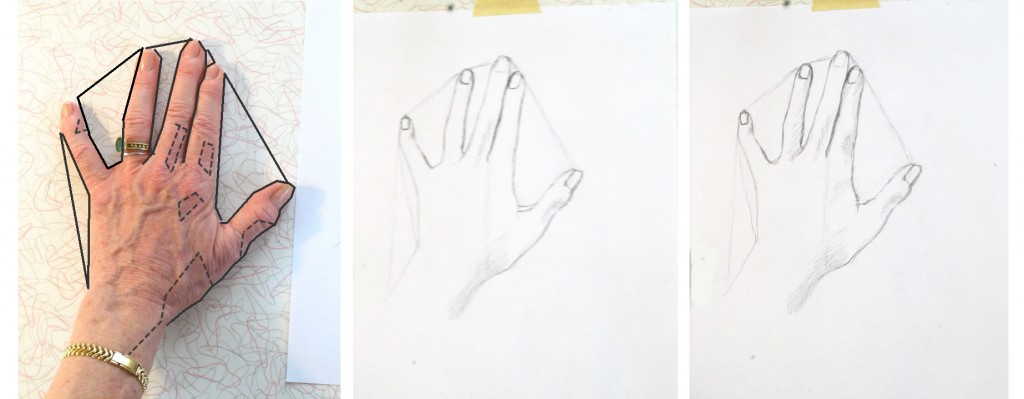
Archive for the ‘Hand drawing tutorials / demos’ Category

Hand Drawing Tutorial #8: Foreshortened Pointer via Right-brain Drawing

Monday, February 7th, 2011

The much-feared foreshortened finger may actually be the most helpful tool to shift you to right-brained seeing.  Its shape is so alien to our standardized image of “finger” that we have no other choice but to abstract how we see it.

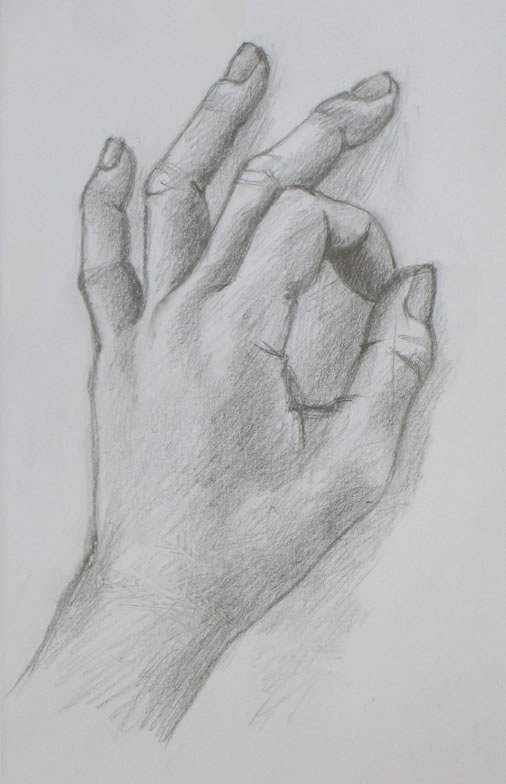
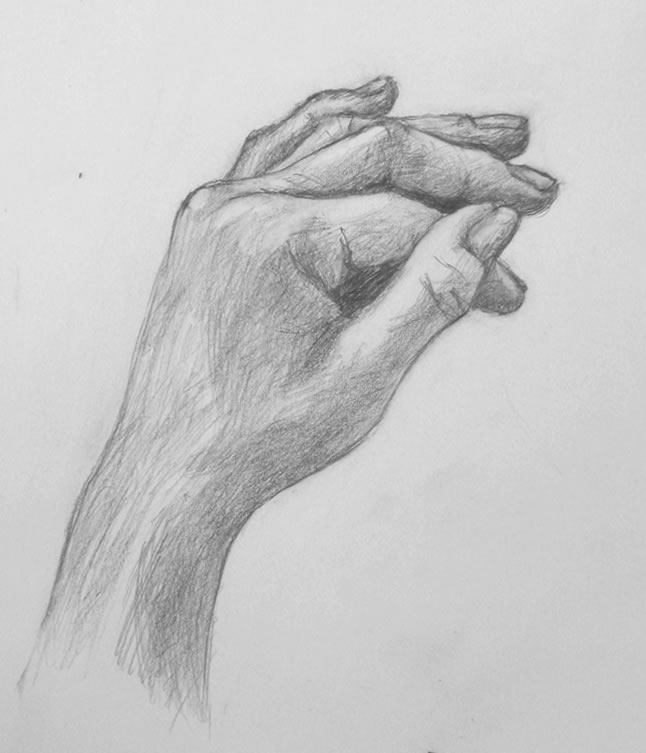
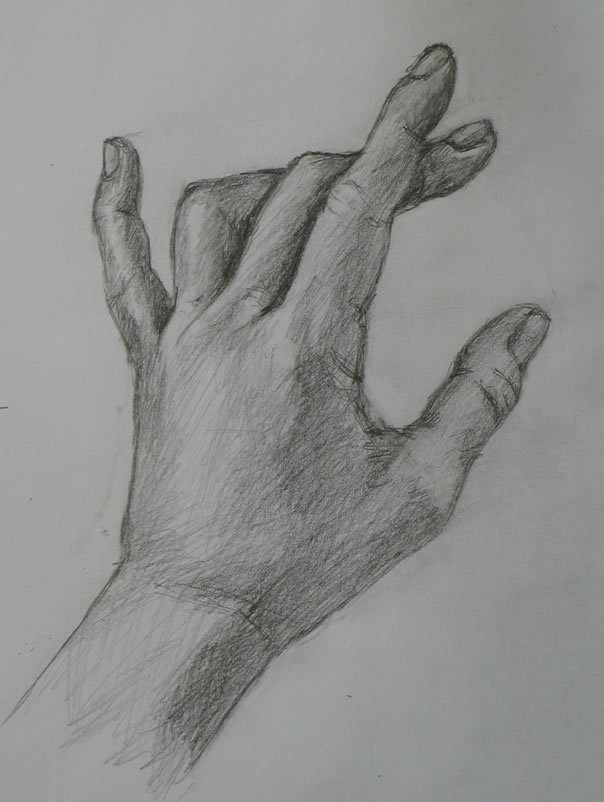
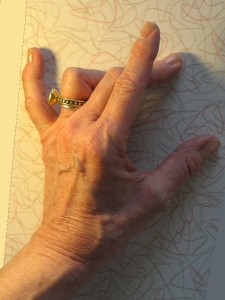
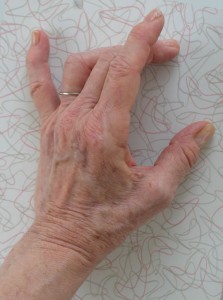
Tutorial #8 hand pose with foreshortened pointer

In this tutorial, we’ll take on the dreaded foreshortened finger (in this case, the pointer).  The hand is often considered the most difficult of all subjects to draw, partly because we so often see the fingers from angles that conflict with our mental shorthand of them as tube-shaped.

Through the magic of right-brained seeing, though, the foreshortened finger becomes fairly easy to draw because it’s seen as a shape like any other shape.

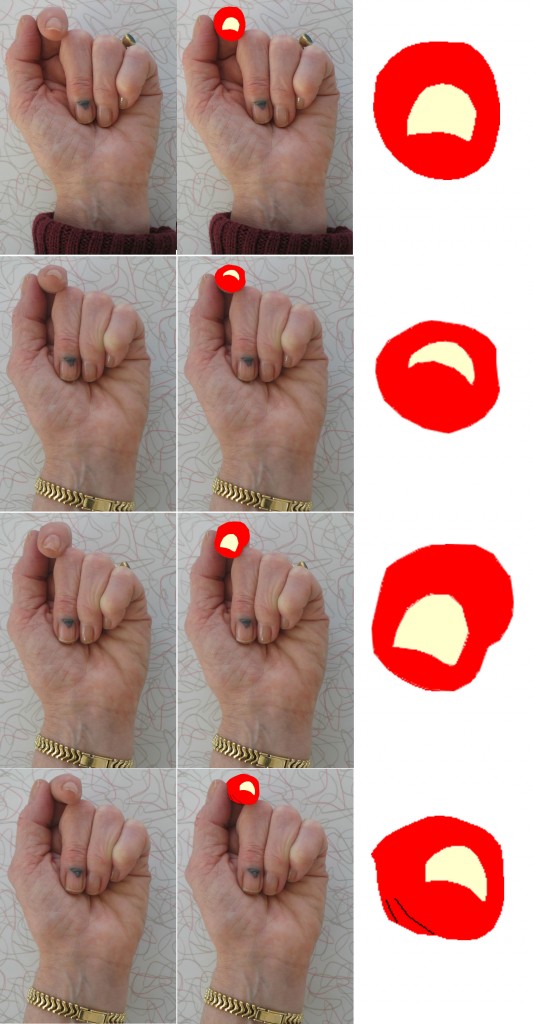
In fact, it occurs to me that the much-feared foreshortened finger may actually be the best tool to help shift you  to right-brained seeing.  Its shape is so alien to our standardized image of “finger” that we have no other choice than to abstract how we see it.  Look at the schematic below to illustrate this (with continuing apologies for my blue smashed fingernail).

In the left column is a series of photos of my hand in slightly different positions.

In the middle column, I’ve traced over the shape of the pointer fingertip in red, and the fingernail in pale yellow.

In the right column, I’ve enlarged this shape so you can really see a few of the variety of shapes a foreshortened fingertip can appear to take on.  The fingernail also has very different shapes.

The more accurately you draw these shapes, the more realistic your drawing will look.

Seeing the foreshortened pointer as a simple shape. Left column: My hand. Middle column: My hand with the shape of the foreshortened pointer outlined in red (the fingernail is pale yellow). Right: Abstracted pointer tip shape, enlarged.

This week’s foreshortened finger pose

This hand pose is identical the one in tutorial #7, with the single exception that the pointer is raised so we see its tip head-on.

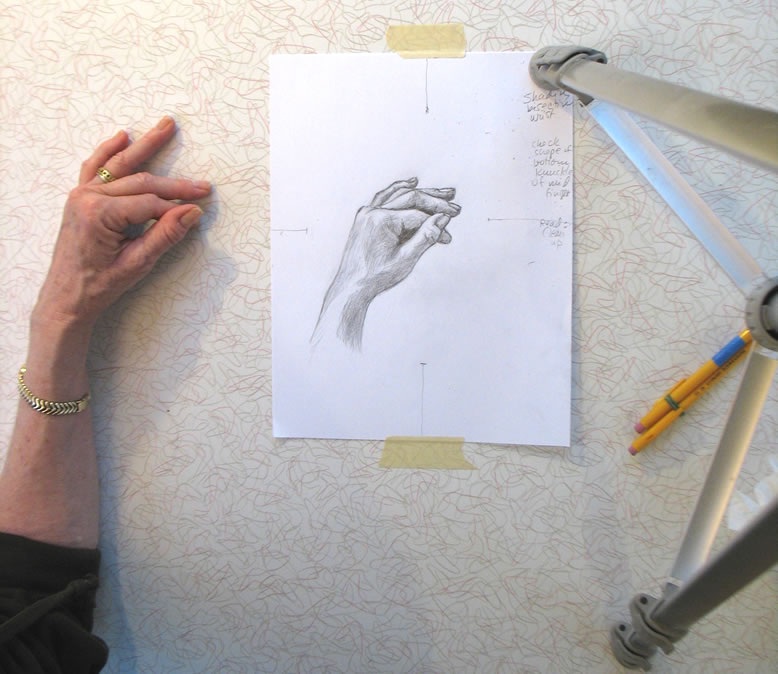
The most difficult part of drawing a dramatically foreshortened finger is actually not the drawing itself.  It’s keeping your hand completely still so you see it from exactly the same angle throughout your sketch.  A slight change in hand position will make you see the finger tip as a dramatically different shape.  Look again at the diagram above to demonstrate this.

To help keep your hand in the same position while you draw, the following can help:

  1. Pay careful attention to how your forefinger looks when you start sketching.  Note its exact shape.  As you draw, adjust its position very slightly to keep it looking that way throughout.
  2. Close one eye while you’re drawing the foreshortened finger (the same eye the entire time) because each eye sees from a slightly different angle.
  3. It’s always important to stand up while you’re drawing so that you’re seeing your work head-on.  If you sit down, you’ll distort your perspective and end up with a distorted drawing.  When you’re drawing something this foreshortened, it’s doubly important to stand up.

Materials you’ll need and setting up your work

Please look back at the relevant sections of the first tutorial for materials and setting up.

The foreshortened finger jigsaw piece

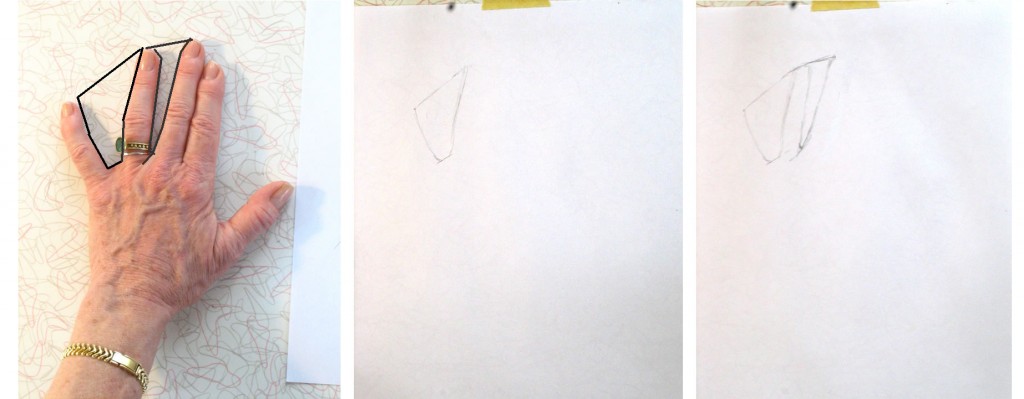
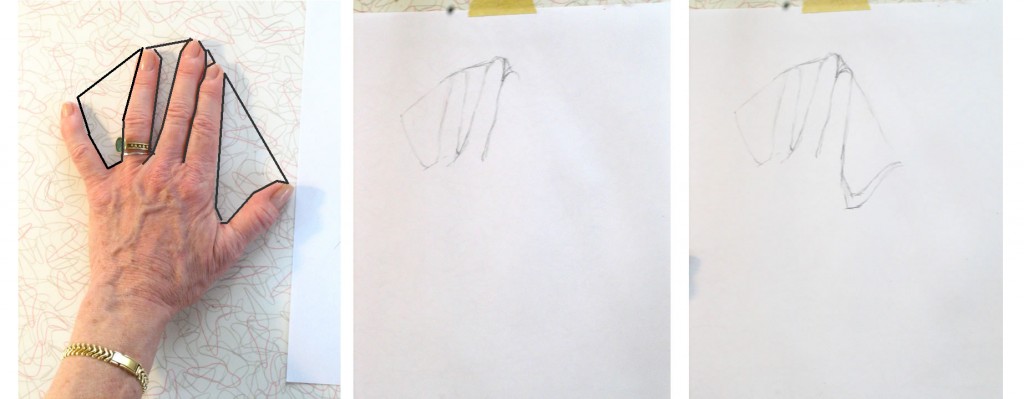
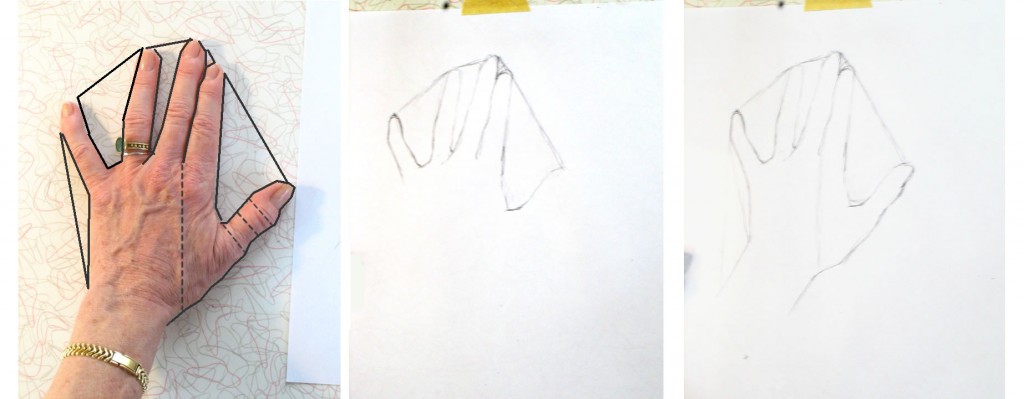
In the 2-part Tutorial #7, I described right-brain drawing as building a jigsaw puzzle whose pieces all need to fit together to form the whole.  You may want to look back on the schematics there, including the video at the end of Part 1 that demonstrates how to create the jigsaw puzzle.  You will approach this #8 pose exactly the same way as that one, building your puzzle from shapes of fingers, nails, and negative spaces around each.

The single change this week is that you’ll need to see and draw different jigsaw pieces to form the pointer and the part of the palm revealed beneath it.  I think the best way to help you see this isn’t to write more verbiage, but to suggest you spend some time carefully studying the diagram above.

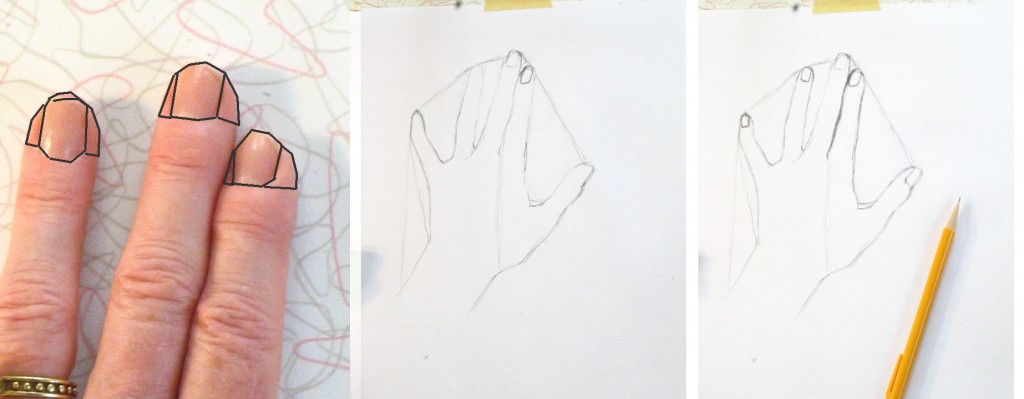
Before you begin drawing your entire hand, practice seeing and drawing your own forefinger tip at slightly different angles. Sketch some of the various shapes it can take on a separate piece of paper.  Then add the fingernail shape.  You’ll be able to draw the nail accurately if you also observe the shapes of the skin visible around the nail.

Note the jigsaw-piece shapes immediately surrounding your fingertip when it’s placed in different positions.  Draw these.

Put this entire mini-jigsaw puzzle together right, and you’ll magically have produced a realistic-looking foreshortened fingertip.

Now turn to drawing your entire hand.  Look carefully at the puzzle piece of your own pointer tip.  It will be slightly different from mine in my drawing.  How is yours shaped?

Video demo of my drawing of  Hand pose #7

As you go through video below of my own drawing, you may notice that somewhere around Frame 21, I reshaped my pointer-tip jigsaw piece incorrectly, making it too wide.  I think this was the usual result of having moved my vantage point slightly (so do as I say, not as I do….)  I was very annoyed at myself!  I didn’t notice my mistake for a while, but when I did, I adjusted it.

This kind of error happens all the time.  Once you notice it, you just need to work through it, correcting it and the jigsaw pieces around it.

If your drawing has gotten so out of whack that you can’t salvage it without major erasures, don’t feel you’ve wasted your time!  You’ve learned a lot from this sketch.  Start a new one and see what you can learn from that.

Becoming good at drawing from life is a matter of constant practice.  And it’s fun!

{"numImgs":"49","constrain":"height","cvalue":"450","shellcss":"width:332px;padding:4px;margin:14px auto 0;"}

Hand Drawing Tutorial #7 (Part 2): Shading as Jigsaw Puzzle

Thursday, January 27th, 2011

The shading process – although it creates the 3D look in your drawing – is actually as simplified and flattened as the drawing stage.

Part 1 of Hand drawing tutorial #7 described the “jigsaw puzzle” line-drawing stage of this sketch.  Please look back at that post for a video of how I built my jigsaw drawing and its connection with right-brained seeing.

We’re now going to shade (render) your drawing.  This is the process that will give it a three-dimensional appearance.

Left: Jigsaw schematic of right-brain seeing. Middle: line drawing from Part 1 of Tutorial #7. Right: finished sketch #7.

I ended my last post with the thought:  “It’s interesting that my final assembled jigsaw resembles a common painting style in which shapes are simplified and surfaces appear flattened. Even though my actual drawing is realistic, my underlying  thought process sees each bit of the drawing as a highly simplified, flattened shape.”

The shading process – although it creates the 3D look – is actually as simplified and flattened as the drawing stage.  When I render a drawing, I’m looking for simply-shaped areas of light and dark in my “posing” hand,  duplicating them on my drawing.

At the end of this post is a video of the entire drawing and shading process for this hand pose.  Below I’ve placed a few still frames.  If you look carefully at their shaded areas, you’ll be able to see how I viewed each area of shadow as a simple shape.  (See below the images for more details.)

Building areas of shadow. (I added more contrast to these still images to enable you to see these areas more readily.) See text below for detailed explanation.

In Frame 24, I began shading with a triangular area at the left base of the hand and wrist.  I then noticed that the pinky finger created another dark area underneath where it folds over.

A vital tool in shading is … squinting your eyes, which enables you to see light and shadow more clearly.  If there isn’t a lot of light-shadow contrast on your hand as you’re drawing, the harder you squint, the more clearly you’ll see what little is there.

In Frame 26, I began to render the ring finger and pinky.  Notice that that the visible finger segments weren’t uniformly one shade.  They had a blob of darker shadow near the joint topmost in the sketch.  This was a product of the lighting conditions on my hand at that moment.

You will need to look at your own fingers to see what kind of light and shadow is is on them.  Use your squint!

Frame 27: I added blocks of shading at the base of the palm.

By the way, a drawing can start looking worse at this stage because you’ve gotten part of the shading done but not all.  So the image is starting to look more 3-dimensional, but out of whack because it’s still incomplete.  You just need to keep moving forward, seeking out all the areas of various depths of shadow and light, and eventually your drawing will look right.

Frame 34: I was now working on the pointer and middle finger, and deepening the shadows in general.  Again, note the areas of differing darkness in each area of the fingers: the joints tend to be lighter, while other areas are darker.  The shadows and highlights on the fingernails are different from those on the fingers because of their shape and the smooth hardness of their surface.  Your careful observation of your own hand will tell you where to place the areas of shade in your own drawing.

{"numImgs":"55","constrain":"height","cvalue":"450","shellcss":"width:322px;padding:4px;margin:14px auto 0;"}

Hand Drawing Tutorial #7: Right-brain Sketching as Jigsaw Puzzle

Wednesday, January 26th, 2011

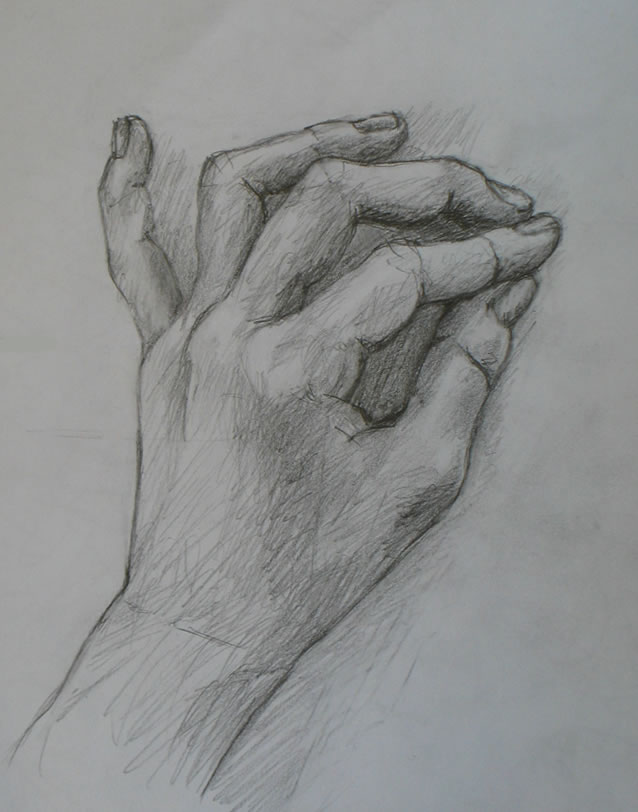
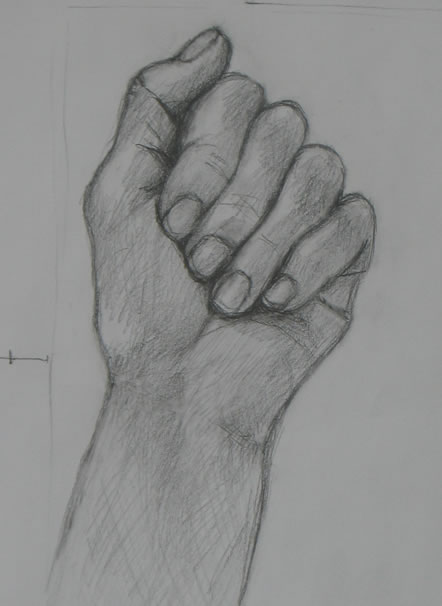
Hand tutorial #7 drawing

In earlier lessons (examples here, and here), we’ve used the “negative spaces” around fingers to help our brains make the transition to right-mode seeing.  But in this tutorial’s hand position, there’s little negative space between fingers because they’re all snuggled up to each other.  So we need another tool to help shift our brains to seeing via “right brain” mode, the prerequisite to realistic drawing.

In this tutorial, I’ll try to help you see your hand as a puzzle of shapes that all need to be fitted together to form the whole.

Seeing your hand as a jigsaw puzzle

As I’ve described earlier, to draw from life, you need to learn to turn off your left-brain vision and turn on your right.

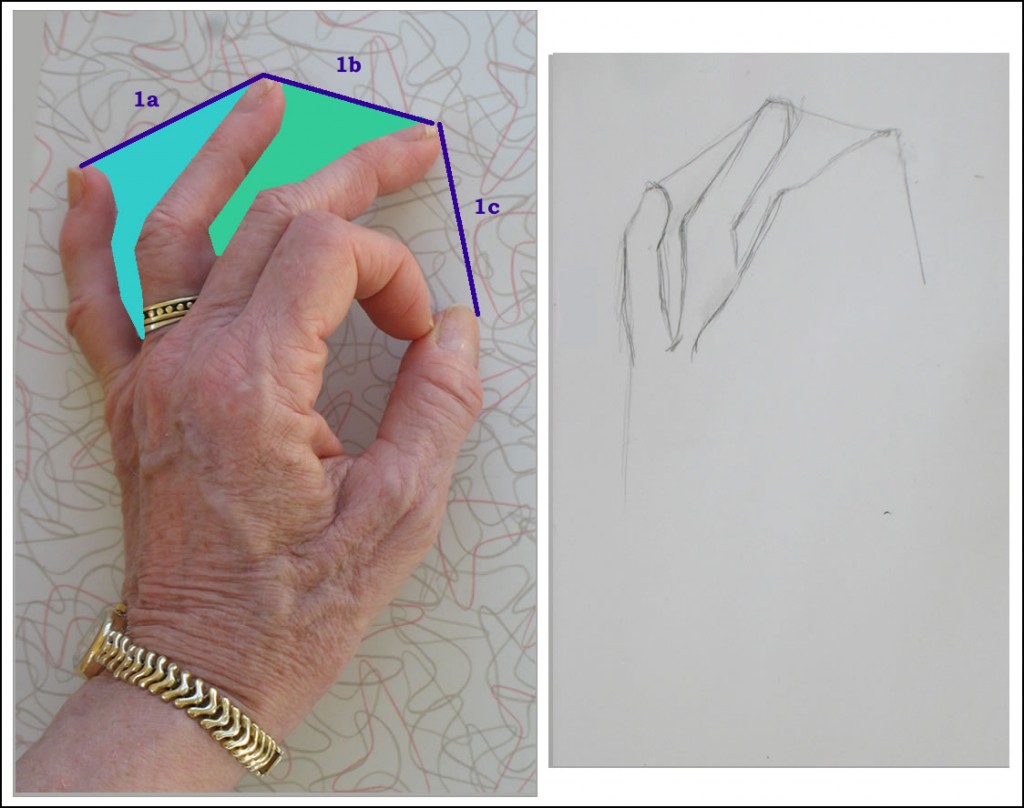
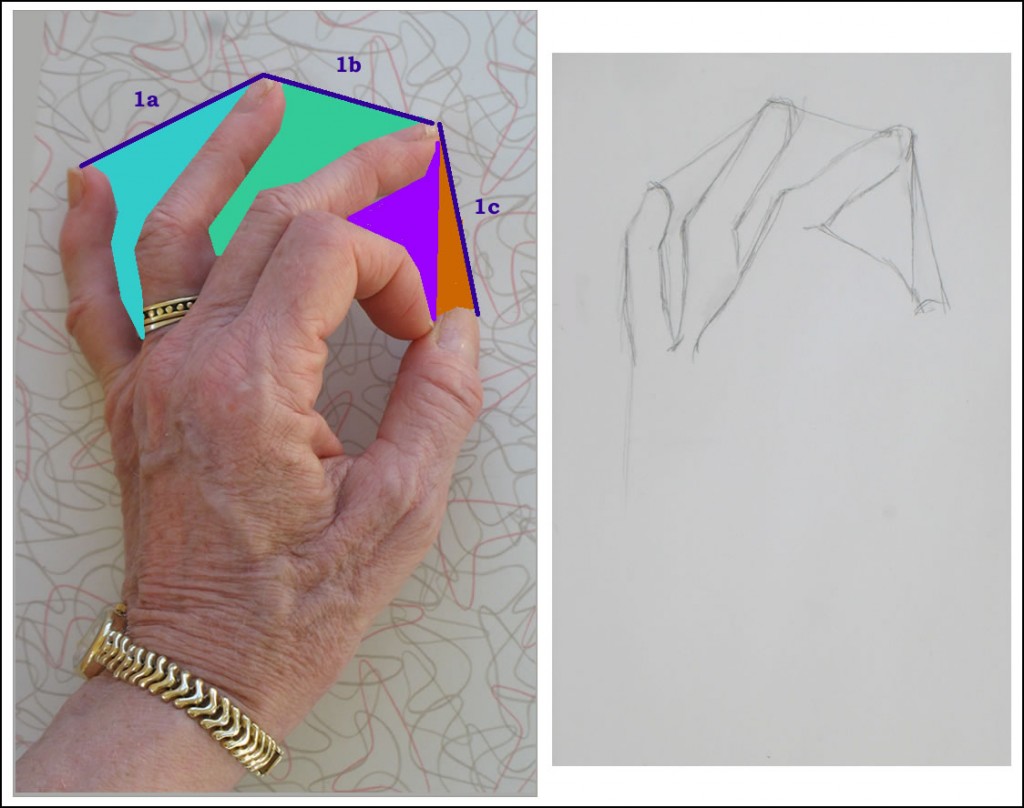
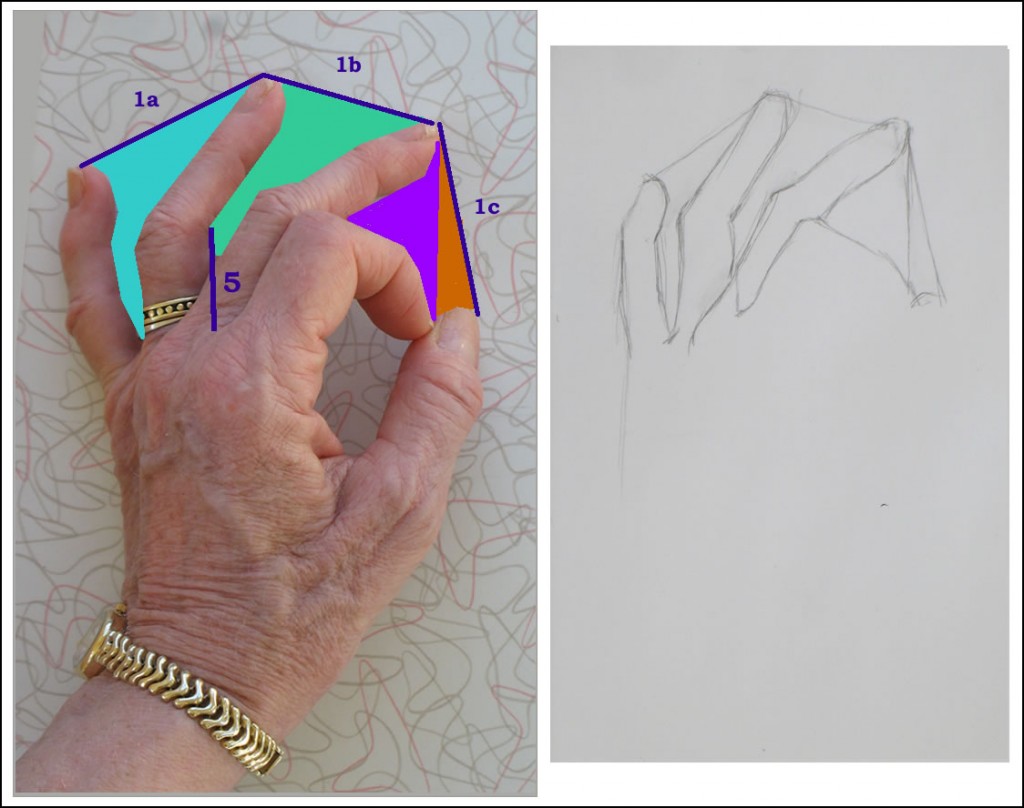
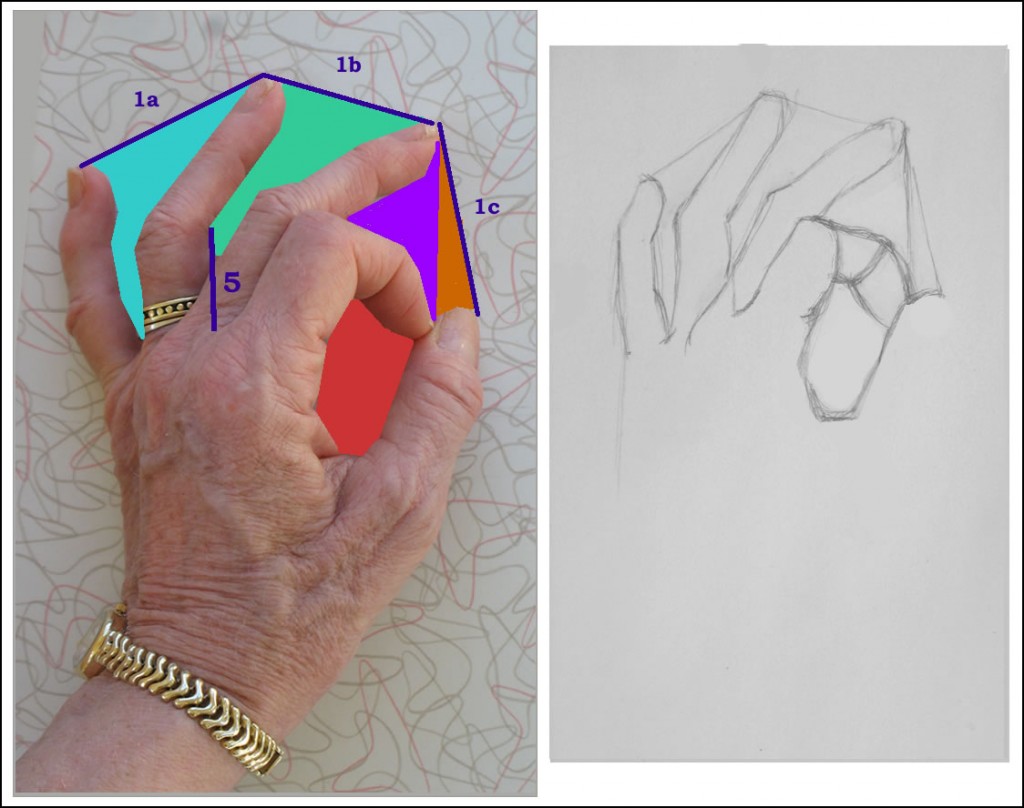
When you see in left-brain mode, you think of fingers as more or less tube-shaped, with rounded tops.  But if you look carefully at my drawing above, you’ll see that the fingers are irregularly shaped, not straight-sided tubes at all.  To help you see this, I’ve outlined my fingers as jigsaw pieces below.  Compare the colored puzzle pieces to the pencil drawing, and you’ll see that those odd shapes are truly accurate.
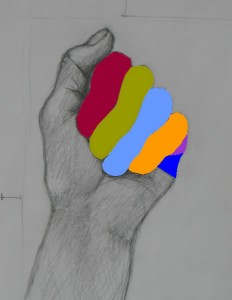
Look at that blue ring finger.  How weird is that?  According to your left brain, that’s not the way a finger is shaped!  And what is that wavy chartreuse worm thing?  Isn’t a finger seen from the front always straight-sided?

Well, no, it’s not.  The real world is full of all kinds of little “anomalies.”  Even if your fingers are naturally more regular than mine, they will fall into their own characteristic positions different from other people’s.

These endless idiosyncrasies don’t fit the left brain’s need to have one quickly-accessible, all-purpose image of “hand” and “fingers.”  Most of the time, it’s imperative that your brain not think of the infinite number of shapes that a finger can appear in.  If your brain had to call to mind all those shapes every time you said “finger,” you’d never get through your day.  This is why our everyday default mode of thinking is left-brained.

But when we want to draw, we need to shift our seeing to R-mode in order to capture the boundless quirkiness of the real world.

How to draw the jigsaw puzzle

OK, so now you know you need to look for the odd shapes that your fingers (or anything else you want to draw) actually are.  But how do you draw those shapes?  How do you record them accurately with your pencil or charcoal?

The answer is to take up each jigsaw piece, one at a time, and figure it out in relationship to the pieces around it.  And periodically, you need to take a look over the entire puzzle to make sure you’re not getting something big out of whack.

More specifically: as you gaze at each bit of your hand, you’re looking that particular bit’s shape and size in relation to other bits around it, and eventually in relation to the whole. Below is a time-lapse demo of my “jigsaw puzzle” as I put it together.
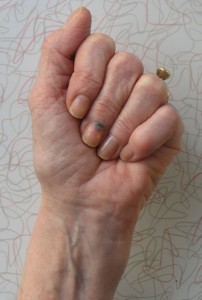
Rough (not exact) position I used for this drawing tutorial.

Let’s get set up for this week’s pose, and move through the jigsaw process below.

Materials and Set-up

Please refer back to the relevant sections of Demo #1 for materials you’ll need and how to set up your work space.

Placement of your hand

In this tutorial for the first time we’re drawing the hand with your palm facing you, rather than the back.

Look at my hand (right) and try to place your hand in a roughly similar position. Fold your fingers inward to touch your palm.  For this tutorial, keep the visible part of your fingers straight.  If they curve, they’ll appear foreshortened, like those in the photos below.  Foreshortening is a challenge that we’ll take on in a future tutorial.  For now, we’ll keep it simple: keep those lower joints straight!
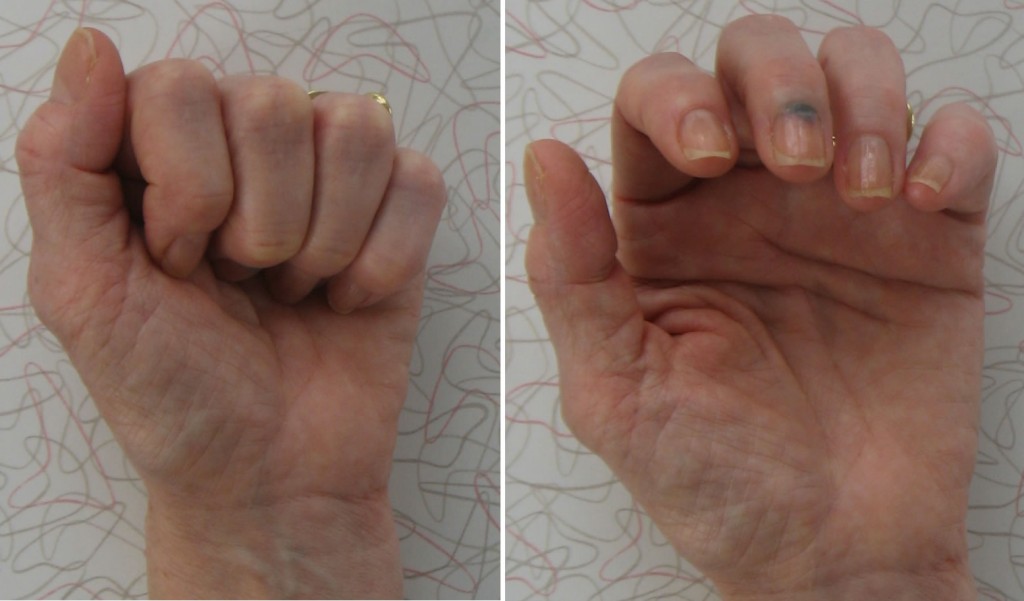
Left: hand has first joint of fingers bent inward, so they appear foreshortened, making them a bit more difficult to draw. Right: both joints of fingers appear foreshortened.

Snuggle the thumb gently up against your forefinger.

(Parenthetically, I have to apologize for my ugly bruised fingernail – I slammed it in a door a couple days ago.  In earlier lessons, I’d already apologized for my permanently-bent baby finger.  Come to think of it, that’s also a result of slamming it in a door.  Anyway, the internet is a wonderful thing except that it’s now going to immortalize my blue nail.  But for art, I’m sucking up all vanity and just getting the tutorials out, embarrassments and all.)

Building the right-brain jigsaw puzzle

Below is a time lapse video with a schematic representation (on the left) of how I built the jigsaw puzzle of this hand pose.  The “puzzle-construction” is a metaphor for how I was thinking while drawing. I made the puzzle just for this blog post, after I drew my hand, reconstructing my right-mode-drawing thought process in a way that I hope will make it understandable to you.

On the right of the time lapse is my actual pencil sketch.

Beneath the video, I’ve written a commentary of what I was doing in each frame.  I’ve numbered each frame so you can easily match it to the text.

You may want to open a second copy of this post in another window so that you can place video and text side by side.  You can press the Pause/Restart button to move through the images at your own pace (hopefully your computer set-up will let you do this – mine never does it exactly).

Note:  the colors I’ve used for my jigsaw pieces have no meaning.  I’ve chosen them for fun and to make the puzzle-building as visually clear as I can.

{"numImgs":"57","constrain":"height","cvalue":"450","shellcss":"width:645px;padding:4px;margin:14px auto 0;"}

Throughout the drawing, I’m thinking of each bit I draw as a piece of a jigsaw puzzle that has to fit properly into the pieces around it.

All the verbiage below may seem overwhelmingly complicated to your left-brain.  But when you develop your capacity to see and draw in right brain mode, you will make these calculations with lightening speed and little conscious thought.

Frame #1 – I’ve drawn a light pencil line around the top and one side of my paper, to give me an additional reference as I draw.  It helps me envision correct shape for the elongated triangle (the chartreuse – chartreuse – “jigsaw piece” in the video) that forms the left side of my wrist and hand up to the curve at the bottom of my thumb.  It’s difficult to draw because of its length and because you have nothing else yet to relate it to.  Thinking of it as two sides of a triangle-shaped puzzle piece will help you get it right.

(The horizontal pencil line in the left margin outside this line has nothing to do with my drawing.  It’s only there to help me align each photo as I’m creating the time-lapse video.)

Frames #2-3 – Two more smaller elongated triangles (green and green in my puzzle) form the outside edge of my thumb.  (I’ve actually sketched in pencil the imaginary “third side” of the triangle, helping me visualize it more easily.)  As you’re drawing, think of these as two puzzle pieces whose shape, size, and position you need to draw in relation to the others you’ve already drawn.

Frame #4 – Trying to figure out the appropriate angle for the edge of my thumbnail, I notice that it’s in a line with the bottom joint of my thumb.  I lightly sketch this imaginary line in pencil.

Frames # 5-6 – Lightly sketching an imaginary line the width of my thumb helps me check that I’ve gotten the angles of my thumb joint “puzzle pieces” drawn accurately.

Frames #7-8 – The (imaginary) line I’ve just drawn helps me get the proper angles for the two lines of the other side of my thumb puzzle piece.

Frame #9 – I draw the next puzzle piece: the deeply-shadowed space between my thumb and forefinger.

Frame #10 – from here it’s easy to see where the side of my forefinger should be sketched.

Frame #11 – I draw an imaginary dotted line to check that I’ve ended the forefinger line in the right place.  I’m becoming aware that I shaped my first, large chartreuse triangular puzzle piece in a way that will make the palm of my hand too small.  But I’m not going to correct this till after I’ve finished the fingers (see below, Frame #52).  The bottom line of the fingers will give me the reference line I need to easily correct the size and shape of my palm.

Frame #12 – With all the puzzle pieces I’ve drawn around the thumb, it’s now easy to form the top and side of its topmost joint.

Frame #13 – A small grass-green triangle fills the space between the tops of the thumb and forefinger.

Frame #14 – A new and improved line for the nail-joint of the forefinger.

Frame #15 – Love those little triangle puzzle pieces that form the tops of fingers!  They’re small and simple to draw.

Frames #16-17 – I can now easily form the edges of the forefinger jigsaw piece, as it fits into the triangles on top and the dark shaded piece on its left side.

Frames #18-20Knuckle wrinkles are great measuring devices to check the relative sizes and shapes of the top and middle finger-segment puzzle pieces.

Frame #21 – Getting the shapes and placement of fingernails is key to drawing a realistic hand.  If you place all fingernails uniformly on every finger, your drawing will look awkward and unrealistic.  Fingertips and nails are also wonderful little measuring devices.  Because they’re relatively small, it’s easy to draw these jigsaw pieces accurately.  In this frame, I draw the finger area next to the fingernail.  You need to look carefully at the end of your finger.  Ask yourself: how much of your finger shows around the nail?  What is the actual shape of this flesh jigsaw piece?

Frame #22 – Ask yourself: what is the actual shape of the fingernail as it’s visible on this finger?  Every nail is seen from a slightly different angle, so appears to be a different shape.  Look carefully at your forefinger nail and draw it as it actually appears.

Frame #23 – Look at the shape of the little triangle between the top knuckles of your middle and ring finger.  Draw this jigsaw piece.  I also added a little line beginning the edges of two adjacent finger-jigsaw pieces.

Frame #24 – There’s a small triangle of shadow between the tip of the pointer and middle fingers (near the nails).  I always love such little shapes because they’re easy to draw, yet help a lot in figuring out the shapes of the adjacent jigsaw pieces.

Frames #25-26 – Figuring out the location of the edges of the middle-finger puzzle piece.

Frames #27-9 – I again use knuckle wrinkles to measure and shape the two finger segments above and below the joint.

Frames 30-31 – Look very carefully at the nail on your middle finger, and at the skin visible on either side of it.  There may be more or less flesh seen around this nail as compared with the pointer.  The nail will appear to be shaped differently, too.

Frames #32-34 – I form the ring finger shape as it fits into the jigsaw pieces around it: the green triangle above and the mauve and lavender middle-finger pieces to the left.

Frame #35 – a somewhat triangular piece sits between the bottoms of the middle and ring fingers.  A short curved line forms the deep wrinkle in the middle of the palm, which here appears to emerge from beneath the middle of the middle fingertip.

Frames #36-40 – A last little green triangle piece forms the top of the pinky.  The rest of the pinky fits into the side of the ring finger piece.  Knuckle wrinkles again help double-check size and shape.

Frames #41-46 – Fingernail jigsaw pieces are again formed by carefully examining  the size and shape of the skin visible on either side, and the size and shape of the nail itself.  The ring finger is the only one on which flesh is visible on both sides of the nail.  Each nail is shaped slightly differently.

Frames #47-48 – In my hand, as seen in this position, two shapes (divided by folds) form the areas immediately under the pinky.  What are these shapes?  Examine your own hand carefully to see what shapes form this area.  For my hand, there is an upper triangle and a lower almost-rectangular jigsaw piece.

Frames #50-51 – by making visual reference to all the shapes already drawn, I sketch in the right edge of my hand and wrist.

Frames #52-3 – I’m finally able to use the bottom of the four completely-sketched fingers to determine the right size and shape of my hand/palm left half.  I can now easily correct the error I made in its left edge at the very beginning of my drawing, and confirm the shape of the bottom thumb segment.

Frame #54 – I add the small triangle-shaped jigsaw piece that lies between the bottom of the pinky and the right lower edge of the ring finger.

Frame #55 – What appears to be a triangle puzzle piece is formed by the wrinkles in the middle of the palm.  This piece nestles beneath the middle fingernail.

Frames #56 – 7 – the basic drawing of my hand is completed with the thumbnail.

Next week, we’ll continue with the rest of this drawing: the shading, seeing it as the addition of more jigsaw puzzle pieces.

A last thought:

It’s interesting that my final assembled jigsaw resembles a common painting style in which shapes are simplified and surfaces appear flattened.  Even though my actual drawing is realistic, my underlying  thought process sees each bit of the drawing as a highly simplified, flattened shape.

Next post we’ll see that the shading process – which creates the 3D look – is actually as simplified and flattened as the drawing stage.

I’d love to hear from you:  Did this jigsaw puzzle metaphor help your drawing process?  Let me know what works and doesn’t work for you in learning to sketch realistically.
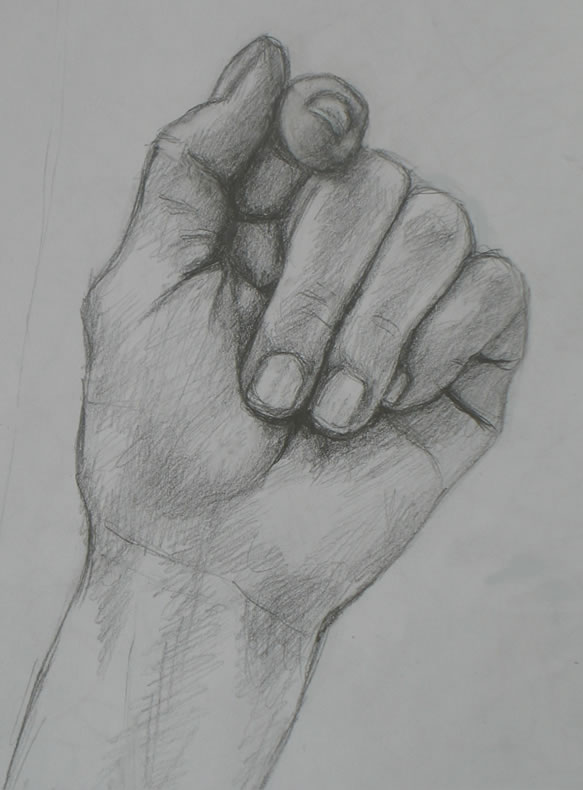
Hand Drawing Demo #6: Reviewing Left Brain/Right Brain

Thursday, December 9th, 2010

I’ve chosen hands as subject of these drawing lessons because they are so available to “pose” for you.  And you can position them in infinitely more interesting ways than your feet!

But my approach to drawing is the same whether your subject is hands, a landscape, flowers or a rocket ship.  I use a few techniques to enable my brain to see in “right brain” mode.  Once you are able to switch over to seeing this way, you’ll be able to draw anything.

Right brain / left brain in drawing

Hand demo #6 sketch

If you’re not familiar with the “right brain” in drawing, please look back at my earlier Why is Learning to Draw “So Hard?” which gives the basics.  And Me Against Da Vinci?  What’s the Right Way to Draw? describes the leap forward my own drawing took when I set aside all the artists’ anatomical information I had learned.  (The artists’ focus on anatomy is historically associated with Leonardo DaVinci.)

Instead, I learned to see in “right brain” mode.  That made all the difference to my drawing.  In right brain mode, the artist is able to see what they’re drawing as a series of angles and shapes that are much easier to draw than when their subject is seen “normally.”

So you can blissfully forget about all the complexities of drawing a hand.  Forget all the thoughts and associations you have with “handness.”  They will interfere with your being able to really see, and to sketch what you’re seeing.

Betty Edwards, who wrote the famous Drawing on the Right Side of the Brain, explained that

we often can’t draw because we’re blocked from seeing what’s right in front of us.  What blocks us is our preconceived notions about what a human hand or leg or eye should look like.  We struggle, trying to draw what we assume we’ll see – instead of seeing what’s actually there: how the specific hand in front of us looks….

My hand drawing tutorials are all about learning to forget you’re drawing a hand, while learning to see in a new way that makes drawing accurately much easier.

Setting up your work space and materials

Please refer back to the relevant sections of Demo #1 for materials you’ll need and how to set up your work space.

Placing your hand

I chose today’s pose partly as an easier one than last week’s.  I wanted a pose in which we can again take advantage of  negative spaces between the fingers.  At the same time, I pushed us a bit ahead by including one finger (the pointer) that’s bent over, producing more of a challenge.

Place your hand with the thumb and forefinger forming an A-OK sign.  Separate the rest of the fingers so space appears between each.  As always, you don’t need to replicate my hand position exactly.

Techniques for engaging your right brain (and disengaging your left) while drawing

We’ve used these techniques before, including in my posts about the angle-abstraction game.  But it’s important to go through them again, because shifting to seeing in right-brain mode is so tricky for many people that a lot of practice is needed.  (Here I explain why the shift is often so difficult.)

One of the most used techniques for right-brain sketching is to draw negative space – that is, to draw the space around your subject, rather than your subject itself.

Another technique I use a lot is to figure out where I need to sketch in a line by noticing its relationship with other parts of the subject.  Your new line may begin at the same level as another part of the subject, for example.  Or it may lie at a particular angle to it.

These techniques sound esoteric and mind-numbing when you read about them.  But “on the ground,” what you’re doing is drawing simple lines and shapes instead of complex ones.  You begin by focusing in on a single simple area, then move quickly to the next one so you don’t get bogged down.  I’ll provide illustrations below to help you catch on to these tools.  (Frame numbers refer to those of the time-lapse video at the end of this post.)

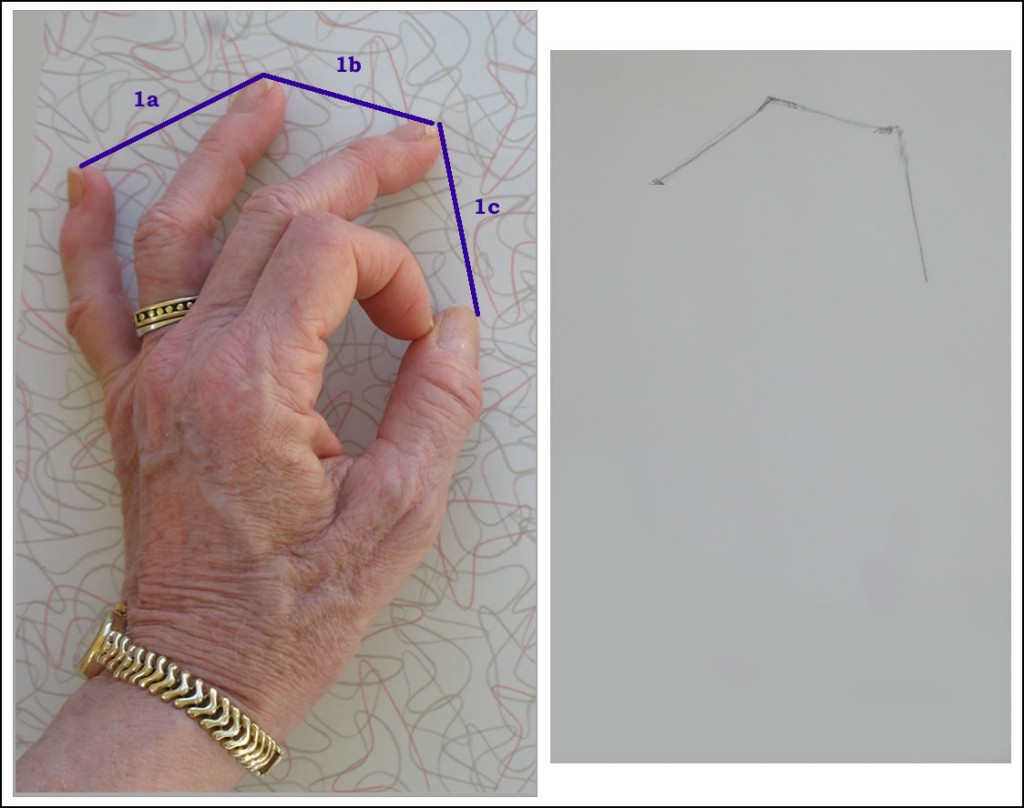
How I began this sketch - Frame 1. The image on the left is a photo of my hand in the approximate position I drew it. I later superimposed on this photo the purple lines which show how I envisioned these lines as I drew them (right).

Frame 1: I began by drawing guidelines connecting the tips of three fingers and my thumb.  Ignoring everything else about my hand, I focused only on judging the simple angles and lengths of imaginary lines between fingertips.

This may sound a bit mathematical and “left brained.”  But when you’re drawing smoothly in right-brain mode, all these judgments take place at lightening speed, without conscious calculation.

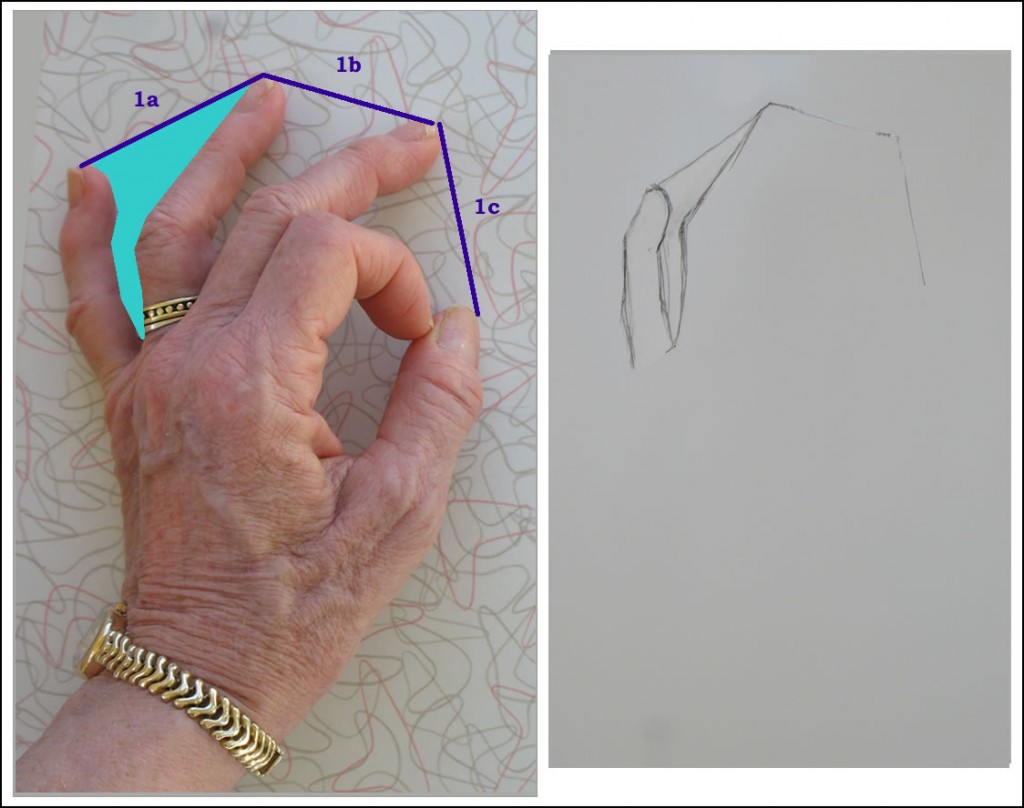
Frame 2: The negative space between the pinky and ring fingers is delineated in turquoise over the photo. The photo of my hand was taken at a different time than the sketch was done, so the negative shapes were slightly different. But you can hopefully get a sense of the technique in spite of this.

Frame 2: Next I drew the negative space between the pinky and middle finger (please note that the photo of my hand was taken at a different time than the sketch was done, so the shapes are slightly different.  You can hopefully get a sense of the technique in spite of the slight discrepancies).

I didn’t worry about how complicated the hand is.  I relaxed and focused only on drawing this fairly simple flat geometric space between two fingers.


Frame 3: another negative space drawn, shown in green on the photo.


Frame 3: One tool I use to judge how to draw negative shapes between fingers is to notice where the bends of joints fall in relation to the finger on the other side of the space.  For example, the sharp bend in the middle finger occurs (horizontally) across from the middle of the middle knuckle of the ring finger.  This sounds crazy when you write it out, but noticing these relationships make drawing the shapes very simple.

While I was drawing this negative space, I noticed that the edge of the middle finger continued almost all the way across the bottom of the ring finger.  So I sketched that in, too.

Frame 4: Drawing the negative space bounded by middle finger, bent-over pointer, and thumb top.

Frame 4: Bypass the complexities of the bent-over pointer between the middle finger and thumb top.  Instead, focus only on the negative shape their edges create.  One easy way to envision this negative space is as two triangles, one whose bottom point is where the forefinger meets the thumb, and the other whose bottom side crosses the thumbtop.

The shapes of the negative spaces aren’t actually perfect triangles, but it will help you draw the more complex shapes by noticing the simple shapes they resemble.

Frame #5: Line revealing placement for base of forefinger

Frame 5: To draw the bottom of the forefinger, I noticed that its base ended almost directly in line with the edge of the ring finger (you have to look closely at the photo to see this, but it was very evident in my actual hand as I was sketching).  I sketched in a vertical guideline to help me draw this (indicated in dark blue on the photo).

Frames 6-7: The negative space formed by thumb and forefinger.

Frame 6-7: Here I made the common error of drawing what should be the foreshortened middle joint of the forefinger too long.  If you watch the time-lapse video below, you’ll see me correcting this in later frames of the sketch.  In fact I never really got it right – but that’s fine!  The goal here is to keep practicing, not to produce a perfect drawing every time.

Frame 8: Vertical guideline to help draw the wrist.

Frame 8: Figuring out where to place the wrist, I noticed that it’s directly below the edge of the forefinger’s base.  I drew a vertical guideline here to help me draw the line of the outside of the thumb down to the wrist.

Frames 9-10: Making a correction using another vertical guideline.

Frames 9-10: By now I’m realizing my silly mistake with that foreshortened forefinger joint (see above, Frame 6-7).  Alas, this is the very joint this lesson is trying to teach you to draw properly!  Part of my error was due to my shifting perspective as I kept moving to snap photos of my sketches.  But that’s no excuse!  And because it’s a common error, it’s good for you to see the process of trying to correct it.  You’ll be able to see this more clearly in the time lapse video below.

*           *          *

As with all these lessons, this isn’t a hard and fast drawing sequence.  It’s very possible that if I drew this hand pose again, I’d do it in different steps, or envision angles and spaces differently.  If you notice other ways of seeing them, use whatever makes sense to you.

{"numImgs":"45","constrain":"height","cvalue":"450","shellcss":"width:290px;padding:4px;margin:14px auto 0;"}

Hand Drawing Demo #5: Partially Hidden Fingers

Thursday, December 2nd, 2010

This is the fifth in a series of online drawing lessons using your hand as your model. The first, most basic lesson is here.

This tutorial’s hand position is very similar to the one in  Hand demo #3 – but with the entire hand rotated onto its outside edge.  This demonstrates how a slight change in position can present an entirely new set of challenges in drawing the hand.

The challenge of drawing partially hidden fingers

My sketch of #5 hand position.

As I began drawing today, I suddenly realized I’d probably chosen a hand position that’s a bit ahead of where we’ve gotten at this point.  Every finger in this pose except the the thumb is partially hidden by other fingers or knuckles.  And you’re seeing them all at odd angles as they emerge from the knuckles.

I promise to return to a simpler pose next week.  But meanwhile, give this position a try.  The approach to drawing it is the same as to drawing anything else.  You may discover that your skills are developed enough at this point to capture your hand in this pose.  And if not, head back to whatever earlier lesson you enjoyed the most.  Practice is the key to learning to draw.

Later in this series of Hand drawing tutorials, we’ll return to more drawing of hidden fingers as well as foreshortened ones.

Setting up your work space and materials

Please refer back to the relevant sections of Demo #1 for materials you’ll need and how to set up your work space

Positioning your hand

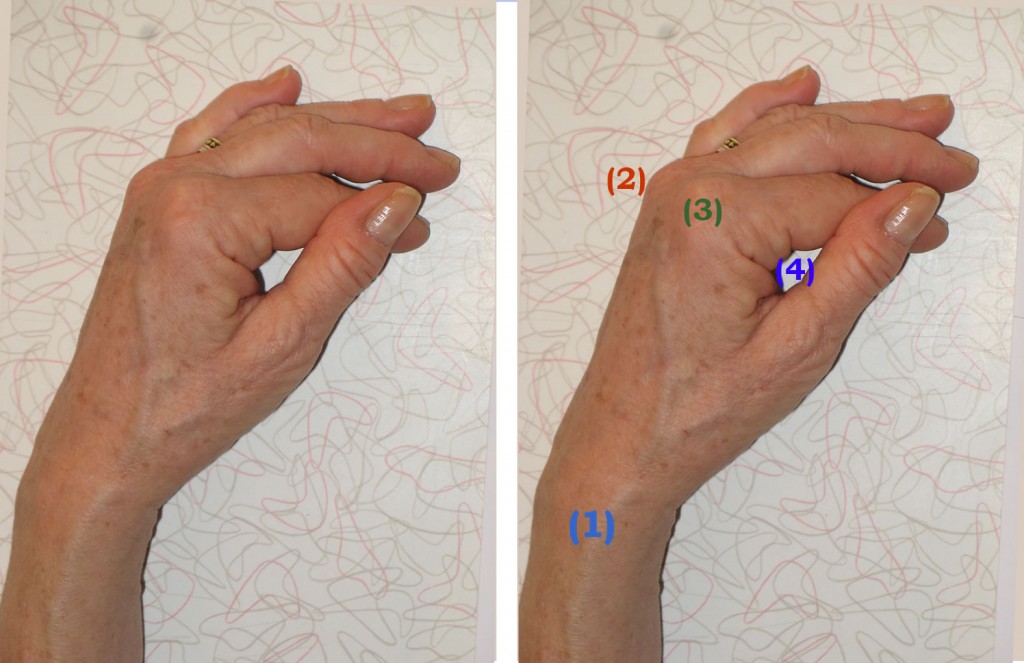
Rest your non-writing hand (your left hand if you’re right-handed and vice versa) on it’s outside edge. Your palm shouldn’t touch the table at all.  Your wrist (1) will be viewed from the side (see photo below).

The knuckles of your middle (2) and pointer (3) fingers will be the only knuckles visible, and they too will be seen from the side.

Place your thumb over the middle joint of your forefinger, creating a roughly teardrop-shape opening (4).

Approximate hand position for this week's drawing tutorial. This photo was taken with a flash, which dramatically changed the lighting from the way it was as I was drawing.

It’s OK if your hand position doesn’t look exactly like mine.  Your hand is probably a different size and shape.  And the important thing is to practice different hand placements, not this exact one.

This photo of my setup (including my camera tripod to the right) shows more accurately the lighting of my hand while I was sketching (though my ring finger had moved out of correct position as I reached up to snap the photo).

Time lapse video demo: drawing the hand from the side, with fingers partially hidden

Below is a time lapse video of my sketching of this hand position.  I’ve numbered each frame so you can easily match it to my written commentary (beneath the video) of what I was doing in each frame.

You may want to open a second copy of this post in another window so that you can place video and text side by side.  You can press the Pause/Restart button to move through the images at your own pace.

My apologies for the inconsistency of lighting from one frame to another.  I’m a painter, not a photographer, and I’m not experienced in compensating for shifting light on a stormy day!

{"numImgs":"34","constrain":"height","cvalue":"450","shellcss":"width:386px;padding:4px;margin:14px auto 0;"}

Frame #1: As I often do when beginning to sketch, I scanned my eye over my entire hand looking for the easiest thing to draw first.  I decided it would be the angle of the back of my hand as it curves into my wrist.  I tried to accurately draw the tilt of this line as compared with an imaginary perfectly-vertical line.  I didn’t draw a vertical guideline, but I pictured it in my head.

Frame #2: I drew the angles on the other side of the wrist and sketched a rough guideline for the top of the knuckles.  My goal here was to sketch the overall geometric shape of my hand.

Frame #3: To check the accuracy of the line I’d just made for my wrist, I sketched a guideline encompassing the negative space next to it.  I noticed that this line was a continuation of the general angle of the first joint-segment of my thumb, so I used it to draw part of my thumb as well.  (For more on the all-important subject of negative space, see for example Hand drawing demo #3 and my post Me Against DaVinci?)

I then noticed that the top of my thumb ended at the same level as the top of the knuckles on the far side of my hand, so I drew a horizontal guideline between the two.  Finding relationships like this is all important to getting proportions accurate as you move ahead.

Frame #4: I sketched in the little teardrop-shaped negative space between my thumb and forefinger [see (4) in the photo of my hand above].  As I drew it, I scanned my eye over the geometric shape of my entire hand to be sure I was getting it placed and sized properly.

Here’s a classic example of where right-brained seeing helps you: if you envision your hand as a pure, flat shape encompassing another shape, it will be much easier to draw than if you get into long discussions with yourself about what a hand should look like when it’s in this particular position.

Frame #5: I decided to shade in the negative space to help me continue seeing it as an aid.  I also drew in the rough curve of the top of the knuckles as it transitioned into the top of my forefinger.  You can see how I’m using the horizontal guideline I drew in Frame #3 as an aid to placing this line correctly.  I haven’t made a distinction yet between the two knuckles because for now, I’m getting general shapes laid down.  Later on I’ll add more detail.

Frame #6: I drew in my thumbnail as a way of measuring whether I’ve got the proportions around it correctly.  I shaded in a bit of the triangular negative space between the pointer and middle finger.  I also began a little shading in the wrist area because this shadow’s edge was approximately halfway across my wrist, so I could use it as a guidepost for other shapes around it.

Frame #7: I was struggling a bit to see where the top edge of the middle finger would be.  So I drew a very rough line.  When in doubt, draw something in the right ballpark, so you can learn from that where a more accurate version will be (see the sailing analogy in my last hand demo.  As I wrote there, “each line you make will help you figure out what you need to do next.  Even if that line turns out to be wrong, making it will help you understand where the right one should be.”).

Frame #8: Sure enough, that crude line gave me more of a sense of where to draw a more accurate line.  I also used the small triangular negative space under this finger, along with a guideline I sketched between the two fingertips to help me accurately envision the negative space that formed the ends of the fingers.

Frame #9: I drew the little triangle-shaped first joint of my ring finger.  Notice how seeing it as a purely geometric shape – a triangle with one angle appearing to emerge near the base of the middle finger and another ending at its first joint – helped me capture this finger far better than would a brainy debate with myself about what a finger should look like from this angle.

Frame #10: I drew the rest of the ring finger, using a guideline to envision the triangular negative space between it and the middle finger.  I’m also adding fingernails as I go along, to help me check my sizes and proportions (this is similar to the way I used finger joints as measuring devices in this tutorial.  And see my diagram of fingernails as negative space for the finger tips around them in this lesson.)

Frame #11: I made a bizarre error here in shaping the bottom half of my pinky finger.  I can’t figure out how I managed this, except that maybe my hand moved while I was craning around to snap the previous photo with my camera.  But I never noticed my error until the very end of the drawing, so I can’t really use that as an excuse!  Anyway, it demonstrates that we all make mistakes as we sketch, and we just need to keep working at it till we get everything accurate.

Frame #13 onward: I began shading, even though I wasn’t sure I had all my proportions right.  You can learn more about what you’re drawing via sketching the shapes of its shadows and highlights.  At this point, I felt that shading would help me more than anything else to figure out improvements I needed to make in the drawing.  As I worked on lights and darks, I continued to hone the outlines of fingers and hand based on what I was learning.

As often happens, this sketch began to look worse before it started looking better.  When this happens, you need to simply keep calmly moving forward through the bad stuff to gradually figure things out and arrive at a drawing you can feel proud of.

I’d love to hear from you how this tutorial went for you.  Did you find this hand position difficult?  Were you able to make progress with it?  If you went back to an earlier lesson instead, which one did you choose?  Leave a comment below!

Hand Drawing Tutorial #4: What to Do When Everything’s Going Wrong

Friday, November 19th, 2010

I’m no sailor but I know that when you’re on the open seas and using the wind as your driving force, the problem isn’t going into a headwind – even energy going opposite to your desired trajectory can be channeled in a useful way. The problem is when there is no wind, no motion….  You can’t leverage stagnation, but a gust in any direction can help you discover what you’ve been looking for all along.

“Be the Wind: What to Do When Things Aren’t Working” by Nicky Hajal, Tumble blog

Final sketch for this week's drawing tutorial

I was not a happy camper while drawing today.  Nothing was going right.  It was a classic autumn day alternating dark clouds and  bright sun, so the light I need to photograph my sketches kept changing.  I couldn’t get my tripod positioned right.  Once I started sketching, I felt that I had begun wrong and should start over.  I fretted that this choice of hand position (right) was inappropriate for your fourth drawing tutorial.

So did I stop and start over?  No, I kept moving forward, trying every trick in my bag to get the drawing back on track.  And eventually it did improve – thanks not to a single brilliant insight, but to dozens of small steps as I slogged ahead.  I won’t be showing this drawing at the Metropolitan, but it works fine.

I’ve learned over my years of doing art that when things aren’t going well, I simply need to keep working, moving forward.  Eventually the drawing will get better.  It’s a matter of time and determination.

A few weeks ago, I read the sailing analogy quoted above and immediately resonated with it.  It’s absolutely true that sailors can move forward using wind in any direction, even a headwind.  The real problem is when they’re becalmed, when there’s no wind at all.

So, too, when you’re drawing: each line you make will help you figure out what you need to do next.  Even if that line turns out to be wrong, making it will help you understand where the right one should be.  If you make five or ten wrong lines, use each one to learn what the right one is.

Rough position of my hand for this sketch. The photo was taken in somewhat different light than when I was sketching my hand.

Materials you need and setting up your work space

Please refer back to the relevant sections of Hand drawing tutorial one for this info.

Positioning your hand

This hand position is somewhat similar to last week’s.  The main difference is that I’ve raised my forefinger so that it appears to cross over the middle finger (of course it doesn’t actually cross over).

My goal here was for you to try a hand pose that doesn’t have the series of small negative spaces between the fingers that we’ve had in every tutorial till now.  For this reason, this position will be more challenging than the first three we’ve sketched.

The many little steps I took to make this drawing work

I think it will be easiest for you to see how I worked on this drawing if you go through the time-lapse video while reading my commentary.  I’ve numbered each frame so you can easily match it to my description (beneath the video) of what I was doing.

You may want to open a second copy of this post in another window so that you can place video and text side by side.

{"numImgs":"35","constrain":"height","cvalue":"450","shellcss":"width:335px;padding:4px;margin:14px auto 0;"}

Frame #1: In earlier hand tutorials, I haven’t drawn this particular negative space – the flattened triangle formed by the edge of my finger and hand – till after sketching the spaces between each finger.  But in Demo #4’s hand position, the negative space between fingers is much larger, hence not as easy to draw.  So I start with an easier shape: the one at the left edge of my hand.

Approximate hand position for this sketch, in different light

There’s no rule about where you “should” start a drawing.  Just start it wherever you notice an easily-drawn shape.

Frame #2: I begin sketching in the negative space formed by the pinky and forefinger at either end; an imaginary line connecting these two fingertips at the top; and the two bent middle fingers at the bottom.

Frame #3: It’s hard to judge the correct size for a negative space this large.  So to check the size I sketched in frame 2, as a measuring device, I sketch in a few lines of the middle fingers.

Frame #6: By this time, it’s clear I’ve gone off somewhere.  The base of the hand I’ve drawn is much too wide.

Frame #7: So I check both sides of the hand and decide it was my Frame #1 triangle that was off.  I erase the old left side of my hand and sketch in a new one.

As I’m checking proportions, I realize I’ve also made the base of the middle finger too wide.  Compare my sketch with my actual hand (photo above right).  This error is in the very center of the drawing.  To correct it, I would have to erase either the entire left or the entire right side of the hand I’ve drawn.

Arghhh!  Should I chuck this drawing and start over?  How can I publish a drawing that’s this incorrect when I’m trying to teach the right way to draw?  But I’ve been having so much technical difficulty with the sun and camera equipment – it’s that part that I don’t want to struggle again with.

I decide to experiment with continuing this drawing.  It’s not going to be perfect, but I realize that you may learn as much from how I handle a somewhat out-of-whack drawing than how I handle a better one.

Frame #8: Rather than agonizing more, I move on to shading the drawing as it stands.

Frame #11: To help disguise my “fat” middle finger-base, shading will be key.  I’ll be paying close attention to it over the course of the rest of this drawing.

Frame #13: That darn bright sun suddenly appears from nowhere, sending a shaft of bright light across the middle of my sketch!

Frame #18: Here I make another mistake, which I didn’t notice till after I finished the drawing (so it’s still there in the “finished” sketch).  I didn’t trust my initial drawing of the length of the pointer, which I had made accurately in Frame #3.  Here I lengthen it slightly, and it gets too long.  Oh, well!

Frame #20: I erase the guidelines I drew early on to help me determine the relative length of the various fingers – or, more accurately, the shapes of the negative spaces between the fingers.  At some point during the shading of a drawing, these lines always become distracting, so I erase them.

Frames 21-35: I continue to try to make all the other proportions – wrist, thumb, middle finger tip – very accurate, to distract from that fat finger in the middle of everything.

I also work on fairly detailed shading, with a full range of darks to highlights.  This gives a sense of 3-dimensionality, hence reality, that can fool the viewer’s eye into overlooking awkward proportions.

*    *    *

So sail on, artists!  Keep moving through as many practice drawings as you can.  Over time, this “wind” is what will get you to the destination you seek.

Your feedback on most and least useful elements of these tutorials

Are there particular parts of these lessons that you find really helpful?  Others that you find a waste of verbiage?  Let me know what you’d like more and/or less of by leaving a reply or comment below.

Hand Drawing Tutorial #3

Friday, November 12th, 2010

This is the third in a series of online drawing lessons using your hand as your model. The first, most basic lesson is here.

The hand is so complicated visually, so able to move its parts in infinite ways relative to the various other parts, that a small movement creates new shapes and new challenges in drawing.  And your hand is always available to “pose” for you!

At the end of this lesson, you’ll find a time lapse photo sequence of my entire Tutorial #3 drawing process, from my first pencil line to the finished sketch.

Setting up

Hand sketch for Tutorial #3

Please refer back to the relevant sections of Tutorial #1 for materials you’ll need and how to set up your work space.

Placing your hand

I chose this rather odd position of my hand because it produces an interesting variation in the negative-space shapes (between the fingers) that we’ve been working with so far.

To place your own hand for this drawing, focus on the spaces between your fingers.  You may not be able to replicate the shapes of the spaces exactly as I did them, because your hand is probably a different size and shape than mine.  Just place your hand in a position close to this.  The goal is to create varying shapes in the spaces between your fingers.

That may seem like an odd goal.  But remember, I’m trying to get you to switch the way you’re seeing to a different mode – what Betty Edwards calls right-brained mode.

Right-brained seeing is all-important for many artists’ drawing process.  But the switch isn’t easy for the human brain to make, as I explain here.

Seeing the negative space between your fingers

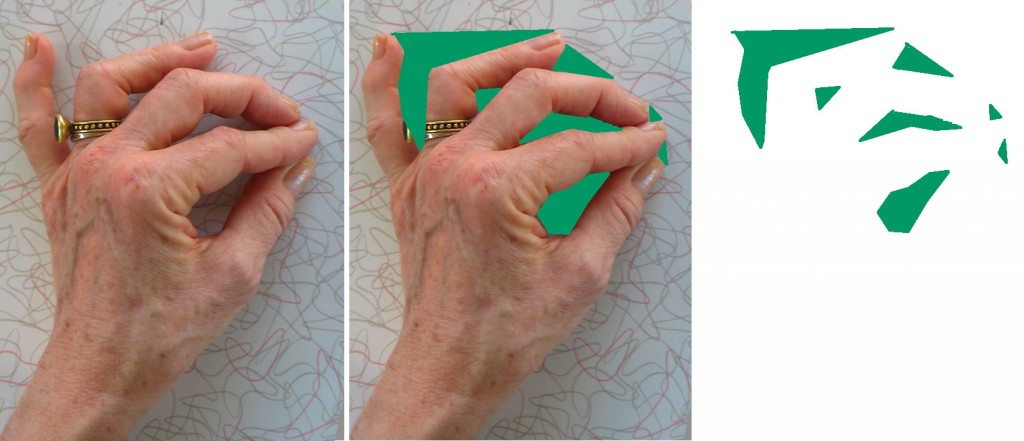
To prime your brain to switch to seeing in right-brain mode, look at the different shapes between my fingers (below).  Between the ring and middle fingers is a small triangle.  Between middle and pointer fingers is a more elongated shape.  And between forefinger and thumb is something like a teardrop shape.  In addition, there are small triangles between the tips of the fingers.

Focus on the space between my fingers, indicated in green in the middle image. On the far right are the green "negative spaces" without a photo underneath. Note the variety in their shapes and positions. This is what you will draw first.

Now look carefully at the spaces between your own fingers.  What are the different shapes and sizes of the spaces your fingers create?  That’s what you’re going to draw first.

Drawing the negative space between your fingers

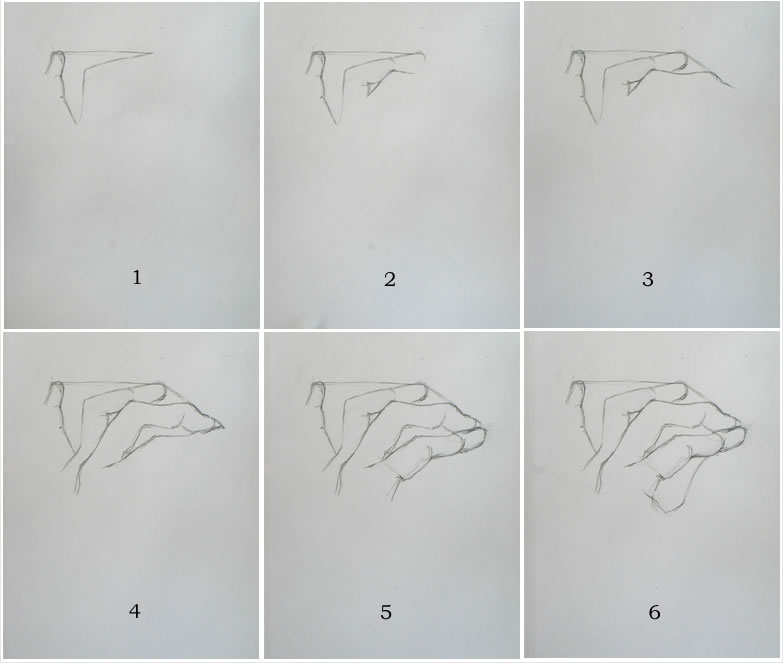
The sequence below shows how I began my drawing with the negative spaces between my fingers, moving from left to right.  It may also be helpful for you to watch this process in the time-lapse video at the end of this post.

This sequence shows how I first drew the negative spaces between my fingers.

To help you judge where you should draw each line, notice where the sharp angle of each finger “fits into” the previous finger.  For example, the sharp bend in the ring finger occurs opposite the middle of the top segment of the pinky (Image 1 above).  The sharp bend of the middle finger overlaps the ring finger halfway across the ring finger’s top, straight edge (Image 3 above).  The pointer’s sharp bend is very close in shape to the underside of the middle finger’s bend (Image 4 above).

Using finger joints as a measuring device

In this demo I draw more joint details of some fingers, compared to previous, simpler hand position negative-space sketches.  At this early stage in the sketch, you don’t want to put in too much detail.  You want to first sketch out the basic shapes of your hand.  So at this early point, I’m drawing the finger-segment details solely as a measuring device.  They help me judge the size and shape of the negative spaces I’m drawing.

Later in the drawing process (see Tutorial #3 video below), I will continue to draw in more of the tiny wrinkles that form each finger-joint.  Each time I did this in this particular drawing, my purpose was to use these lines as measuring devices that helped me check whether I was drawing everything around the joint to the appropriate size.

Artists always need ways of judging relative sizes of elements they’re drawing.  So with anything you draw, look for the smaller sub-units that make up the whole.  You can use them to measure and also to judge whether you’re drawing angles and shapes accurately.

Artists often use grids in drawing.  These are another form of measuring device, and they also help you judge whether you’re drawing angles and shapes correctly.  It’s always easier to judge the size and angle of a line when it’s short than when you’re trying to draw an entire object all at once.  This is exactly how I’m using the joints of the fingers in my drawing.

At the same time, it’s very important to remember that you must not get lost in detail at this stage.  Right now, you’re just blocking out very basic shapes.  Keep moving forward!  Don’t get stuck on one tiny part of the whole.  You will make adjustments and add details later.

Some tips on shading your drawing

As you begin shading your drawing (see the video at the end of this post), it’s often easiest to look for the very darkest areas and begin there.  As you can see, I use the loosest kind of pencil scribbles to shade these hand drawings.  This is fine – you’re practicing.  Don’t get too caught up in technique right now.

Squint your eyes to see the lights and darks of your hand.  If you’re lucky enough to have strong lighting on your hand, you may not need to squint much.  But if the light is more even, you’ll need to squint hard!

Sometimes you’ll find it difficult to see any but the darkest shadows on your hand.  To create a fully-rounded appearance, you’ll need to sketch in the more medium-toned shadows as well.  If you’re having trouble seeing these, look instead for the highlights on your hand – the very lightest areas.  Once you see the pattern of the lightest lights, it will be easier to recognize the paler shadows around them.

Final adjustments

The next day after I did this hand sketch, I noticed that I had made the base of the hand and the large thumb knuckle too wide.  So I got out my eraser and pencil and made some adjustments.  I also fiddled with the shading around my fingers.

You can continue “fixing” little bits of your drawing as long as you want.  But it’s often more helpful to just note where you want to improve next time, and then move on to a new drawing.  Keep practicing new drawings all the time!

Hand Drawing Demo #3

You can click through this demo at your own pace.  Stop it at frames you want to study longer and move fast through other sequences.

{"numImgs":"42","constrain":"height","cvalue":"450","shellcss":"width:353px;padding:4px;margin:14px auto 0;"}

Hand Drawing Tutorial #2

Wednesday, November 3rd, 2010

This is the second in a series of online drawing lessons using your hand as your model.  The first, most basic lesson is here.

The hand is so complicated visually, so able to move its parts in infinite ways relative to the various other parts, that a small movement creates new shapes and new challenges in drawing.

At the end of this lesson, you’ll find a time lapse photo sequence of my entire Tutorial #2 drawing process, from my first pencil line to the finished sketch.

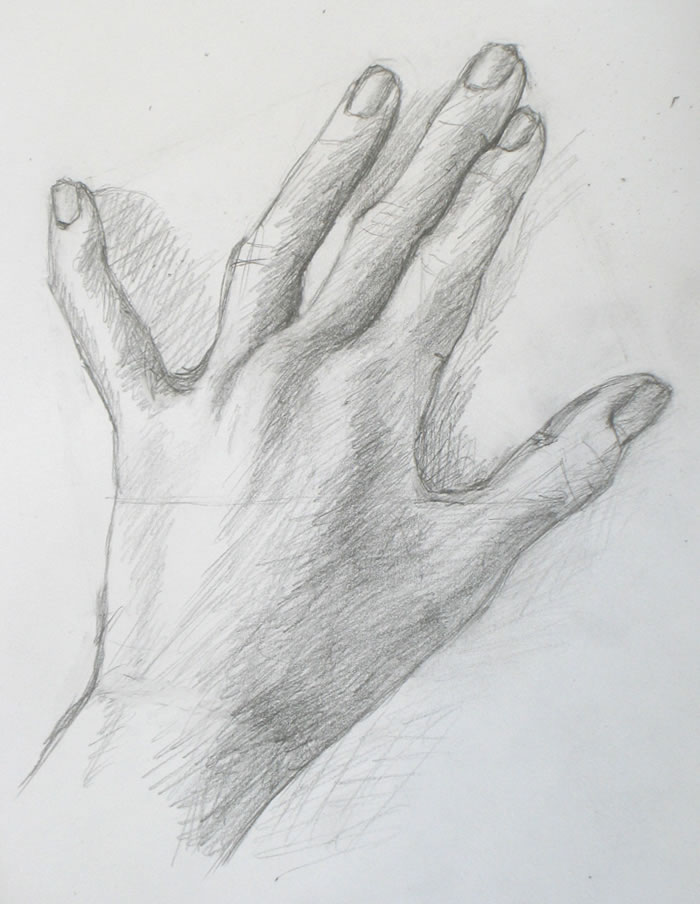
This lesson's hand sketch. You can still see a light line across the back of the hand, which I drew as a guide.

Materials you’ll need

You can use any paper and pencil or charcoal that you enjoy.  I’ve used the same paper, pencil, and tape for this lesson as I did in the first.  Please look back for specifics if you want them.

My Tutorial #2 drawing (right) appears darker than the first demo, even though I used the same simple pencil and other materials.  The reason is that this time, I made an effort to draw more heavily in order to make even the guidelines I sketched more visible to you.

Setting up to draw

Tape a piece of paper to your drawing surface, leaving enough space to place your non-drawing hand next to the paper as your model.  For important explanation and a photo, please go here

Placing your hand

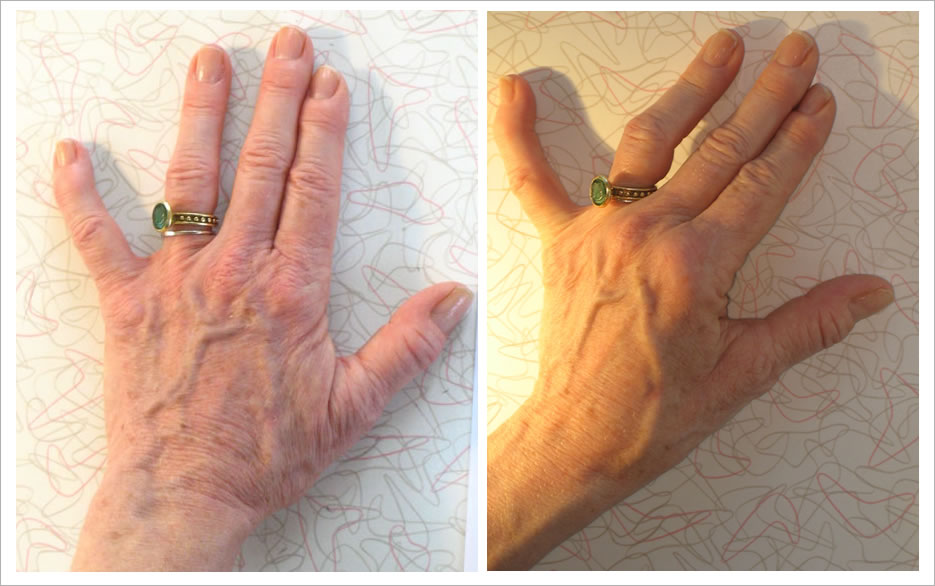
In this lesson, we’ll draw a slight variation of the hand “pose” from the first lesson.  In the first lesson, we drew the most simple version possible: the hand placed flat, viewed from the back.  For this lesson, I began by setting my hand and fingers in the exactly the same position as in Tutorial #1.  Then I made a single change:  I lifted my pointer-finger knuckle upward, well off the table.  (The lighting this time is also different.)

Compare the positions of the hand in Demo #1 (left) and Demo #2 (right). The fingers and bottom of the hand are similar. But I've raised the knuckle of my pointer finger off the table, creating a more complex subject for sketching.

I also placed a strong light source (a halogen lamp) to the left side of my hand.  This creates the intense lights and darks that help the artist create the illusion of three-dimensionality.

As always, start by drawing negative space

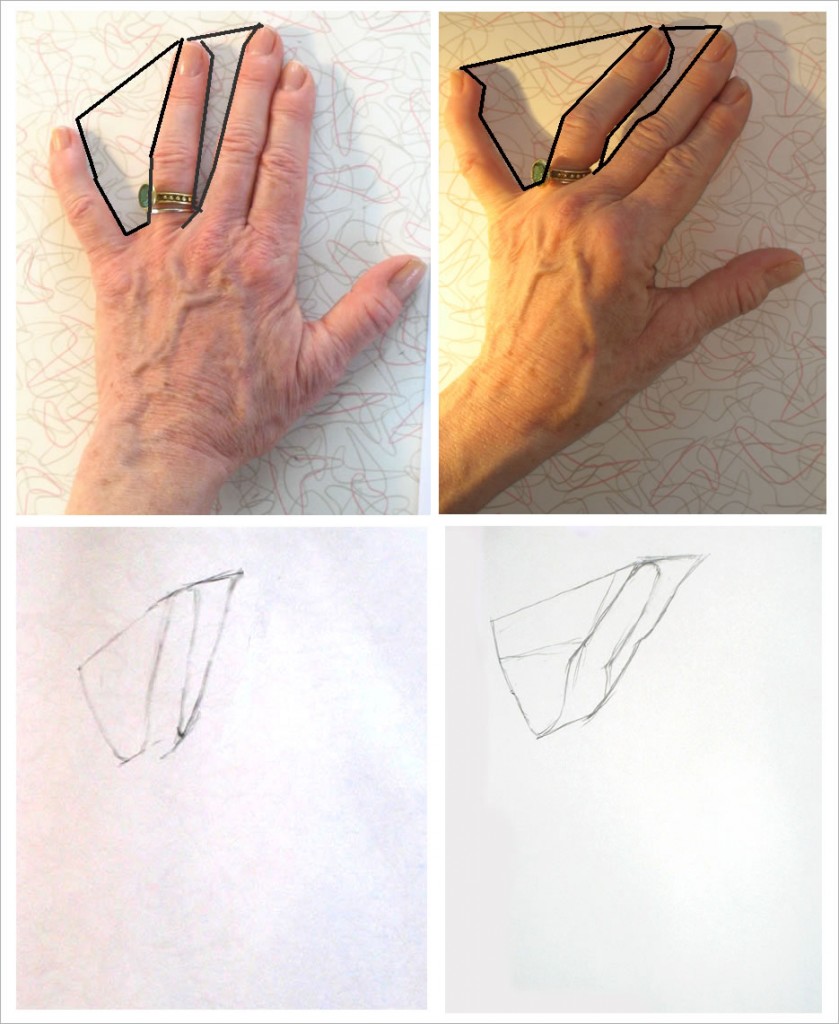
For me, the key to beginning drawing any subject matter is to find easily-drawn areas of negative space.  For our hand poses, the obvious basic negative spaces are those between three of the fingers. Look at the spaces between the pinky and ring finger, and between the ring and middle fingers in each pose:

I've drawn black lines over the photos of each hand pose, outlining two spaces between fingers. Below each photo are the first lines in my drawing of the hand above it. Note that in the second drawing, I broke the negative space down into more geometric shapes (the sketched guidelines) than in the first drawing.

Continue “carving out” the negative space all around the hand to create its complete outline, as we did last lesson.

Making a course-correction by drawing guidelines

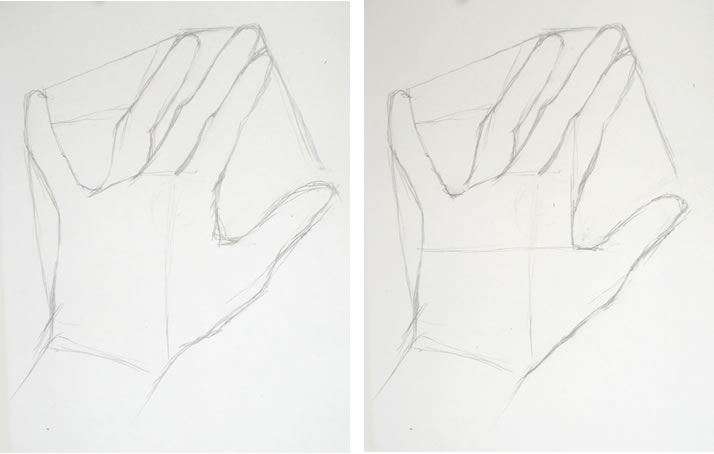
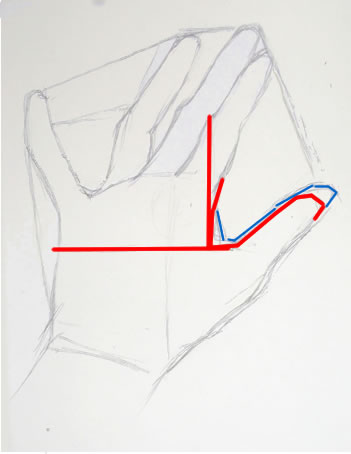
When I’d completed the outline of my hand, it looked really off (below, left).  The thumb was too large, and the entire hand seemed too stretched out to the right side.  I had clearly made a mistake somewhere along the way.  But what was it?  What had I done wrong, and how could I correct it?

Don’t worry, this kind of mistake happens all the time!  What you need to do now is to look over your hand to find relationships between lines you think are correct and the areas you feel you may have gotten wrong.

My first completed outline (above left) was clearly off. I corrected my drawing (above, right) using a horizontal guideline across the back of the hand and a vertical one intersecting it at the base of the thumb.

Following this method, I realized I had mis-placed the “scoop” of negative space between the forefinger and thumb.  To help you see this more easily, I’ve colored over the incorrect inner thumb line in blue (see right).

The edge of the hand between the forefinger and base of the thumb actually lies directly under the first joint of the forefinger (note my vertical guideline, right).

I figured out where the horizontal portion of the thumb-base should be by drawing a horizontal line from the point on the other side of the hand directly across from it (see horizontal guideline, right).  It may seem odd to figure out the placement of the thumb by looking at  its relationship to the far side of the hand.  But it works.  And it helps you check whether your entire drawing is shaping up properly in relation to the whole.

Now for the drawing demo

I think you’ve probably had enough technical verbiage for this lesson.   So just continue from here the same way we did in Tutorial #1.  It may help you to check out the time-lapse sequence of my drawing below. You can move through it at your own pace by clicking the “stop” button at the bottom when you’re ready to see the next image.

{"numImgs":"29","constrain":"height","cvalue":"450","shellcss":"width:348px;padding:4px;margin:14px auto 0;"}

A couple moments you may have noticed in the “video:”

First: at some point, I erased the negative-space guidelines I had drawn in the very beginning from each finger tip to the next.   It’s often fun seeing guidelines like this in a finished sketch, but they were distracting me as I was trying to evaluate lights and darks for the shading.  So I got rid of them.

Second: this time I decided to fill in the shadows my hand cast on the table.   I first considered doing this because the left side of the middle finger was so light (because of the halogen lamp) that I had nothing to define its edge.  I thought I’d try defining it by the shadow next to it.  Once I had started with that finger, of course I had to finish the entire shadow of my hand.  I wouldn’t always do this in a quick sketch.  But in this case it helped, and I liked the result.

Drawing Tutorial: A Simple Drawing of Your Hand

Friday, October 22nd, 2010

This is the first of a series of drawing lessons in which we’ll draw our hands.

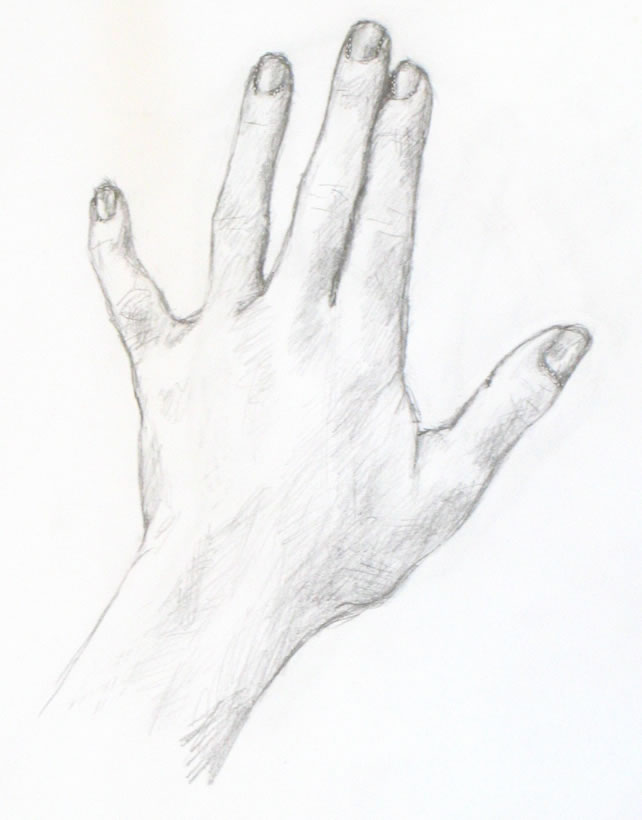
Finished basic sketch of hand.

I chose hands because they are always available to “pose” for you!  And they can be placed in an infinite variety of simple or challenging positions.  The techniques you’ll learn from these lessons can be applied to drawing anything and everything else.

This first lesson is a simple drawing of the back of your hand.  This is the hand at its most basic, with no odd angles or foreshortening.  Future lessons will become more complex as we go along.

Materials you’ll need:

You can use any kind of paper.  I used plain printer paper and a Papermate “Sharpwriter” #2 pencil.  These are very unsophisticated materials, which I love using to practice drawing.   They’re easy to find, so you can do a quick sketch any time you have a bit of free time.

Set up your work area:

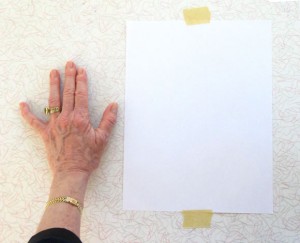
Set up for first simple drawing of the hand

First, tape a piece of paper to a table where you’ll have space to put your non-drawing hand next to it.

Place your non-writing hand (your left hand if you’re right-handed and vice versa) next to on the table very close to the paper.

You will need to stand up while you sketch so that you’re viewing your drawing (and your hand) from directly above.  If you sit down, you’ll be seeing your paper at an angle, which will make you distort your drawing.

Alternatively, you can use an easel, either a table easel or a free-standing one.  You will then need to place your hand vertically on the easel so you’re viewing it from the same angle as your paper.

Ideally you should stand up while you draw, whatever you’re using.  Standing will give you most perspective so you can do your best work.

Placing your hand

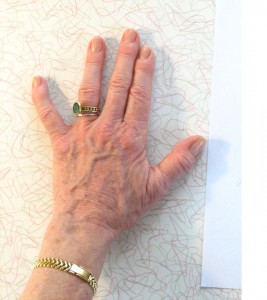
Place your fingers as I've done here: first two close together and the others separated by different amounts.

Place your hand with the first two fingers touching each other, really snuggled up together.  Your ring finger should be somewhat separated from the first two.  Your pinky should stretch out at a more distant angle.  Place your thumb with a good space between it and the rest of your fingers.

These differing amounts of space between your fingers will help you see the “negative space” between and around your fingers and hand.  You can read more on why this is true here.

To me, the ability to see negative space is the key to drawing anything.  Focusing on the space around what you’re trying to draw tricks your eye into seeing more accurately.  It’s an extremely important skill for you to develop!

Begin by drawing negative space

First, look carefully at the space between your pinky and ring fingers.  It’s roughly a triangle. The top of the “triangle” is created by an imaginary line connecting the tops of the two fingers (we’ll erase this line at the end of sketching the entire hand).  I’ve placed black lines on top of the photo of my hand to help you see this.

Don’t look at the fingers themselves!  Forget that you’re drawing fingers.  Focus on the space between the fingers and draw it, as I’ve done in the middle image below.  Form each angle of the shape as accurately as you can.  Then move on to the triangle between the next two fingers, as in the far right image below.

Begin by drawing the spaces between your fingers. Don't look at the fingers! Focus on the spaces between them.

The “triangles” are each tipped at a different angle.  Be sure to draw your “triangles” tipped just the way they are in your hand.

Between the next two fingers is a line (see below), not a space, because of the way we’ve placed the fingers.  Look at this line carefully and replicate it in your drawing.  At the top of the pointer finger is a little tiny triangle formed against the middle finger.

Between the first two fingers is a line. There's another large sort-of triangle formed by the thumb.

Now sketch the sort-of-triangle between the pointer and thumb.  You can see that I made a mistake in drawing my first line.  My second, lower line is more accurate, but for now I’m leaving both.  We want to keep moving forward quickly, and will erase mistakes later.

Next I formed the edge of the pinky finger (see below), again envisioning it as a triangle, this one long and almost flat.

I have an odd little crook in my pinky from slamming it in a hotel balcony door a few years ago.  It’s a bit sad, but I’m using all its angles to help in my drawing.

The outside edge of the pinky is formed by visualizing another triangle. The edge of the thumb uses reference lines (dashed), one of which I drew, others which I just envisioned.

Moving on to the bottom line of the thumb and hand: To help figure out where the line should cut in to form the wrist, I drew a faint vertical line from between the first two fingers downward.  You can see this very light line in my drawing (farthest right, above).  Because of the particular position of my hand, my wrist appears to emerge not from the center of my hand, but from the area beneath the ring finger and pinky.  Sketching the light vertical line helped me draw the wrist where it actually is.

I then captured the ins and outs of the bottom line of the thumb and hand by visualizing more imaginary reference lines forming right angles with the top of the thumb (drawn in dashed lined on the photo of my hand, left above).

Another time, I might have sketched this line using a triangle visualization, as I’ve been doing up to now.  There’s no right or wrong here.  The more of the hand you draw, the more reference points you have to judge where your next lines should go.   You should use whatever reference points enable you to see where the line is in reality, hence where you should draw it on your paper.

Positive space can be negative, too!

Now that we’ve completed the outline of the hand, are we finished with negative space?  Not at all!  Let’s take a look at what happens when we begin to sketch in fingernails.

Nails and finger tips can be envisioned as negative space for each other.

Here we’re repeating the same kind of process we used to draw the negative space between the fingers.  Here the fingers around the fingernails are the “negative space” of the nails.  Seen another way, the fingernails are the negative space of the tips of the fingers surrounding the nails.

Draw each nail carefully.  Observe how much finger appears on either side of each nail – they are all different!  If you draw them all the same, according to some idea of where the nails “belong,” you will miss an opportunity to make your drawing appear three-dimensional and real.
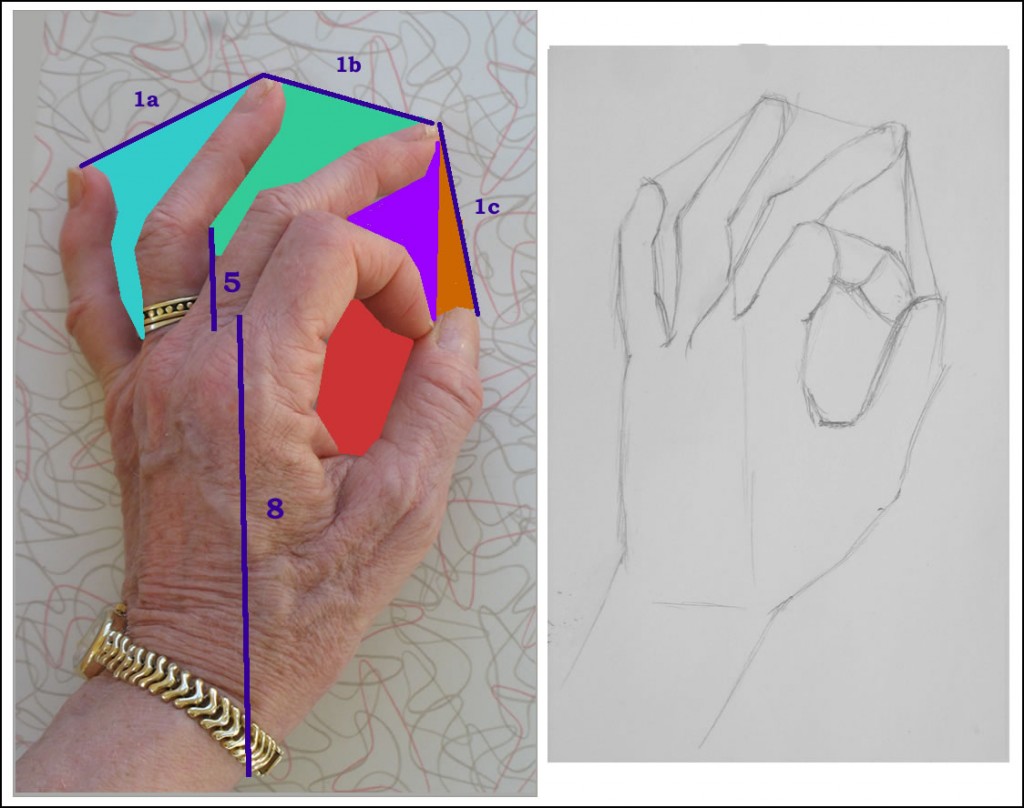
For example, the nail on my ring finger (above) has almost identical bits of finger tip around it.  But my middle fingernail has more finger tip on the right side than on the left.  And my pointer nail has hardly any skin showing on its left.

Notice the different angles and shapes of top and bottom lines of each nail. They are all different: my middle nail appears to have a shallower curve at the bottom, while my ring finger nail has a deeper curve at the bottom.  You need to draw each of them as they really are, not as you think they should be, if you want to create a realistic drawing.

Adding shading

The process of adding shading is very much the same as what we’ve been doing all along:  seeing shapes and areas in relation to each other.  The only new thing we’re adding now is learning to see values – which shadows are darkest?  Which are barely there?

The best way to judge where you should shade is to squint your eyes so that you see only the most basic areas of light and dark.  This is easiest when you have a strong light source that throws deep shadows.  But even minimal shading can be detected by squinting hard.

On the photo of my hand below, I’ve drawn dotted lines around areas of shade that I first noticed and shaded in with my pencil.

To see areas of light and dark, squint your eyes really hard.

As I shade in, I also continue to refine the outlines of each finger and the hand, adding the subtle variations to the rough “triangles” I sketched at the very beginning of the lesson.  Looking for shadow and light helps me see details of the outline as well.  You can see how I worked through this in the very short video below.  You’ll need to watch it through several times because the changes are subtle (next lesson I’ll use darker drawing tools so you can see more clearly).

{"numImgs":"14","constrain":"height","cvalue":"450","shellcss":"width:331px;padding:4px;margin:14px auto 0;"}

As you work, keep looking and looking at specific areas and at your entire hand as a whole, comparing dark and less dark shadows.  Pencil more heavily in areas – such as the line between the pointer and middle finger – which are very dark.  Use a lighter touch for lighter shadows.

Note super-light areas by squinting hard.  If they’ve gotten too dark, you can use the edge of your eraser to lighten them.

Even your nails have highlights and shadows.  Try to see and replicate them accurately.  Look at the nail beds – the skin touching the nails.  It’s shaded in some places and light in others.  I made all my nail beds too dark, so I lightened them at the very end.
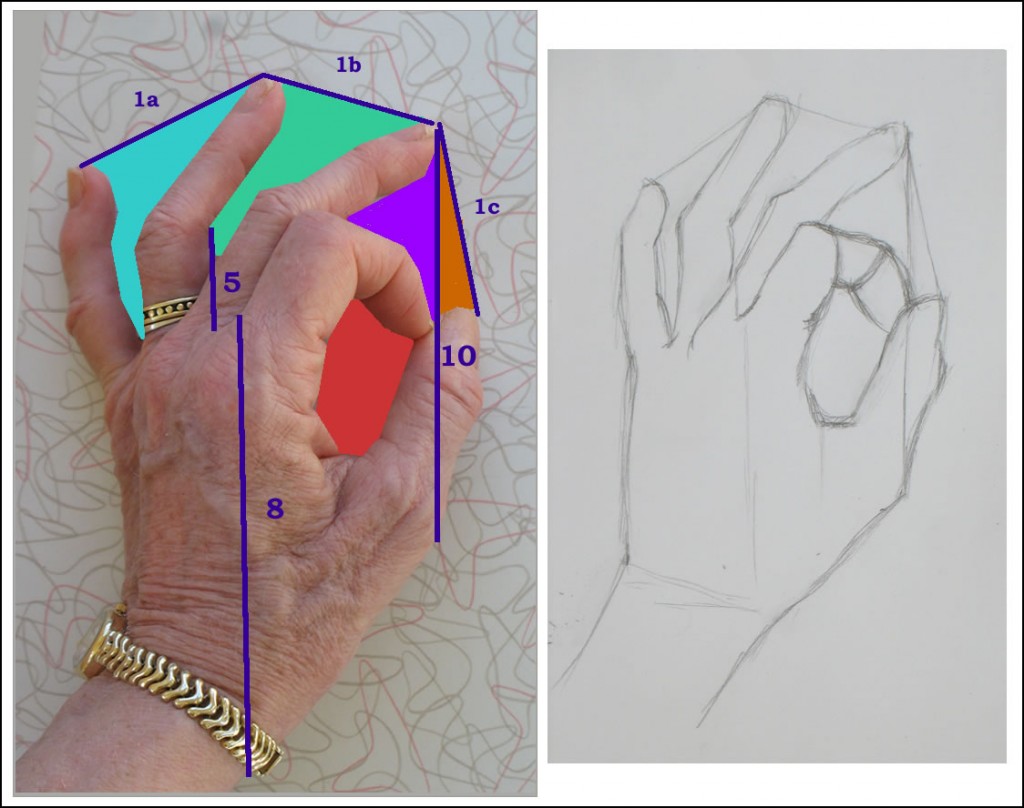
I hope you’ve enjoyed and learned from this lesson!  We’ll do a different view of your hand next lesson.