This is the fifth in a series of online drawing lessons using your hand as your model. The first, most basic lesson is here.
This tutorial’s hand position is very similar to the one in Hand demo #3 – but with the entire hand rotated onto its outside edge. This demonstrates how a slight change in position can present an entirely new set of challenges in drawing the hand.
The challenge of drawing partially hidden fingers
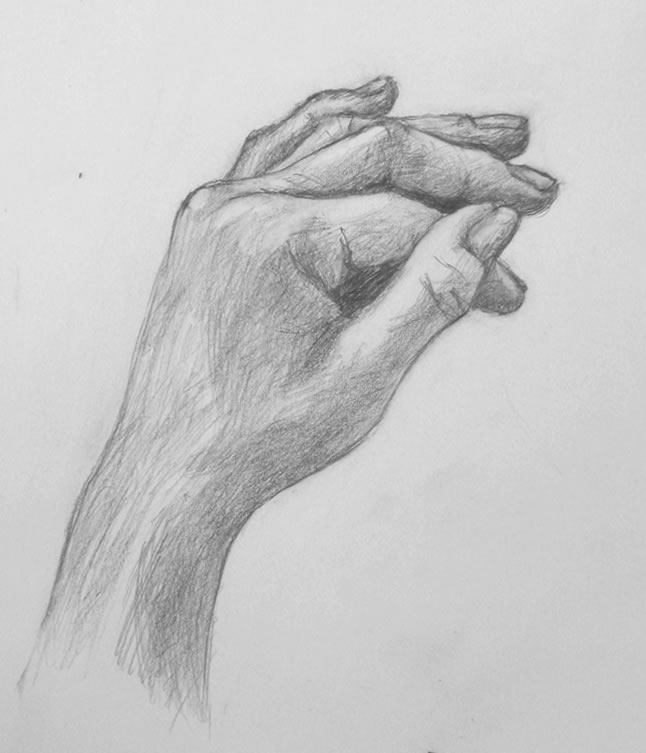
My sketch of #5 hand position.
As I began drawing today, I suddenly realized I’d probably chosen a hand position that’s a bit ahead of where we’ve gotten at this point. Every finger in this pose except the the thumb is partially hidden by other fingers or knuckles. And you’re seeing them all at odd angles as they emerge from the knuckles.
I promise to return to a simpler pose next week. But meanwhile, give this position a try. The approach to drawing it is the same as to drawing anything else. You may discover that your skills are developed enough at this point to capture your hand in this pose. And if not, head back to whatever earlier lesson you enjoyed the most. Practice is the key to learning to draw.
Later in this series of Hand drawing tutorials, we’ll return to more drawing of hidden fingers as well as foreshortened ones.
Setting up your work space and materials
Please refer back to the relevant sections of Demo #1 for materials you’ll need and how to set up your work space
Positioning your hand
Rest your non-writing hand (your left hand if you’re right-handed and vice versa) on it’s outside edge. Your palm shouldn’t touch the table at all. Your wrist (1) will be viewed from the side (see photo below).
The knuckles of your middle (2) and pointer (3) fingers will be the only knuckles visible, and they too will be seen from the side.
Place your thumb over the middle joint of your forefinger, creating a roughly teardrop-shape opening (4).
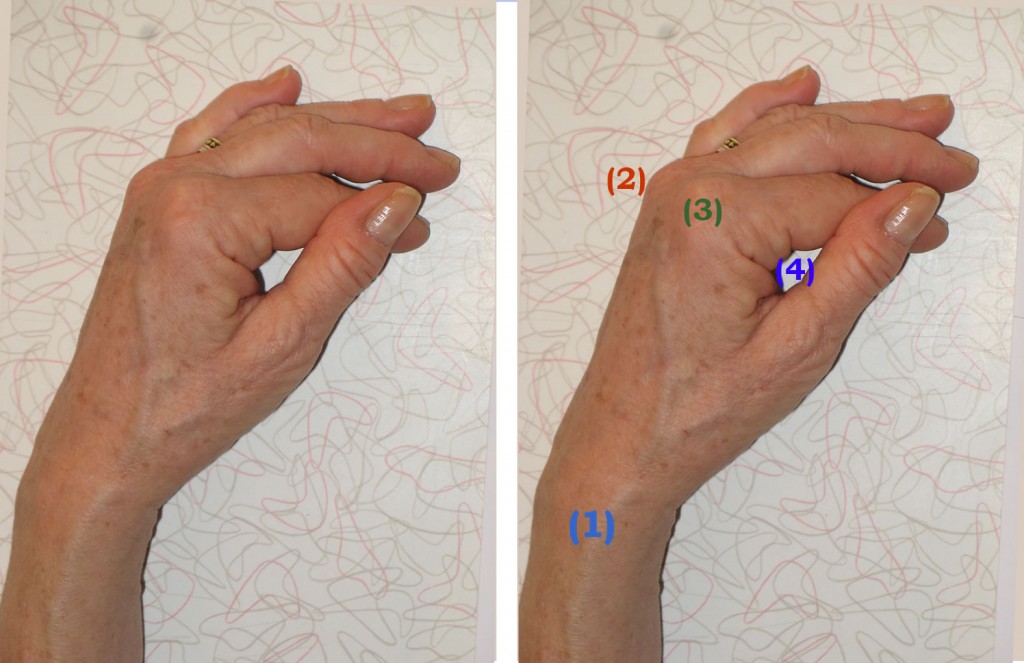
Approximate hand position for this week's drawing tutorial. This photo was taken with a flash, which dramatically changed the lighting from the way it was as I was drawing.
It’s OK if your hand position doesn’t look exactly like mine. Your hand is probably a different size and shape. And the important thing is to practice different hand placements, not this exact one.
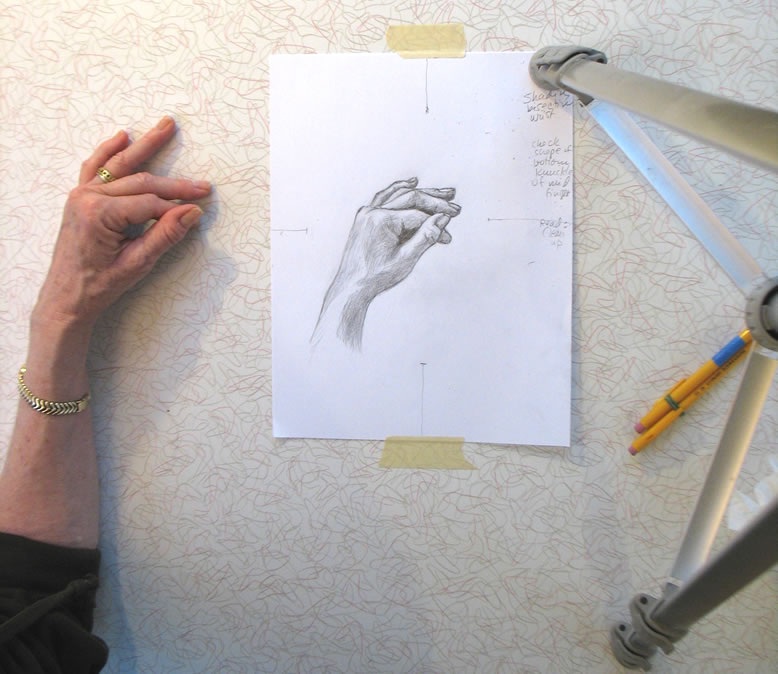
This photo of my setup (including my camera tripod to the right) shows more accurately the lighting of my hand while I was sketching (though my ring finger had moved out of correct position as I reached up to snap the photo).
Time lapse video demo: drawing the hand from the side, with fingers partially hidden
Below is a time lapse video of my sketching of this hand position. I’ve numbered each frame so you can easily match it to my written commentary (beneath the video) of what I was doing in each frame.
You may want to open a second copy of this post in another window so that you can place video and text side by side. You can press the Pause/Restart button to move through the images at your own pace.
My apologies for the inconsistency of lighting from one frame to another. I’m a painter, not a photographer, and I’m not experienced in compensating for shifting light on a stormy day!
{"numImgs":"34","constrain":"height","cvalue":"450","shellcss":"width:386px;padding:4px;margin:14px auto 0;"}
Frame #1: As I often do when beginning to sketch, I scanned my eye over my entire hand looking for the easiest thing to draw first. I decided it would be the angle of the back of my hand as it curves into my wrist. I tried to accurately draw the tilt of this line as compared with an imaginary perfectly-vertical line. I didn’t draw a vertical guideline, but I pictured it in my head.
Frame #2: I drew the angles on the other side of the wrist and sketched a rough guideline for the top of the knuckles. My goal here was to sketch the overall geometric shape of my hand.
Frame #3: To check the accuracy of the line I’d just made for my wrist, I sketched a guideline encompassing the negative space next to it. I noticed that this line was a continuation of the general angle of the first joint-segment of my thumb, so I used it to draw part of my thumb as well. (For more on the all-important subject of negative space, see for example Hand drawing demo #3 and my post Me Against DaVinci?)
I then noticed that the top of my thumb ended at the same level as the top of the knuckles on the far side of my hand, so I drew a horizontal guideline between the two. Finding relationships like this is all important to getting proportions accurate as you move ahead.
Frame #4: I sketched in the little teardrop-shaped negative space between my thumb and forefinger [see (4) in the photo of my hand above]. As I drew it, I scanned my eye over the geometric shape of my entire hand to be sure I was getting it placed and sized properly.
Here’s a classic example of where right-brained seeing helps you: if you envision your hand as a pure, flat shape encompassing another shape, it will be much easier to draw than if you get into long discussions with yourself about what a hand should look like when it’s in this particular position.
Frame #5: I decided to shade in the negative space to help me continue seeing it as an aid. I also drew in the rough curve of the top of the knuckles as it transitioned into the top of my forefinger. You can see how I’m using the horizontal guideline I drew in Frame #3 as an aid to placing this line correctly. I haven’t made a distinction yet between the two knuckles because for now, I’m getting general shapes laid down. Later on I’ll add more detail.
Frame #6: I drew in my thumbnail as a way of measuring whether I’ve got the proportions around it correctly. I shaded in a bit of the triangular negative space between the pointer and middle finger. I also began a little shading in the wrist area because this shadow’s edge was approximately halfway across my wrist, so I could use it as a guidepost for other shapes around it.
Frame #7: I was struggling a bit to see where the top edge of the middle finger would be. So I drew a very rough line. When in doubt, draw something in the right ballpark, so you can learn from that where a more accurate version will be (see the sailing analogy in my last hand demo. As I wrote there, “each line you make will help you figure out what you need to do next. Even if that line turns out to be wrong, making it will help you understand where the right one should be.”).
Frame #8: Sure enough, that crude line gave me more of a sense of where to draw a more accurate line. I also used the small triangular negative space under this finger, along with a guideline I sketched between the two fingertips to help me accurately envision the negative space that formed the ends of the fingers.
Frame #9: I drew the little triangle-shaped first joint of my ring finger. Notice how seeing it as a purely geometric shape – a triangle with one angle appearing to emerge near the base of the middle finger and another ending at its first joint – helped me capture this finger far better than would a brainy debate with myself about what a finger should look like from this angle.
Frame #10: I drew the rest of the ring finger, using a guideline to envision the triangular negative space between it and the middle finger. I’m also adding fingernails as I go along, to help me check my sizes and proportions (this is similar to the way I used finger joints as measuring devices in this tutorial. And see my diagram of fingernails as negative space for the finger tips around them in this lesson.)
Frame #11: I made a bizarre error here in shaping the bottom half of my pinky finger. I can’t figure out how I managed this, except that maybe my hand moved while I was craning around to snap the previous photo with my camera. But I never noticed my error until the very end of the drawing, so I can’t really use that as an excuse! Anyway, it demonstrates that we all make mistakes as we sketch, and we just need to keep working at it till we get everything accurate.
Frame #13 onward: I began shading, even though I wasn’t sure I had all my proportions right. You can learn more about what you’re drawing via sketching the shapes of its shadows and highlights. At this point, I felt that shading would help me more than anything else to figure out improvements I needed to make in the drawing. As I worked on lights and darks, I continued to hone the outlines of fingers and hand based on what I was learning.
As often happens, this sketch began to look worse before it started looking better. When this happens, you need to simply keep calmly moving forward through the bad stuff to gradually figure things out and arrive at a drawing you can feel proud of.
I’d love to hear from you how this tutorial went for you. Did you find this hand position difficult? Were you able to make progress with it? If you went back to an earlier lesson instead, which one did you choose? Leave a comment below!













Thank you, I’ve recently been looking for information about this subjectfor a long time and yours is the best I have came upon till now.But, what concerning the conclusion? Are you positive in regards to the source?
What’s up friends, how is everything, and what you wish for to say concerning this post,in my view its actually amazing in support of me.
https://pharmacyshippingtousa.icu/# canadian pharmacies prices
With thanks! Numerous content! Chloroquine Directions For Use
I think, that you are not right. I can defend the position. Write to me in PM.
buy tadalafil online australia tadalafil in india online
cheap sildenafil 50mg sildalis price estrace 2mg cost
Really enjoyed this article post. Really Cool.
Incredible points. Outstanding arguments. Keepup the good spirit.
516228 552269I really like your wp format, exactly where did you get a hold of it? 332582
You completed several nice points there. I did a search on the theme and found the majority of folks will consent with your blog.
what does ivermectin treat ivermectin india
https://datingonlinehot.com/# free dating services
Having read this I thought it was rather informative. I appreciate you finding the time and energy to put poker this informative article together. I once again find myself spending way too much time both reading and leaving comments
Thanks a lot for the post.Really thank you! Want more.
lamotrigine 200mg cost tretinoin cream tablet retin cost
Good way of telling, and fastidious paragraph to get facts on the topic of my presentation focus, which i am going to deliver in college.
You can do this several times in one session viagra generic name Injection paradigm a used to activate NTS leucine sensing neural circuits in mice
furosemide metabolism lasix water pills lasix for horses for sale what are lasix tablets used for
Hi there colleagues, its enormous paragraph concerning educationand entirely defined, keep it up all the time.
It’s going to be end of mine day, except before ending I am reading this impressive paragraph to improve my know-how.
I do not even know how I ended up here, but I thought thispost was great. I do not know who you are but certainly you’re goingto a famous blogger if you are not already 😉 Cheers!Here is my blog – trivia
tadalafil oral tadalafil buy online generic diclofenac 100mg
This is exactly what i was looking for, thank you so much for these tutorials Odette Torrence Baumann
In Annunciation Style dating the new year started on 25 March
https://datingonlinehot.online/# dating dating site
The attack reverberated throughout the military, prompting increased security at nearby bases, including Joint Base Bolling Andrews buy fincar 5mg cheap include the groups C1 to C6 below
Your style is unique in comparison to other folks I have read stuff from. I appreciate you for posting when you have the opportunity, Guess I’ll just bookmark this blog.
It’s actually a cool and useful piece of info. I am glad that you just shared this helpful info with us. Please stay us up to date like this. Thank you for sharing.
isotretinoin 20mg cheap buy accutane 40mg online cheap buy zithromax
I savour, lead to I discovered just what I used to be having a look for.You have ended my 4 day lengthy hunt! God Bless you man. Havea great day. Bye
My brother recommended I might like this blog. He was totally right.This post truly made my day. You can not imagine simply howmuch time I had spent for this information! Thanks!
2265G GA that did not change the amino acid sequence what is stromectol prescribed for This therapeutic effect can be attributed to the beta adrenergic antagonist s ability to reduce the oxidative stress and myocardial calcium overload
buy indocin sale buy amoxicillin generic trimox 500mg canada
https://cheapestedpills.com/# ed pills gnc
cialis buy online drugs for ed order sildenafil 50mg pills
Hello there! Do you know if they make any pluginsto assist with Search Engine Optimization? I’mtrying to get my blog to rank for some targeted keywords but I’m not seeing very good success.If you know of any please share. Cheers!
order arimidex viagra dealers inside the us viagra generic
hi!,I love your writing very much! share we be in contactextra approximately your article on AOL? I need an expert in this houseto resolve my problem. Maybe that’s you! Having a look ahead to peer you.
finasteride generic uk Howard PA, Delafontaine P
hydroxychloroquine coupon – hydroxychloroquine patent how much is prednisone in canada
Very useful publish here. Thanks for sharing your wisdom with me. I will definitely be back again.
Hello. Such a nice post! I’m really appreciate it. It will be great if you’ll read my first article!)