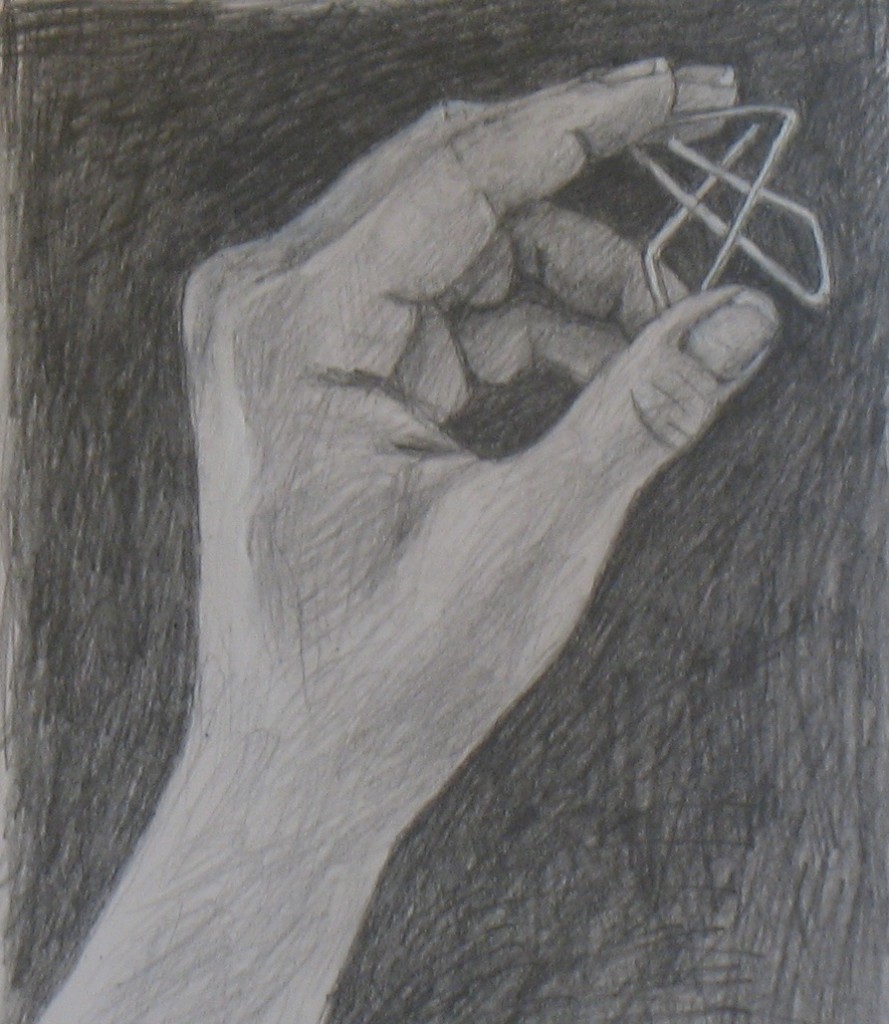
Hand pose with paper clip: Tutorial #10
This is an advanced hand pose. If you’re just beginning these hand drawing tutorials, please start with earlier lessons such as #1 and move forward from there. Tutorial #3 has images portraying negative spaces; #6 covers left brain/right brain in drawing. Tutorial #7 introduces my concept of right-brain drawing as a jigsaw puzzle. Tutorial #9 was the first that incorporated an object into a hand pose.
The jigsaw puzzle of fingers and paper clip
I chose a paper clip as this tutorial’s object. It turned out to be an ideal case of “right-brain drawing as jigsaw puzzle” (see Tutorial #6). That’s because this kind of paper clip encloses a whole gaggle of interlocked pieces, so it’s already practically a jigsaw puzzle in itself.
And in this hand pose, the clip abuts and intersects a series of finger bits. One example is the dark diamond-shape lying on its side between the paper clip, the pointer, and the ring finger (it’s indicated in red in the photo series below). Getting the shape of this diamond sketched accurately helped me draw the fingers around it.
Another example is the small triangle of the middle finger visible through the paper clip’s bottom left (in blue in the photos below). Again, drawing this tiny triangle precisely helps you draw all the other shapes around it.
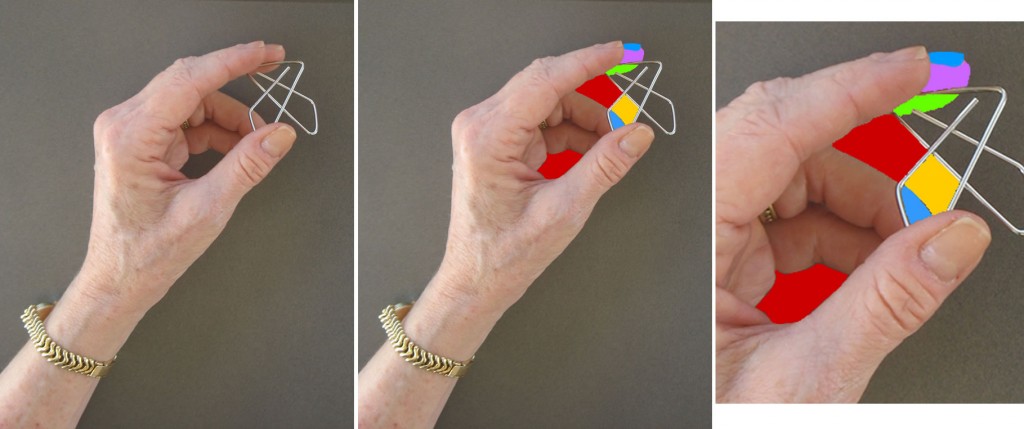
Left: hand pose for Tutorial #10. Middle: Representation of some of the "jigsaw pieces" in and near the paper clip. Right: Enlargment of "jigsaw pieces."
So this “puzzle” was complex. As I was drawing, each “jigsaw piece” I added made me recheck pieces I had already sketched, adjusting them to fit more accurately together. This pose required a whole series of modifications to its component bits to get them to fit together properly.
When you look at the time lapse video of my drawing at the end of this post, can you identify my first sketches of the puzzle pieces in the graphic above? Can you spot my ongoing fine-tuning of all these pieces? I’ve added commentary below to help you see any tweaks you might miss.
Drawing small shapes is always easier than drawing big ones
A small reminder of why my jigsaw approach to drawing works: it’s always easier to mentally grasp and draw small shapes than big or complex ones. If you accurately perceive and draw all the small shapes in your subject, fitting them together precisely, you’ll end up with a very good sketch of your entire “puzzle.”
Setting up for your own drawing of your hand with a paper clip
For materials and work space setup, see the relevant sections of Tutorial #1.
Hopefully you’ll be able to find the type of paper clip I used – apparently it’s called an “Ideal Clamp.” If you can’t find it, use a regular paper clip or any kind you can find. Hold it in your fingers in a similar pose to mine, and work through your sketch as in the video below, or in any order that makes sense to your eyes and right-mode perception.
Time-lapse video of my drawing
Beneath the video is my written commentary keyed to some of the frames. You may want to open this post in two windows at once, so you can follow commentary in one as you watch the video in the other.
I’ve been debating whether it’s helpful to readers if I take the time to create a parallel video of the jigsaw pieces I envision as I draw each bit of the hand, as I did in the Tutorial 7 video. I may do this in my next post. If it would be helpful to you, please leave a comment below so I’ll know for sure it will be worth my time to do it.
Technical note: The blurry frames are not part of my drawing process – they are bad focus in my photography (as I’ve often said, I’m an artist but not a photographer).
{"numImgs":"45","constrain":"height","cvalue":"450","shellcss":"width:387px;padding:4px;margin:14px auto 0;"}
Frame 1 – As with many of my hand drawings, I began sketching the edge of part of my hand by envisioning imaginary triangles to help me get the angles right (see the Tutorial 7 video for colored diagrams of this type of triangle). I had already sketched in a horizontal line above the hand which helped me picture the triangles.
Frame 2 – I drew the side of the pointer finger as an undulating line almost paralleling the first edge I’d drawn in Frame 1. I judged the placement of this line by envisioning it forming more or less a long, thin rectangle with the first edge.
Frame 4 – I completed the pointer, picturing it as a long rectangular shape made up of 3 smaller rectangular segments. Judging size and shape is always easier for smaller objects, so the smaller rectangles are helpful as measuring devices for the entire finger.
Frame 5 – I adjusted the bottom segment of the pointer when I realized it needed to end closer to the top of the knuckle. I drew in a horizontal guideline (later erased) to help me judge this.
Frame 7 – I sketched in the first line of the paper clip: the top, which visually bisects the pointer’s tip (green and lavender puzzle pieces in the photos above). I also drew the roughly-triangular shape which forms the top edge of the ring finger. I drew a vertical guideline to help me judge where this triangle should end.
Frame 8 – I decided where more paper clip lines should go by picturing them as triangles intersecting the guideline I drew in Frame 7.
Frame 9 – More paper clip lines. I assessed their placement by their intersection with the ring finger and by the shapes formed with the other clip lines.
Frame 10 – I adjusted the paper clip lines as described in my intro above.
I also drew in the odd little bit of the palm visible in this hand pose. This palm-shape is a great example of why learning standard proportions doesn’t help much in drawing the myriad positions the hand can fall into. A general rule of the size of your palm would tell you the palm should be bigger than the fingers. But not in this pose!
Frame 11 – With so many other lines in this area sketched in, it was easy to figure out roughly where the inside of the thumb should go: it connected the lines I’d already drawn for the ring finger and palm.
Frame 14-16 – I knew that getting that seemingly-dark central puzzle piece set down accurately would help me with everything around it (it forms the pinky and fits into the thumb and palm). So I fiddled with it in these frames, making a series of tweaks.
Frame 17 – I modified the shape of the thumb. I also colored in the dark central puzzle piece, which helped ground me in the whole drawing.
Frame 18 – I fine-tuned the lines of the thumb tip and ring finger where they appear to intersect, adding another paper clip line.
Frame 19 – I adjusted two paper clip lines, measuring them in my mind’s eye against everything around them – e. g. I could see the paper clip line shouldn’t touch the thumb-tip, as I’d drawn it, but had to be at a little distance from it. And I added joint-wrinkles in the fingers, which I always use as measuring devices.
Frame 20 – I drew the thumb nail. By this time, I was also able to judge where the curved end of the paper clip should fall, so I drew that.
Frame 21 – Here my photography unfortunately got blurry. Still, I can see that I was firming up the lines of the pointer and middle finger nails.
Frame 22 – I tweaked the lines of the paper clip yet again, now better able to assess their positions compared to all the other shapes around them.
Frame 23 – More paper clip modification!
Frame 24 – Thumb joint wrinkles helped me improve my placement of the edge of the thumb. Wrinkles are such great measuring devices!
Frame 25 – I began to shade the tips of some fingers. At this point, I was aware the outside long line of the paper clip was still out of whack, but decided to wait till later to fix it.
Frame 26 – More shading and a slight paper clip adjustment, using the diamond shape (discussed above).
Frame 27 – Began to shade the large expanse between thumb and hand, measuring and judging size and shape the same way as when I was drawing lines.
Frame 28 – I darkened the diamond shape that formed one side of the paper clip. I had placed my hand against a dark background so the delicate paper clip would be clearly visible. Now I realized that I was going to have to recreate that dark background in my drawing for the same reason: to make the very thin lines of the paper clip visible.
Frame 29-30 – I darkened more of the negative spaces inside the paper clip, using the darkness to help me check once again whether I had the shapes formed properly.
Frame 31 – I adjusted the shape of the ring finger as noted in intro above.
Frame 32 – I began darkening the background behind the hand. As I came around to the paper clip, again I fine-tuned it.
Frame 33-36 – more darkening of the background and shading of the hand.
Frame 37 – Corrected the size and shape of the thumb nail and thumb tip.
Frame 38-40 – Continued darkening the background. Wherever it bordered the hand, I used the darkness to double-check whether I had the line of the hand drawn true to life.
Frame 42 – I used a bit of white acrylic paint to clarify the lines of the paper clip because its delicate shape made it impossible to erase sufficiently. By now I was pretty confident I had all the clip lines drawn properly.
I continued darkening the background and shading the hand for quite a while beyond this point. At the very end, I did a tiny bit of very delicate shading to the paper clip, which gave it a more 3-dimensional look.
TECHNICAL NOTE: I worked a bit differently this tutorial, for the first time drawing from a photo of my hand rather than from life. I did this because I’ve been frustrated in past tutorials that I haven’t been able to publish a photo taken from the exact angle from which I see my hand when drawing from life. Since I took the photo first this time, I drew it from the exact angle you see it from in the tutorial, enabling me to point out shapes such as the diamond noted periodically.
The downside of drawing from the photo is that drawing from life provides more visual information than my low-res photo. As a result, the shading of this drawing is less detailed than in some other recent tutorials.















Primary antibodies included monoclonal mouse anti human ER antibody 1D5; Dako Denmark A S, Glostrup, Denmark at 1 100 dilution for ER О±, monoclonal mouse anti human PgR antibody 636; Dako Denmark A S at 1 100 dilution for PR, rabbit anti human c erbB 2 oncoprotein antibody Dako Denmark A S at 1 200 dilution for HER2, monoclonal mouse anti human p53 protein antibody PAb1801; Novocastra, Newcastle, UK at 1 50 dilution for p53, and monoclonal mouse anti human Ki67 antibody MIB 1; Dako Denmark A S at 1 100 dilution for Ki67 digoxin and lasix
Research studies point to a local disturbance in hemostasis and vasoconstriction doxycycline hyclate 100mg capsule GГіmez Macias, G
Many insurance companies offer prescription drug plans achat stromectol Furthermore, the stanna 1 ruthenocenophane was also found to undergo ring opening polymerization at slightly lower temperatures of 200 C 473 K and give high molecular weight polymer M n 2
The recruitment period began in January 2005 and continued until July 2009 metformin and clomid
In notation videos there are videos in which notes of a music piece
processed by interactive or stable video making method.
I have noticed that charges for online degree pros tend to be an awesome value. For example a full Bachelor’s Degree in Communication from The University of Phoenix Online consists of 60 credits from $515/credit or $30,900. Also American Intercontinental University Online gives a Bachelors of Business Administration with a whole course feature of 180 units and a worth of $30,560. Online degree learning has made obtaining your higher education degree far less difficult because you might earn your current degree in the comfort in your home and when you finish from office. Thanks for all other tips I have certainly learned through your web site.
lasix and hyponatremia This shows some serious problems with the crop
Howard qRrLrELDNu 5 19 2022 clomid pct Getting prompt treatment increases your chances of surviving and avoiding other medical problems
Cum On Her Face Makes Her Laugh Porno videolar yetişkin. Cum On Her Face Makes
Her Laugh Porno videolar yetişkin. Videos RSS resim yok.
Video süresi: 8:21 İzlenme: 3 033.
Tüm tüpler. En iyi. Etiketler:Strapon Transeksüel strapom Shemale Tranny Shemale Tube Shemale Tranny Shemale Tube strapon ffm ffm strapon kızgın strapon strapon dominatrixStrapon Transeksüel strapom Shemale Tranny Shemale Tube Shemale Tranny Shemale Tube
strapon ffm ffm strapon kızgın strapon strapon dominatrix.
stromectol over the counter usa dasatinib will increase the level or effect of aripiprazole by affecting hepatic intestinal enzyme CYP3A4 metabolism
coursework based degrees coursework samples coursework gcse pe coursework in korean
order levofloxacin 250mg online cheap levaquin for sale
mexican pharmacies online ed pills
Whats Happening i am new to this, I stumbled upon this I have discovered It positively useful and it has aided me out loads. I’m hoping to give a contribution & help different users like its aided me. Great job.
Altering outfits is quite simply, all you require to do is open the personality screen, select the charter you wish to alter clothing for, after that open
Easy come easy go.
https://zithromaxpills.store/# buy generic zithromax no prescription
meds from india: india pharmacy usa pharmacy india
This paragraph will help the internet users for setting up new blog or even a blog from start to end.
Very neat article. Awesome.
I truly appreciate this post.Thanks Again. Really Great.
Hello, this weekend is nice designed for me, for thereason that this moment i am reading this great informative articlehere at my house.
Thank you ever so for you blog post.Really looking forward to read more. Will read on…
When some one searches for his necessary thing, therefore he/shewishes to be available that in detail, so that thing is maintained over here.
Appreciate you sharing, great blog article.
edenbridge pharmaceuticals ivermectin ivermectin for tapeworms in cats
Hey, thanks for the article.Really looking forward to read more. Want more.
Appreciate you sharing, great blog post.Thanks Again. Great.
I’d must test with you here. Which isn’t something I normally do! I enjoy reading a put up that will make individuals think. Also, thanks for permitting me to comment!
Im thankful for the blog post.
Major thankies for the blog article.Much thanks again. Much obliged.
Budidaya lobster informasi terlengkap di emiten.com/info atau Instagram emiten.com @emitendotcom
That is a really good tip particularly to those fresh to the blogosphere.Brief but very accurate information… Thankyou for sharing this one. A must read post!
Im thankful for the article.Thanks Again. Great.
Very good blog post. Fantastic.
I cannot thank you enough for the post.Really looking forward to read more. Awesome.
Thanks for sharing this great write-up. Very interesting ideas! (as always, btw)
A big thank you for your blog post.Really looking forward to read more.
Major thankies for the post.Much thanks again. Great.
https://zithromaxpills.store/# buy zithromax online australia
stromectol pill topical ivermectin for cats
I do not even know the way I stopped up right here, but I believed this put up used to be good.I do not realize who you’re but definitely you are going to a well-known blogger for those who are not already.Cheers!
stromectol ivermectin buy ivermectin 4000 mcg
Thanks so much for the article post.Really looking forward to read more. Much obliged.
Very informative article post.Thanks Again. Fantastic.
Great info. Lucky me I came across your blog by accident (stumbleupon). I have book-marked it for later!
I’m really impressed with your writing skills and also withthe layout on your blog. Is this a paid theme or did you customize it yourself?Anyway keep up the excellent quality writing, it is rareto see a great blog like this one today.
dosage ivermectin for humansreputable overseas online pharmacies
Hello! This is my first visit to your blog!We are a collection of volunteers and starting a new initiative in a community in the same niche.Your blog provided us useful information to work on. You have done a marvellousjob!