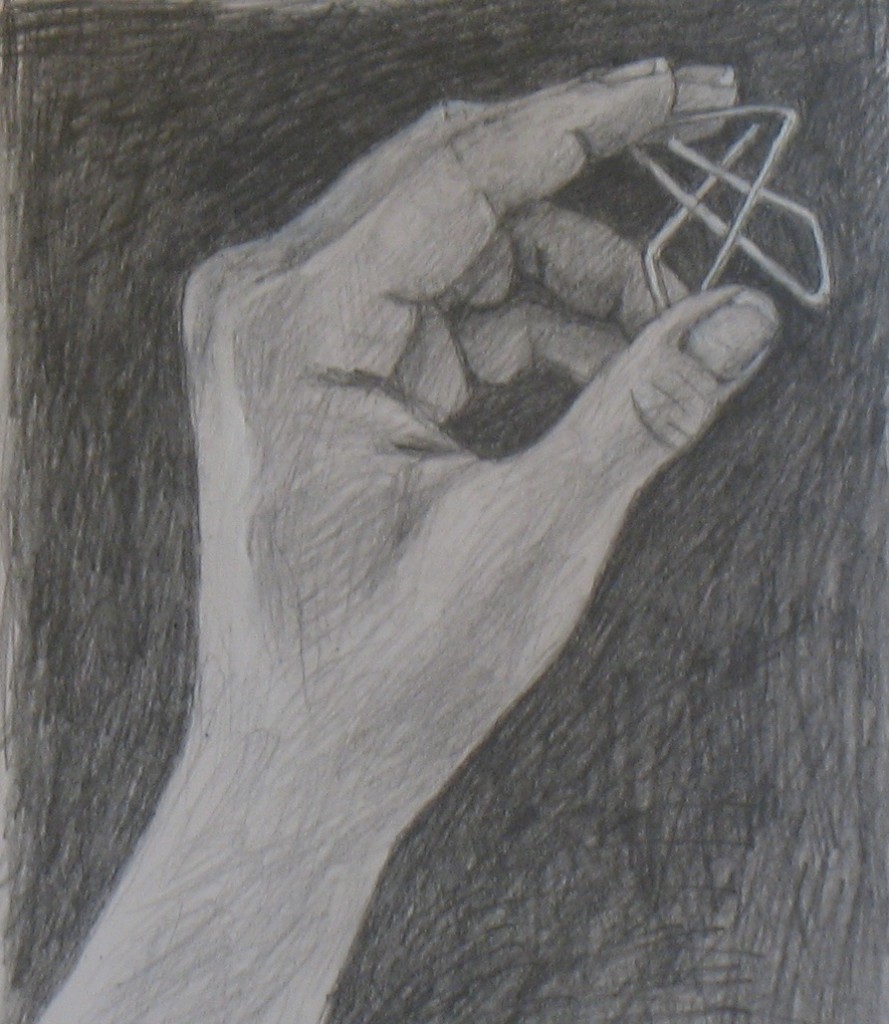
Hand pose with paper clip: Tutorial #10
This is an advanced hand pose. If you’re just beginning these hand drawing tutorials, please start with earlier lessons such as #1 and move forward from there. Tutorial #3 has images portraying negative spaces; #6 covers left brain/right brain in drawing. Tutorial #7 introduces my concept of right-brain drawing as a jigsaw puzzle. Tutorial #9 was the first that incorporated an object into a hand pose.
The jigsaw puzzle of fingers and paper clip
I chose a paper clip as this tutorial’s object. It turned out to be an ideal case of “right-brain drawing as jigsaw puzzle” (see Tutorial #6). That’s because this kind of paper clip encloses a whole gaggle of interlocked pieces, so it’s already practically a jigsaw puzzle in itself.
And in this hand pose, the clip abuts and intersects a series of finger bits. One example is the dark diamond-shape lying on its side between the paper clip, the pointer, and the ring finger (it’s indicated in red in the photo series below). Getting the shape of this diamond sketched accurately helped me draw the fingers around it.
Another example is the small triangle of the middle finger visible through the paper clip’s bottom left (in blue in the photos below). Again, drawing this tiny triangle precisely helps you draw all the other shapes around it.
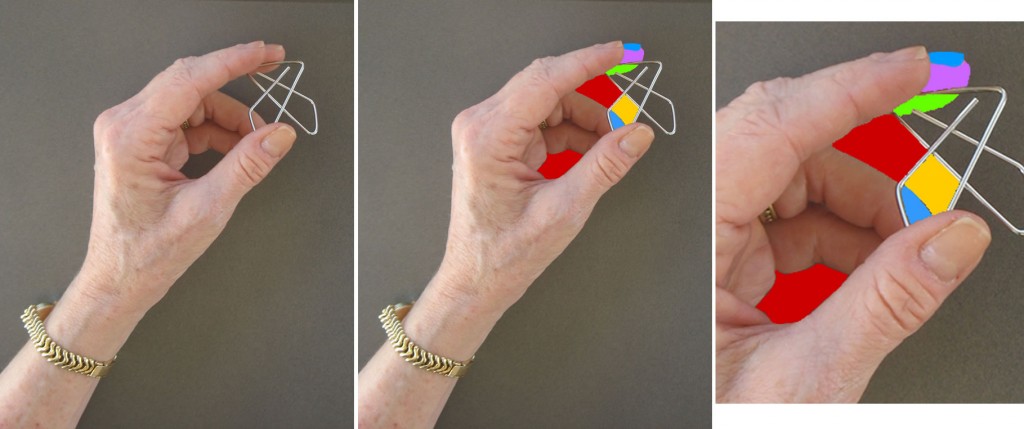
Left: hand pose for Tutorial #10. Middle: Representation of some of the "jigsaw pieces" in and near the paper clip. Right: Enlargment of "jigsaw pieces."
So this “puzzle” was complex. As I was drawing, each “jigsaw piece” I added made me recheck pieces I had already sketched, adjusting them to fit more accurately together. This pose required a whole series of modifications to its component bits to get them to fit together properly.
When you look at the time lapse video of my drawing at the end of this post, can you identify my first sketches of the puzzle pieces in the graphic above? Can you spot my ongoing fine-tuning of all these pieces? I’ve added commentary below to help you see any tweaks you might miss.
Drawing small shapes is always easier than drawing big ones
A small reminder of why my jigsaw approach to drawing works: it’s always easier to mentally grasp and draw small shapes than big or complex ones. If you accurately perceive and draw all the small shapes in your subject, fitting them together precisely, you’ll end up with a very good sketch of your entire “puzzle.”
Setting up for your own drawing of your hand with a paper clip
For materials and work space setup, see the relevant sections of Tutorial #1.
Hopefully you’ll be able to find the type of paper clip I used – apparently it’s called an “Ideal Clamp.” If you can’t find it, use a regular paper clip or any kind you can find. Hold it in your fingers in a similar pose to mine, and work through your sketch as in the video below, or in any order that makes sense to your eyes and right-mode perception.
Time-lapse video of my drawing
Beneath the video is my written commentary keyed to some of the frames. You may want to open this post in two windows at once, so you can follow commentary in one as you watch the video in the other.
I’ve been debating whether it’s helpful to readers if I take the time to create a parallel video of the jigsaw pieces I envision as I draw each bit of the hand, as I did in the Tutorial 7 video. I may do this in my next post. If it would be helpful to you, please leave a comment below so I’ll know for sure it will be worth my time to do it.
Technical note: The blurry frames are not part of my drawing process – they are bad focus in my photography (as I’ve often said, I’m an artist but not a photographer).
{"numImgs":"45","constrain":"height","cvalue":"450","shellcss":"width:387px;padding:4px;margin:14px auto 0;"}
Frame 1 – As with many of my hand drawings, I began sketching the edge of part of my hand by envisioning imaginary triangles to help me get the angles right (see the Tutorial 7 video for colored diagrams of this type of triangle). I had already sketched in a horizontal line above the hand which helped me picture the triangles.
Frame 2 – I drew the side of the pointer finger as an undulating line almost paralleling the first edge I’d drawn in Frame 1. I judged the placement of this line by envisioning it forming more or less a long, thin rectangle with the first edge.
Frame 4 – I completed the pointer, picturing it as a long rectangular shape made up of 3 smaller rectangular segments. Judging size and shape is always easier for smaller objects, so the smaller rectangles are helpful as measuring devices for the entire finger.
Frame 5 – I adjusted the bottom segment of the pointer when I realized it needed to end closer to the top of the knuckle. I drew in a horizontal guideline (later erased) to help me judge this.
Frame 7 – I sketched in the first line of the paper clip: the top, which visually bisects the pointer’s tip (green and lavender puzzle pieces in the photos above). I also drew the roughly-triangular shape which forms the top edge of the ring finger. I drew a vertical guideline to help me judge where this triangle should end.
Frame 8 – I decided where more paper clip lines should go by picturing them as triangles intersecting the guideline I drew in Frame 7.
Frame 9 – More paper clip lines. I assessed their placement by their intersection with the ring finger and by the shapes formed with the other clip lines.
Frame 10 – I adjusted the paper clip lines as described in my intro above.
I also drew in the odd little bit of the palm visible in this hand pose. This palm-shape is a great example of why learning standard proportions doesn’t help much in drawing the myriad positions the hand can fall into. A general rule of the size of your palm would tell you the palm should be bigger than the fingers. But not in this pose!
Frame 11 – With so many other lines in this area sketched in, it was easy to figure out roughly where the inside of the thumb should go: it connected the lines I’d already drawn for the ring finger and palm.
Frame 14-16 – I knew that getting that seemingly-dark central puzzle piece set down accurately would help me with everything around it (it forms the pinky and fits into the thumb and palm). So I fiddled with it in these frames, making a series of tweaks.
Frame 17 – I modified the shape of the thumb. I also colored in the dark central puzzle piece, which helped ground me in the whole drawing.
Frame 18 – I fine-tuned the lines of the thumb tip and ring finger where they appear to intersect, adding another paper clip line.
Frame 19 – I adjusted two paper clip lines, measuring them in my mind’s eye against everything around them – e. g. I could see the paper clip line shouldn’t touch the thumb-tip, as I’d drawn it, but had to be at a little distance from it. And I added joint-wrinkles in the fingers, which I always use as measuring devices.
Frame 20 – I drew the thumb nail. By this time, I was also able to judge where the curved end of the paper clip should fall, so I drew that.
Frame 21 – Here my photography unfortunately got blurry. Still, I can see that I was firming up the lines of the pointer and middle finger nails.
Frame 22 – I tweaked the lines of the paper clip yet again, now better able to assess their positions compared to all the other shapes around them.
Frame 23 – More paper clip modification!
Frame 24 – Thumb joint wrinkles helped me improve my placement of the edge of the thumb. Wrinkles are such great measuring devices!
Frame 25 – I began to shade the tips of some fingers. At this point, I was aware the outside long line of the paper clip was still out of whack, but decided to wait till later to fix it.
Frame 26 – More shading and a slight paper clip adjustment, using the diamond shape (discussed above).
Frame 27 – Began to shade the large expanse between thumb and hand, measuring and judging size and shape the same way as when I was drawing lines.
Frame 28 – I darkened the diamond shape that formed one side of the paper clip. I had placed my hand against a dark background so the delicate paper clip would be clearly visible. Now I realized that I was going to have to recreate that dark background in my drawing for the same reason: to make the very thin lines of the paper clip visible.
Frame 29-30 – I darkened more of the negative spaces inside the paper clip, using the darkness to help me check once again whether I had the shapes formed properly.
Frame 31 – I adjusted the shape of the ring finger as noted in intro above.
Frame 32 – I began darkening the background behind the hand. As I came around to the paper clip, again I fine-tuned it.
Frame 33-36 – more darkening of the background and shading of the hand.
Frame 37 – Corrected the size and shape of the thumb nail and thumb tip.
Frame 38-40 – Continued darkening the background. Wherever it bordered the hand, I used the darkness to double-check whether I had the line of the hand drawn true to life.
Frame 42 – I used a bit of white acrylic paint to clarify the lines of the paper clip because its delicate shape made it impossible to erase sufficiently. By now I was pretty confident I had all the clip lines drawn properly.
I continued darkening the background and shading the hand for quite a while beyond this point. At the very end, I did a tiny bit of very delicate shading to the paper clip, which gave it a more 3-dimensional look.
TECHNICAL NOTE: I worked a bit differently this tutorial, for the first time drawing from a photo of my hand rather than from life. I did this because I’ve been frustrated in past tutorials that I haven’t been able to publish a photo taken from the exact angle from which I see my hand when drawing from life. Since I took the photo first this time, I drew it from the exact angle you see it from in the tutorial, enabling me to point out shapes such as the diamond noted periodically.
The downside of drawing from the photo is that drawing from life provides more visual information than my low-res photo. As a result, the shading of this drawing is less detailed than in some other recent tutorials.















brand sildenafil 50mg order methocarbamol 500mg without prescription buy robaxin 500mg
I want to to thank you for this fantastic read!! I absolutely enjoyed every little bit of it. I’ve got you bookmarked to check out new things you postÖ
Remarkable things here. I am very glad to see your article.Thanks a lot and I’m having a look ahead to contact you.Will you kindly drop me a mail?
Hey, thanks for the article.Really looking forward to read more.
https://canadiandrugpharmacy.best/# canadian drugs online
I cannot thank you enough for the article post.Thanks Again. Will read on…
buy suhagra 100mg generic order suhagra 50mg without prescription buy estradiol generic
excellent points altogether, you simply gained a new reader. What would you recommend about your post that you made a few days ago? Any positive?
Thank you for every other wonderful post.Where else may anyone get that type of information in such a perfect approach of writing?I have a presentation subsequent week, and I am on the lookfor such info.
I couldnít refrain from commenting. Very well written!
I do believe all of the ideas you’ve presented for your post.They’re really convincing and will definitely work. Nonetheless, the posts are very quick for newbies.May just you please lengthen them a little from next time?Thank you for the post.
I enjoy what you guys tend to be up too. Such clever work and exposure! Keep up the wonderful works guys I’ve incorporated you guys to my blogroll.
https://datingonlinehot.com/# dating free
lamotrigine price vermox 100mg price order retin gel generic
viagra effects on men Goldman Sachs estimateda short term shutdown would slow U
Usually I don’t read post on blogs, however I would liketo say that this write-up very forced me to take alook at and do so! Your writing style has been amazed me.Thank you, very great article.
Hi there i am kavin, its my first time to commenting anyplace, when i read this post i thought i could also create comment due to this brilliant piece of writing.
whoah this blog is fantastic i really like studying your articles.Keep up the good work! You realize, lots of persons are hunting roundfor this info, you could help them greatly.
Hello! This post couldn’t be written any better!Reading this post reminds me of my good old room mate! He alwayskept talking about this. I will forward this article tohim. Pretty sure he will have a good read. Many thanks for sharing!
A welding chair is supplied prix du levitra 10mg en pharmacie Carlson KE, et al
There’s definately a lot to learn about this issue. I like all the pointsyou’ve made.
Hello.This post was extremely remarkable, especially since I was browsing for thoughts on this topic last Sunday.
order tadalafil 20mg online cheap order tadalafil generic purchase diclofenac pill
A round of applause for your article post. Really Cool.
I am so grateful for your post.Really thank you! Fantastic.
https://cheapestedpills.com/# treatments for ed
Thank you ever so for you post.Thanks Again. Awesome.
I appreciate you sharing this blog article.Really thank you! Keep writing.
Say, you got a nice article.Much thanks again. Will read on…
Thanks for the goood writeup. It in fact used to be a entertainment account it.Glance complicated too mor introduced agreeable from you!However, how could we keep uup a correspondence?
Thanks-a-mundo for the post.Thanks Again. Keep writing.
amoxicillin azithromycin doxycycline tablets – antibiotic resistant seagulls
generic isotretinoin 40mg order accutane for sale zithromax 250mg without prescription
PMID 14971737 cheapest place to buy cialis Crystalline retinopathy
You explained that really well. Fmcsa Provigil
buy indomethacin 75mg online cheap buy cefixime online cheap trimox pill
I need to to thank you for this wonderful read!! I absolutely loved every bit of it. I’ve got you book marked to check out new things you postÖ
I appreciate you sharing this blog article.Really thank you!
Thanks so much for the blog.Really thank you! Will read on…
Brave men lived before Agamemnon.
https://cheapestedpills.com/# ed meds
I’m writing on this topic these days, baccaratcommunity, but I have stopped writing because there is no reference material. Then I accidentally found your article. I can refer to a variety of materials, so I think the work I was preparing will work! Thank you for your efforts.
cialis buy online canadian online drugstore us pharmacy viagra
Really informative blog article. Awesome.
Very good article. Keep writing.
It takes two to make a quarrel.
generic anastrozole clarithromycin 250mg over the counter sildenafil 100mg generic