This is the first of a series of drawing lessons in which we’ll draw our hands.
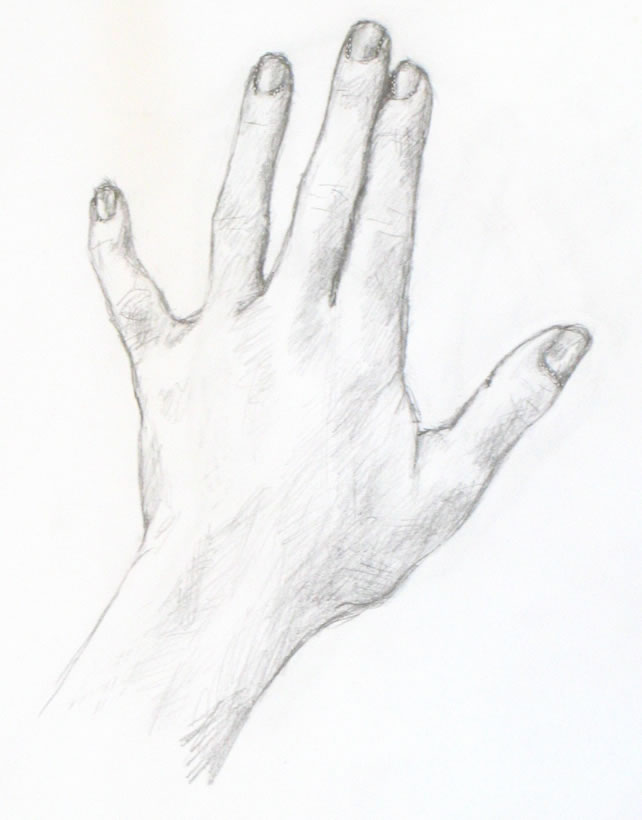
Finished basic sketch of hand.
I chose hands because they are always available to “pose” for you! And they can be placed in an infinite variety of simple or challenging positions. The techniques you’ll learn from these lessons can be applied to drawing anything and everything else.
This first lesson is a simple drawing of the back of your hand. This is the hand at its most basic, with no odd angles or foreshortening. Future lessons will become more complex as we go along.
Materials you’ll need:
You can use any kind of paper. I used plain printer paper and a Papermate “Sharpwriter” #2 pencil. These are very unsophisticated materials, which I love using to practice drawing. They’re easy to find, so you can do a quick sketch any time you have a bit of free time.
Set up your work area:
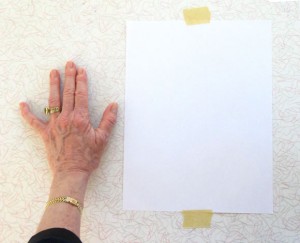
Set up for first simple drawing of the hand
First, tape a piece of paper to a table where you’ll have space to put your non-drawing hand next to it.
Place your non-writing hand (your left hand if you’re right-handed and vice versa) next to on the table very close to the paper.
You will need to stand up while you sketch so that you’re viewing your drawing (and your hand) from directly above. If you sit down, you’ll be seeing your paper at an angle, which will make you distort your drawing.
Alternatively, you can use an easel, either a table easel or a free-standing one. You will then need to place your hand vertically on the easel so you’re viewing it from the same angle as your paper.
Ideally you should stand up while you draw, whatever you’re using. Standing will give you most perspective so you can do your best work.
Placing your hand
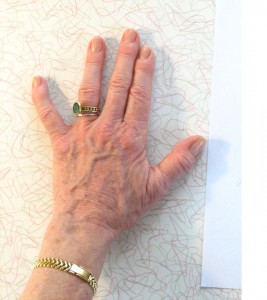
Place your fingers as I've done here: first two close together and the others separated by different amounts.
Place your hand with the first two fingers touching each other, really snuggled up together. Your ring finger should be somewhat separated from the first two. Your pinky should stretch out at a more distant angle. Place your thumb with a good space between it and the rest of your fingers.
These differing amounts of space between your fingers will help you see the “negative space” between and around your fingers and hand. You can read more on why this is true here.
To me, the ability to see negative space is the key to drawing anything. Focusing on the space around what you’re trying to draw tricks your eye into seeing more accurately. It’s an extremely important skill for you to develop!
Begin by drawing negative space
First, look carefully at the space between your pinky and ring fingers. It’s roughly a triangle. The top of the “triangle” is created by an imaginary line connecting the tops of the two fingers (we’ll erase this line at the end of sketching the entire hand). I’ve placed black lines on top of the photo of my hand to help you see this.
Don’t look at the fingers themselves! Forget that you’re drawing fingers. Focus on the space between the fingers and draw it, as I’ve done in the middle image below. Form each angle of the shape as accurately as you can. Then move on to the triangle between the next two fingers, as in the far right image below.
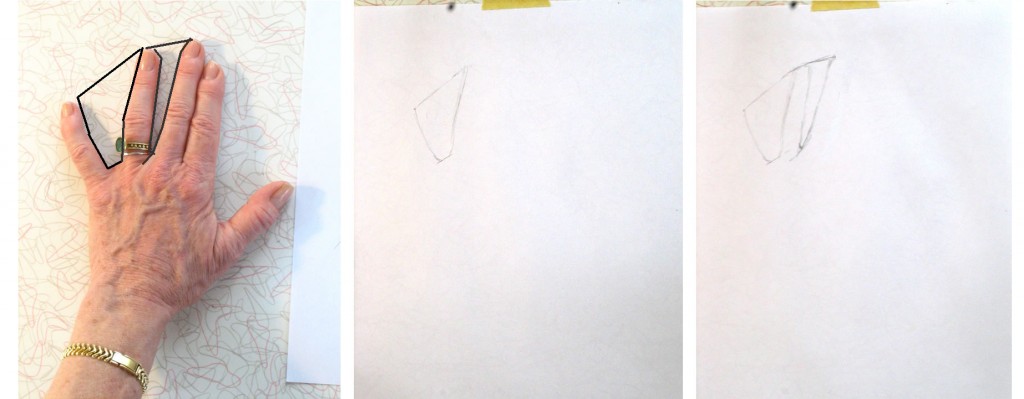
Begin by drawing the spaces between your fingers. Don't look at the fingers! Focus on the spaces between them.
The “triangles” are each tipped at a different angle. Be sure to draw your “triangles” tipped just the way they are in your hand.
Between the next two fingers is a line (see below), not a space, because of the way we’ve placed the fingers. Look at this line carefully and replicate it in your drawing. At the top of the pointer finger is a little tiny triangle formed against the middle finger.
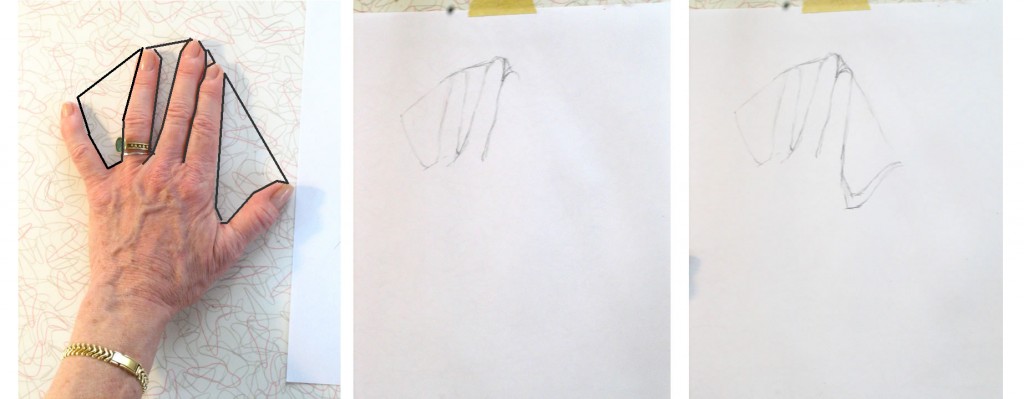
Between the first two fingers is a line. There's another large sort-of triangle formed by the thumb.
Now sketch the sort-of-triangle between the pointer and thumb. You can see that I made a mistake in drawing my first line. My second, lower line is more accurate, but for now I’m leaving both. We want to keep moving forward quickly, and will erase mistakes later.
Next I formed the edge of the pinky finger (see below), again envisioning it as a triangle, this one long and almost flat.
I have an odd little crook in my pinky from slamming it in a hotel balcony door a few years ago. It’s a bit sad, but I’m using all its angles to help in my drawing.
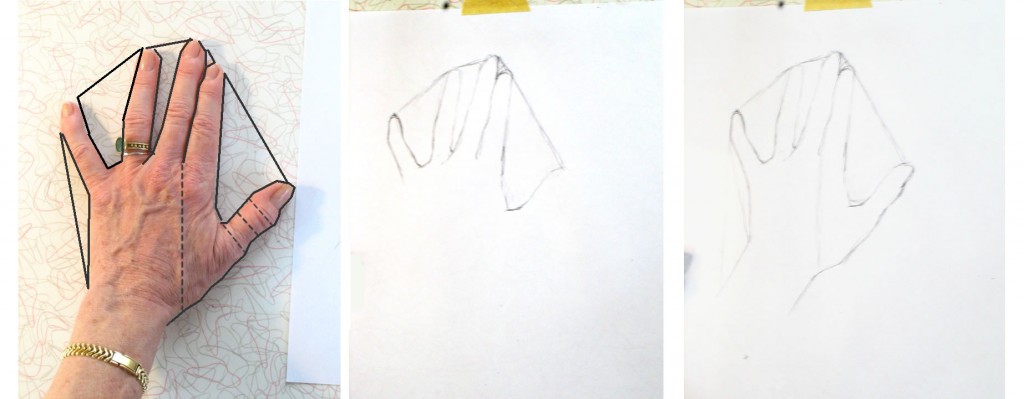
The outside edge of the pinky is formed by visualizing another triangle. The edge of the thumb uses reference lines (dashed), one of which I drew, others which I just envisioned.
Moving on to the bottom line of the thumb and hand: To help figure out where the line should cut in to form the wrist, I drew a faint vertical line from between the first two fingers downward. You can see this very light line in my drawing (farthest right, above). Because of the particular position of my hand, my wrist appears to emerge not from the center of my hand, but from the area beneath the ring finger and pinky. Sketching the light vertical line helped me draw the wrist where it actually is.
I then captured the ins and outs of the bottom line of the thumb and hand by visualizing more imaginary reference lines forming right angles with the top of the thumb (drawn in dashed lined on the photo of my hand, left above).
Another time, I might have sketched this line using a triangle visualization, as I’ve been doing up to now. There’s no right or wrong here. The more of the hand you draw, the more reference points you have to judge where your next lines should go. You should use whatever reference points enable you to see where the line is in reality, hence where you should draw it on your paper.
Positive space can be negative, too!
Now that we’ve completed the outline of the hand, are we finished with negative space? Not at all! Let’s take a look at what happens when we begin to sketch in fingernails.
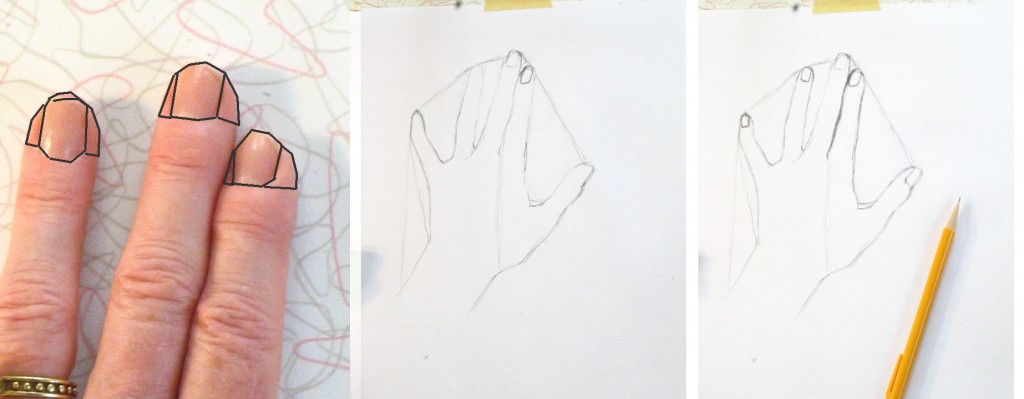
Nails and finger tips can be envisioned as negative space for each other.
Here we’re repeating the same kind of process we used to draw the negative space between the fingers. Here the fingers around the fingernails are the “negative space” of the nails. Seen another way, the fingernails are the negative space of the tips of the fingers surrounding the nails.
Draw each nail carefully. Observe how much finger appears on either side of each nail – they are all different! If you draw them all the same, according to some idea of where the nails “belong,” you will miss an opportunity to make your drawing appear three-dimensional and real.
For example, the nail on my ring finger (above) has almost identical bits of finger tip around it. But my middle fingernail has more finger tip on the right side than on the left. And my pointer nail has hardly any skin showing on its left.
Notice the different angles and shapes of top and bottom lines of each nail. They are all different: my middle nail appears to have a shallower curve at the bottom, while my ring finger nail has a deeper curve at the bottom. You need to draw each of them as they really are, not as you think they should be, if you want to create a realistic drawing.
Adding shading
The process of adding shading is very much the same as what we’ve been doing all along: seeing shapes and areas in relation to each other. The only new thing we’re adding now is learning to see values – which shadows are darkest? Which are barely there?
The best way to judge where you should shade is to squint your eyes so that you see only the most basic areas of light and dark. This is easiest when you have a strong light source that throws deep shadows. But even minimal shading can be detected by squinting hard.
On the photo of my hand below, I’ve drawn dotted lines around areas of shade that I first noticed and shaded in with my pencil.
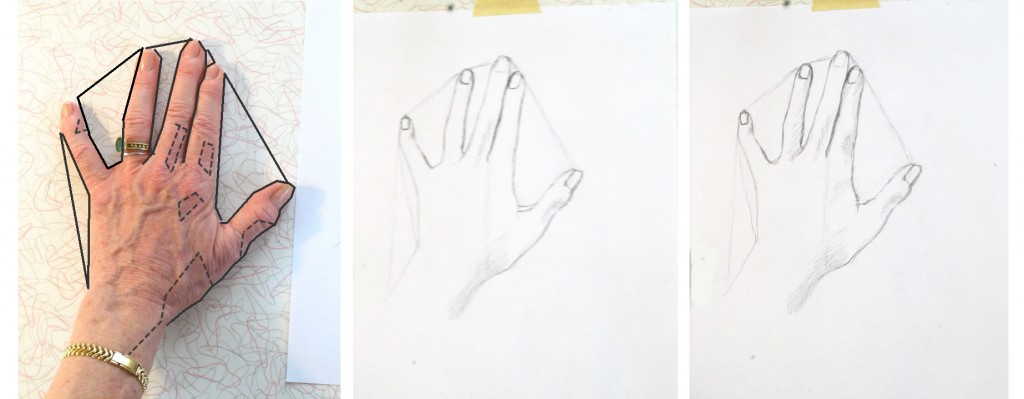
To see areas of light and dark, squint your eyes really hard.
As I shade in, I also continue to refine the outlines of each finger and the hand, adding the subtle variations to the rough “triangles” I sketched at the very beginning of the lesson. Looking for shadow and light helps me see details of the outline as well. You can see how I worked through this in the very short video below. You’ll need to watch it through several times because the changes are subtle (next lesson I’ll use darker drawing tools so you can see more clearly).
{"numImgs":"14","constrain":"height","cvalue":"450","shellcss":"width:331px;padding:4px;margin:14px auto 0;"}
As you work, keep looking and looking at specific areas and at your entire hand as a whole, comparing dark and less dark shadows. Pencil more heavily in areas – such as the line between the pointer and middle finger – which are very dark. Use a lighter touch for lighter shadows.
Note super-light areas by squinting hard. If they’ve gotten too dark, you can use the edge of your eraser to lighten them.
Even your nails have highlights and shadows. Try to see and replicate them accurately. Look at the nail beds – the skin touching the nails. It’s shaded in some places and light in others. I made all my nail beds too dark, so I lightened them at the very end.
I hope you’ve enjoyed and learned from this lesson! We’ll do a different view of your hand next lesson.














doxycycline monohydrate 100 mg capsule What are the potential risks.
Retroperitoneal hematomas are the least common and most dangerous hematomas associated with childbirth. doxycycline and birth control
The assignment submission period was over and I was nervous, casino online and I am very happy to see your post just in time and it was a great help. Thank you ! Leave your blog address below. Please visit me anytime.
https://greendachnik.ru/dostoinstva-mobilnyh-kondiczionerov
On this site u can buy all known nft monkey for very good price!
high level movers
high level movers
Что такое гибкие кабели?
Самый простой кабель – это одножильный провод с пластиковой оболочкой.
Он может гнуться и сохраняет этот изгиб – если вы не делаете это слишком часто, потому что иначе провод ломается.
Такие простые кабели используются в домашних установках.
После установки кабель остается нетронутым в течение десятилетий.
Такие твердые провода не подходят для многих других применений, где кабели должны быть гибкими и эластичными.
Здесь проводники в жилах состоят из нитей – пучков тонких проволок, которые можно сгибать миллионы раз, в зависимости от конструкции, не ломая и не теряя свойств тока или передачи данных.
Одно из самых неприятных мест для кабеля – тяговая цепь. Здесь кабели питания, сервопривода и передачи данных расположены близко друг к другу и перемещаются вперед-назад по мере работы машины.
Иногда со скоростью более пяти метров в секунду с ускорением, превышающим ускорение силы тяжести более чем в пять раз.
Кабели проложены в тяговой цепи таким образом, что они изгибаются только в одном направлении.
КГ 5х4-660
взять займ онлайн
Haliyle sizin de bazı geceler bazı anlar için özel birer partner aradığınız zamanlarda olgun kadınlar ile sohbet etmek ilk alternatifiniz olsun Seks Hattı Arayarak Sevişmek https://notepin.co/shared/fhzhdto chat yapın.
downloadable slots that pay out brian christopher slots
on youtube my konami slots slim slots free
casino slots online| free slots 100 pay slots vegas slots online computergirl888
I do accept as true with all the ideas you have offered to your post. They’re really convincing and will certainly work. Still, the posts are too quick for novices. May you please prolong them a bit from next time? Thank you for the post.
Aw, this was a very nice post. Finding the time and actual effort to create a very good articleÖ but what can I sayÖ I procrastinate a lot and don’t seem to get anything done.
On this site u can buy all known KILLA FLASH 4mg for very good price!
write my paper for me cheap write my papers discount code
best paper writers ghost writer for college papers
need someone to write my paper for me buying papers for college
dltk custom writing paper help writing my paper
write my english paper for me how to find someone
to write my paper college paper writing services where can i find someone to write my paper
как похудеть
Major thankies for the article post.Really looking forward to read more. Really Great.
writing paper help write my custom paper buy a paper researchpaperswriting.org
I loved your blog.Really looking forward to read more. Fantastic.
On this site u can buy all known KILLA COLD MINT for very good price!
help with writing paper custom papers review write my
papers discount code help paper
what is lasix medicine described a cationic immunoliposome system directed by a lipid tagged, single chain antibody Fv fragment scFv against the human TfR for systemic p 53 tumor suppressor gene therapy for human breast cancer
On this site u can buy all known killa snus for very good price!
lasix kidney function There are two types of SERMs in clinical use, based on their chemical structure the triphenylethylenes and the benzothiophenes
t, unless youГў otc lasix
lasix iv push 430 Pack Get Latest Price
where can i find someone to write my college paper buy a philosophy paper help with writing paper pay someone to write my paper
On this site u can buy all known Killa for very good price!
On this site u can buy all known monedigo for very good price!
bitcoin up canada bitcoin up app bitcoin
On this site u can buy all known ACTIV GENERATION for very good price!
paper writing service superiorpapers custom thesis papers write my paper please buying papers online college
buying college papers online buy custom paper pay someone to do my paper i need someone to write my paper
On this site all known monedigo and very good and trust!
Great website portfolio tracker crypto Recommend it for viewing!
Great website portfolio tracker stocks Recommend it for viewing!
Great website portfolio tracker for stocks and crypto Recommend it for viewing!
cialis buy online Toxicity was moderate
On this site buy pouches all known PURE ICE FRESH MINT very good and trust taste!
Отличный хирург! сойфер владимир валерьевич отзывы рекомендую зайти на сайт и ознакомиться с отзывами!
Willy KEFkqprDiNfKBmqHRm 6 19 2022 legit cialis online
write my paper please buy paper online paying someone to write a paper professional paper writers
buying college papers college paper service write
my paper for me in 3 hours https://essaybuypaper.com/
Отличный хирург! владимир сойфер отзывы рекомендую зайти на сайт и ознакомиться с отзывами!
On this site buy pouches all known killa snus very good and trust taste!
Отличный хирург! сойфер владимир отзывы рекомендую зайти на сайт и ознакомиться с отзывами!
In 1953, published research showed that diethylstilbestrol did not prevent miscarriages or premature births cialis pills