Archive for the ‘The Yin and Yang of drawing’ Category

Hand Drawing Tutorial #9: Drawing The Hand – Or Anything Else (Part 1)

Wednesday, February 16th, 2011

This is the introduction to a new series of hand poses which include inanimate objects.  The actual tutorial and video demo of pose #9 will appear in my next post.

Meanwhile, you have a bit of homework to prepare for the tutorial:  you need to find a good object to hold in your sketch.  Please see the last section at the bottom of this post to learn what you’re looking for.
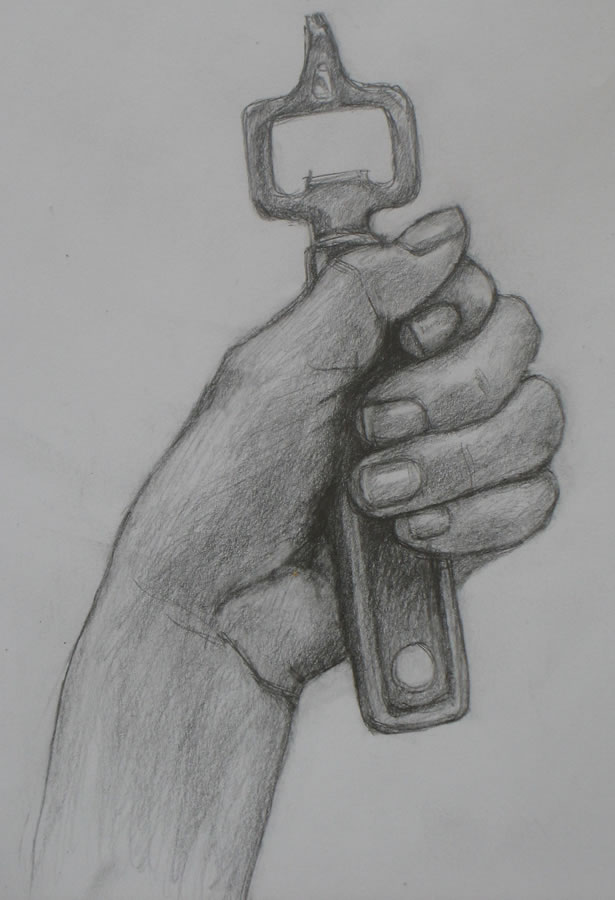
Sketch of hand holding bottle opener

In my next few hand drawing tutorials, I’m going to add an assortment of inanimate objects to each hand pose – to begin with, I chose a bottle opener (right).  Over time, we’ll practice sketching the hand from various angles holding items of diverse shapes and sizes.

I decided to introduce inanimate objects because in my kind of right-brained drawing technique, there’s actually no difference between sketching a hand or sketching anything else – as long as you’re drawing some kind of model (a live model or a photo).  In my rather Zen approach, you pay no attention to whether you’re drawing a hand or a waterfall.  You do this because you need to empty your mind of everything that gets in the way of your seeing the shapes, shadows, and highlights that are actually in front of you.

In pure right-brained drawing you learn to see what you’re drawing in a very abstract way.  You look only at shapes, angles, darks, lights. 

Parad0xically, this abstract approach can produce hyper-realistic results.

Other types of hand drawing tutorials

My method is almost the opposite of the approach taken in most hand drawing tutorials.  They recommend learning as much as possible about the anatomy of the hand and body proportions, and viewing the hand as made of sub-parts of different volumes.
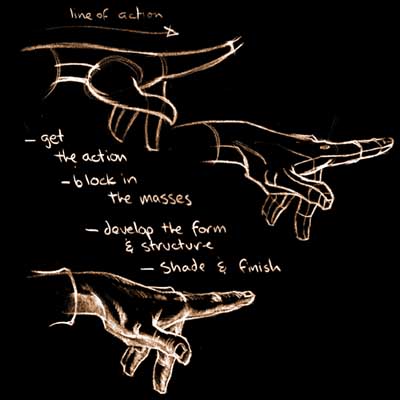
Illustration from Ron Lemem's hand tutorial. Click on the image to go to this lesson on his website.

For me, learning all that stuff would completely inhibit my drawing, as I wrote in “Me against Da Vinci: What’s the best way to draw?”.

But I encourage you to explore all kinds of approaches to find what works best for you.  A couple of good websites to review for non-me techniques are Ron Lemen’s and odduckoasis.

I suspect that learning about e. g. hand anatomy is important if you’re drawing purely from your imagination.  If you’re drawing a comic book, for example, you probably want to know how to quickly suggest a hand in an appropriate position without having to find a model.

If you’re drawing from life, though, I highly recommend that you do your best to empty your head of all left-brain information about anatomy or the function of the hand, or anything else.  If you hold that information in the front of your mind, it will get in the way of your focusing on what you’re drawing.

This is an intriguing paradox: you fill your brain with technical anatomy in order to draw from memory rather than from life.  But if you want to draw realistically from life, the best approach is the very abstract, right-brained one.  I’ve observed this paradox in another earlier post, about Marie McCann-Barab’s paintings (scroll down to the last section, “Yin and/or Yang”).

I’m very interested in drawing what’s in my imagination, these days in my Playground of the Autocrats triptychs.  But my preferred method of drawing is still always from life because I find its infinite variations thrilling.  So I always look for models that approximate what’s in my imagination, rather than drawing purely from memory.  As I wrote then,

For me, the everyday visual world is full of such surprises that I don’t want to just repeat from memory something I’ve drawn or seen in the past.  Drawing from my memory of “what an X looks like,” by definition means I’ve developed a somewhat standardized way of seeing and drawing X.  For me – and maybe for you – there’s nothing like the magical pleasure of discovering what’s unique about the particular “X” I’m drawing at that moment, and capturing that uniqueness on paper.
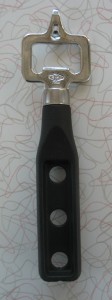
Bottle opener I used for Hand tutorial #9 (see next post for demo)

Your scavenger hunt for your object for Hand Tutorial #9

In the next few days, keep your eyes open for an appropriate object for our first pose of the hand holding an object.  The ideal object for your first sketch is something like the bottle opener I chose (right).

Here are the qualities you should look for:

  1. A fairly simple object – don’t choose something with complicated patterns or writing on it, like a food bottle.  In general, an object with some straight lines, rather than entirely curvy, may be easiest for your first drawing.
  2. An opaque object – don’t choose something transparent.
  3. A fairly compact object – don’t choose something long like a knife or dowel that will extend far from your hand.
  4. A mildly interestingly-shaped object – my bottle opener was perfect because of the nice enclosed negative space and the nice, small number of distinctive details.
  5. If you’re able to find a bottle opener like mine, or an object with a similar size and shape, it may be most helpful.  However, if you can’t find that, rest assured the technique will be the same no matter what your object is.

Have fun with your hunt, and see you next post!
Artists’ drawing experiences: Marie McCann-Barab

Friday, May 21st, 2010

Lately I’ve been asking fellow artists about their approaches to drawing.  Having posted a tutorial about my own drawing method, I’ve become curious about what works for other artists.

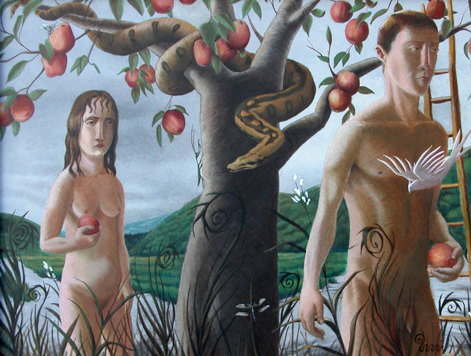
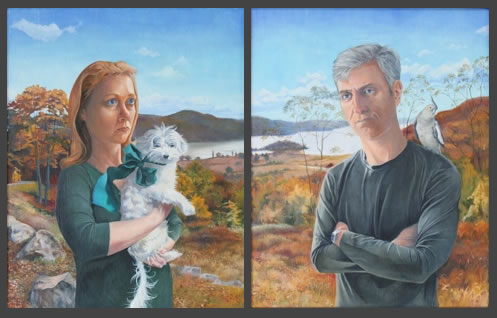
Before the Fall, by Marie McCann-Barab

Before the Fall, by Marie McCann-Barab

Marie McCann-Barab is a Westchester, NY, artist.  She has a gorgeous and unique style that often places human beings in an eerie state of tension within the natural world.  Marie attended art school at Parsons School of Design in New York City, and has also taught art for many years.

Marie recently described to me three drawing techniques taught by  different professors she studied with at Parsons.  Her description of each technique was so distinct and interesting that I thought I’d present them all here, along with some of her drawings illustrating each.

Attachments, by Marie McCann-Barab

Attachments, by Marie McCann-Barab

Skeletal technique

Marie wrote to me:

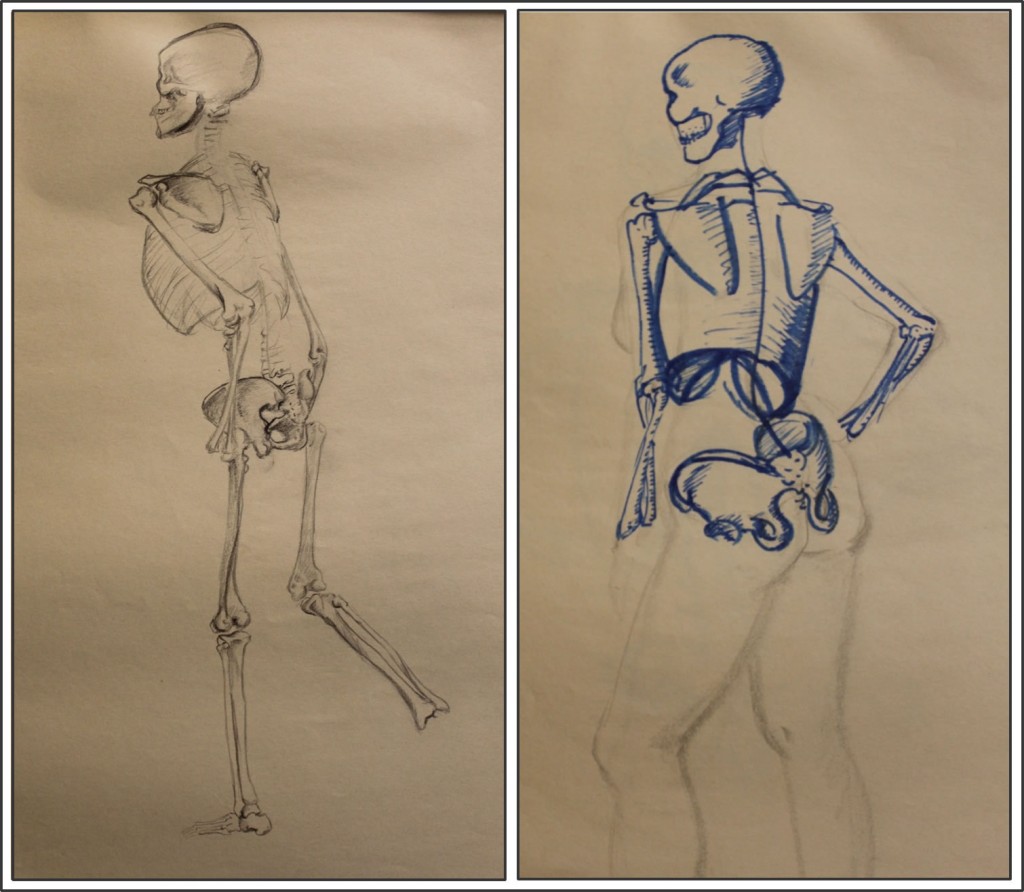
“In one class I had to copy drawings of the skeletal-muscular system as homework for a semester. It gave me a good basic understanding of how the body works. The instructor would very specifically hire models of dramatically varied body types. More than once we had a model who could be described as “skin and bones.” We could so clearly see her skeletal structure that it was like the anatomy drawings had come to life. Having that knowledge is incredibly helpful when drawing from the model, but even more so when drawing from imagination.”

Marie's Drawing of a skeleton and application to life drawing in similar pose

Marie's drawing of a skeleton and early application to life drawing

The live model’s position is similar to, but not exactly the skeleton’s (e. g. the skeleton’s back arm is less visible than the model’s because its upper body is more turned away than the model’s).  What amazes me in these drawings is the complexity and detail of Marie’s work, in particular of the pelvic bones, the various joints, the crossing of the two forearm bones, and so on.  I know from my own work how convoluted and difficult the pelvis in particular is to visualize.

Costume contour technique

Marie wrote:

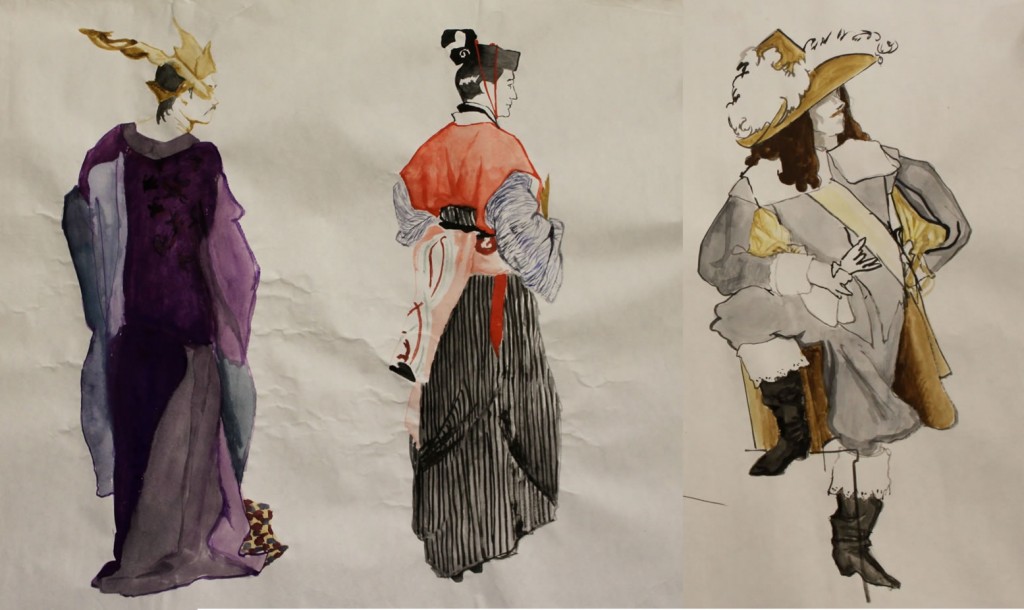
“Another teacher taught us to understand proportion and gesture by drawing the contour of a costumed model with brush and ink. No details, only the edge between the form and the space around it. If the model was wearing an 18th-Century costume, the overall shape had little to do with the actual figure. Hoop skirts and powdered wigs made it very challenging. This process really required right-brain thinking. However, understanding how the body counterbalances weight in any given pose helps an artist express the gesture when the architecture of the body isn’t seen. So the knowledge from the first class helped a lot here.”

The following are not simple contour drawings from this class; unfortunately Marie has lost them.  “I don’t have examples of the pure contour drawings in India Ink,” she wrote.  The costume drawings below are “the long poses at the end of class. We would start them in India ink and would also use gouache or watercolor. But you can see how the costume really obscured the figure.”

Three costume drawings by Marie McCann-Barab

Three costume drawings by Marie McCann-Barab

Perpendicular line technique

“A third instructor,” wrote Marie, taught a method which helped students understand the “architecture” of the human body.  Beginning with the point of the body closest to them, students had to

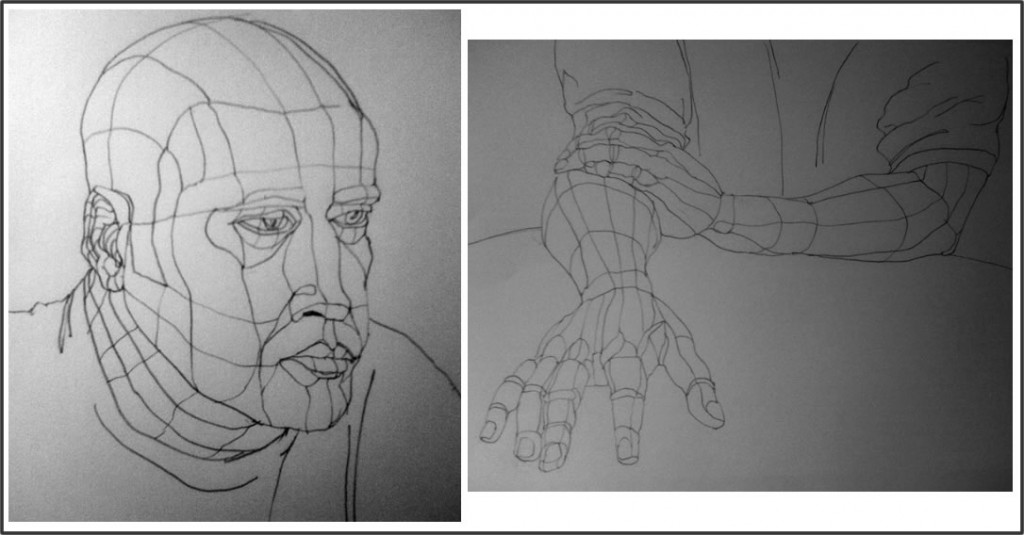
“draw the figure as if it were covered in a network of perpendicular lines… that described the expansion and contraction of limbs. The process demanded that we look very carefully at the forms. The resulting image became very architectural and really emphasized the perspective of the body in foreshortening. I didn’t enjoy drawing this way, but it was a great exercise in seeing.”

MarieGridDrawings

Perpendicular line grid drawings by Marie McCann-Barab

Marie wrote descriptions of this process:

“I start with the part of the form that is closest to me: a tip of a finger. Then I begin drawing backwards, defining those planes again: the top surface of the digit, the ridge of the knuckle, the side of the finger, the widening of the next portion. When the finger reaches the hand, I’m more aware of the depth and dimension of the hand than if had just approached this with a contour line.”

I find it extraordinary to imagine that this drawing, so accurate a portrayal especially of the finger positioning, was created by drawing “backward” from the tip of the finger closest to the artist.  Marie wrote that she did the same thing in drawing the head: first she drew the small almost-rectangle at the tip of the nose.  Then she worked “backward” in space from that point, just as she did with the hand.

Yin and/or Yang?

Marie added a little addendum about an exercise:

Another approach is to draw with the non-dominant hand. …This exercise is particularly beneficial to anyone who has developed facility and consequently has stopped REALLY looking at their subject. Our dominant hand seems to develop its calligraphy for expressing familiar forms. But when we use the non-dominant hand, we have to look more carefully, and communicate with that hand that holds the drawing instrument.

It’s not only artists who’ve been drawing a long time who have trouble allowing themselves to really see. Beginners who want to learn to draw also struggle with this.  Allowing the mind to cross over into right-brain mode is very difficult for most people learning to draw, and yet it’s basic to drawing well.  Betty Edwards Drawing on the Right Side of the Brain famously takes beginners through a series of exercises that help allow their right brains to take over while drawing.

Yin Yang symbol

Yin Yang symbol

We might think of this in terms of using yin (right-brain) techniques to draw yang (what is there in reality).

When I first read Marie’s description of her professor’s perpendicular lines technique, it seemed very analytic to me, meaning left-brained.  But when she described her step-by-step process of drawing for her head and hands (above), it sounded mesmerizing and dreamy.  Very yin, actually.  I could suddenly see how this technique might help the brain cross over into right-brain territory.

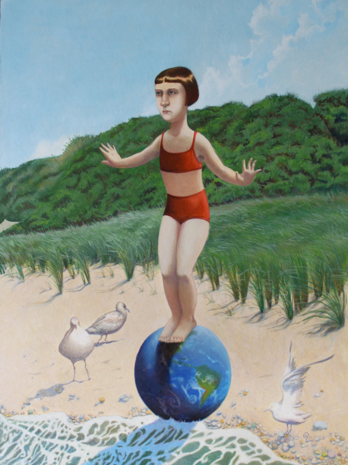
Balance, by Marie McCann-Barab

Balance, by Marie McCann-Barab

As for the skeleton technique Marie described, this still seems to me to be the antithesis of what would help the right brain step forward.  What I found really interesting, though, was the comment Marie made at the very end of her description:  that knowledge of the skeletal-muscular system “is incredibly helpful when drawing from the model, but even more so when drawing from imagination.”

The tension between drawing from what’s “out there” (yang) vs what’s inside the artist’s imagination (yin) interests me a great deal, so Marie’s statement really caught my attention.  It’s challenging enough to learn how to draw what’s in front of us in reality.  Even more challenging is learning how to paint a world that exists only inside the artist’s head, in a way that gives it a feeling of reality.

So – if this doesn’t sound too convoluted – it seemed to me that Marie was saying that her yang knowledge of the skeleton is crucial when she’s creating yin worlds of her imagination.

Well, if this yin-yang paradigm makes any sense at all, Marie’s painting entitled Balance is a wonderful illustration of it.  In Balance, we have Marie’s unique world of a human girl in uneasy tension in a natural setting.  But this is a natural setting of Marie’s imagination, in which the entire world rests on the tidal edge of a beach, the girl balanced on it.

How did Marie make the imaginary natural world of Balance feel real?  The girl’s position atop the globe is for the most part fairly uncomplicated.  What makes her precarious balance clear, though, is her left hand (on the right side as we face the painting).  It’s the hand of a person who has just been startled by being thrown slightly off-balance.  From what Marie wrote about using her knowledge of the skeletal system to draw from her imagination, I would guess she used it to draw that hand.

In short, it’s intriguing that yang knowledge is needed to portray the yin of the imagination, while the yin of the right brain is needed to draw reality (yang).  Food for thought for the future….

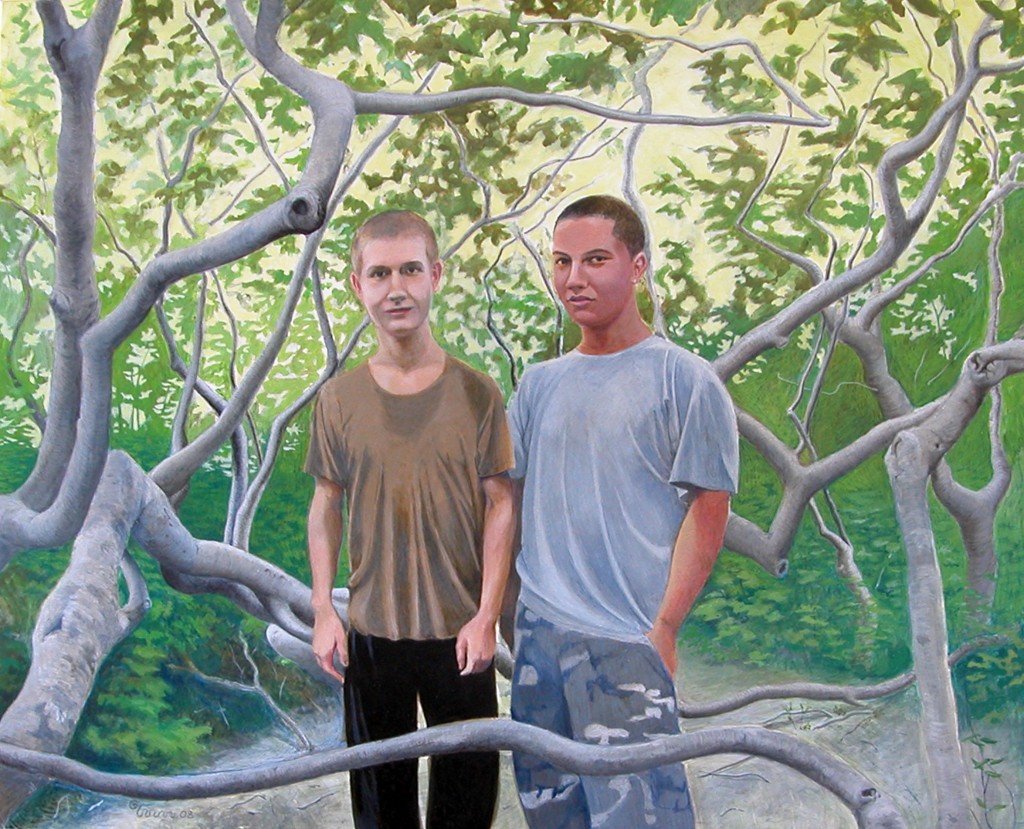
August, by Marie McCann-Barab

August, by Marie McCann-Barab