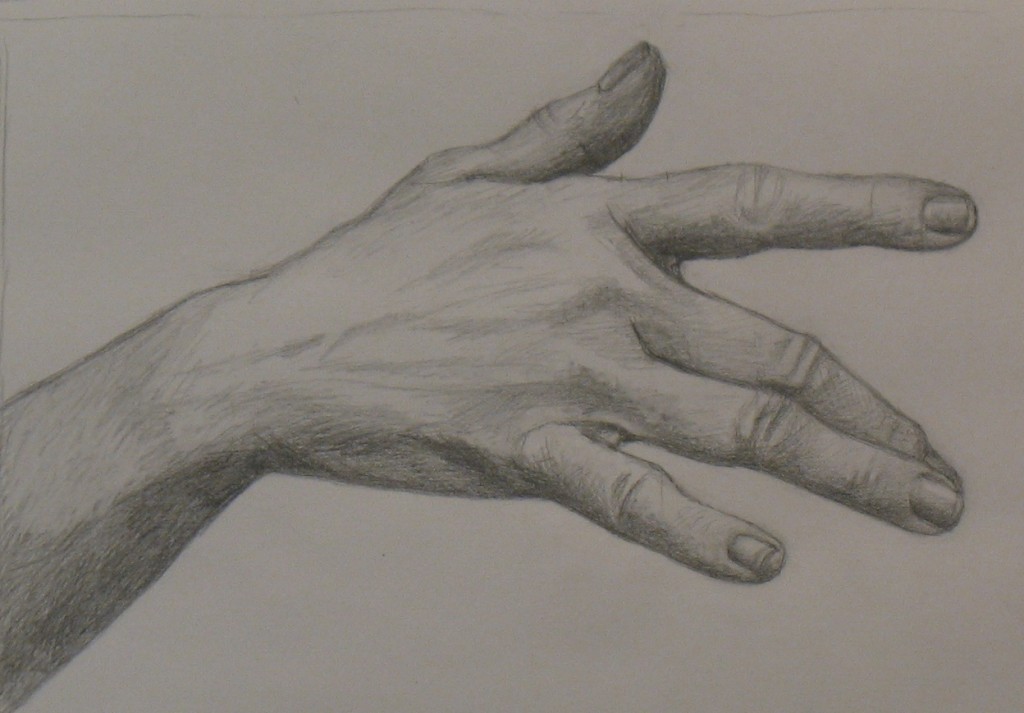
Hand Tutorial 14 Final Drawing
Artists often use grids to help them draw. A common example is when an artist is re-drawing a small sketch they’ve completed onto a larger canvas or onto a wall for a mural.
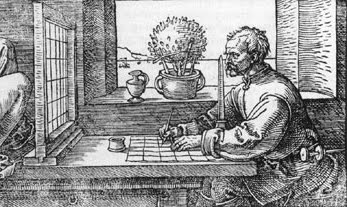
Albrecht Durer's grid. A physical grid made of wood and wires is placed between the artist and the subject he's drawing. He's sketched a corresponding grid on his paper. The vertical instrument in front of his nose is a guide to keep his head in the same position each time he looks through the wire grid, so he always sees the identical view through each grid square.
Grids are so helpful that historically, people have rigged up ways of applying physical grids to the real world when drawing from life. See the picture to the right for Albrecht Durer’s set-up. Betty Edwards says dozens of versions of such devices have been recorded in the US Patent Office (New Drawing on the Right Side of the Brain, p. 100).
Why are grids so helpful in drawing?
As I’ve said in previous tutorials: it’s always easier to draw a small, simple shape than to draw a large complex one. Artists use grids to chop up complex images into small bits that are easier to draw.
In earlier tutorials, I’ve used the concepts of constructing a jigsaw puzzle and seeing with the “right brain” to help you “chop up” your drawing into little easily-drawn pieces,
I haven’t yet talked much about the fact that, while constructing the “jigsaw puzzle,” in my mind’s eye, I’m applying an imaginary grid to help me draw the pieces in their proper places, sizes, and shapes. More accurately, I’m imagining bits of a grid only where and when I need them.
What is a “custom grid?”
What do I mean by drawing “a grid where and when I need” it? I mean that each time I’m about to draw a new line in my sketch, I run my eye over other lines I’ve drawn, to see which might end or begin at the same level as the bit I’m about to draw, and so serve as a compass to guide me. I look to see whether the hand-part I’m about to draw is, for example, at the same level as the middle of the joint on the finger I’ve just drawn. Or which previous hand-part is directly above or beneath the bit I’m sketching next.
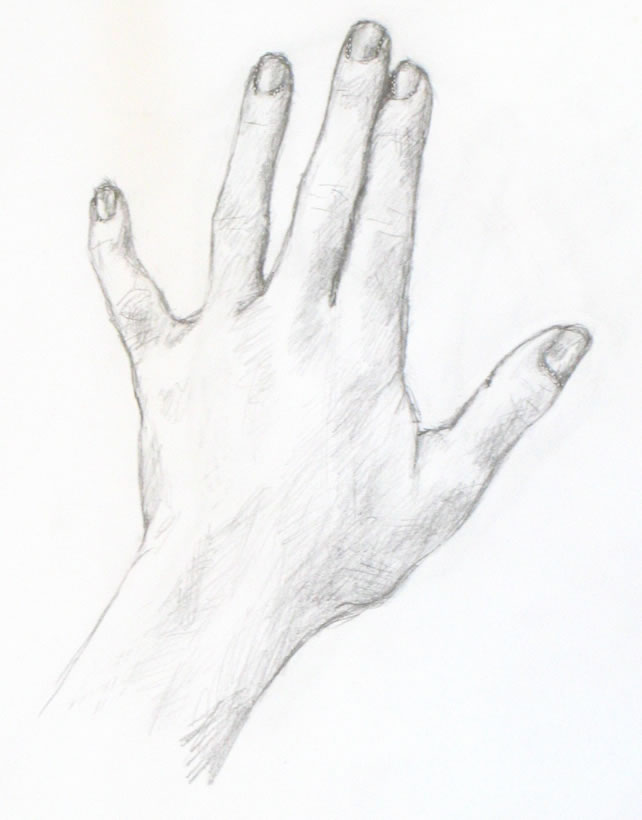
In my drawing for this tutorial, I’ve actually sketched many of the lines I usually just envision in my mind. You’ll see that this technique helps me build up an imaginary web of lines and reference points that enable me to pinpoint where each new line of the hand should be drawn. I don’t put a wire grid between me and my hand, nor do I pencil an entire grid on my paper. But the effect is close to the same. I’m imagining the pieces of a grid that I need at any given moment.
The video at the end of this post will demonstrate how I do this.
Tutorial 14 Hand Pose
This is the first tutorial in which we’re drawing our hands from the standpoint of some one facing us, instead of from our own viewpoint. In my last post, I showed how to take photos to use for these poses if you have to do it entirely on your own. If you haven’t taken photos that will work for this tutorial – or don’t have some one willing to pose for you – please go back to see how to do this. Try to replicate roughly the same pose as the one above for your own drawing.
Since this is the first drawing from “the outside,” I’m using the simplest pose of the group of photos I took in Tutorial 13. This pose mirrors the simple pose from our own vantage point which began this series of hand tutorials.
Natural subtleties in photos
Interestingly, we’re adding one small complexity in this pose compared to that very first one, in which our hand rested on a table (see right). All the fingers in the first tutorial relaxed onto the surface of the table, so all were supported in the same plane.
In Pose 14, though, I held my hand in the air as I took a photo. As a result, my pinky was poised at a different angle than the rest of my fingers. So I was drawing it from a slightly foreshortened perspective.
This hand pose looks relaxed and natural in a way many of the ones I’ve drawn from life don’t. This is because it’s not easy to hold a relaxed pose for a long time while you draw (in addition to which I have to keep reaching around the tripod to take photos of my drawing in action). It’s really tough to hold your hand in the air in a natural position for very long, so it’s easier to draw the hand resting on a table. But that really limits the number of poses available to you.
What I love about working from photos is you can freeze fleeting poses that in life couldn’t be held naturally for very long (this is why life drawing teaches you to draw incredibly quickly, sometimes in 10-second or 30-second poses).
Work materials and set up
Refer back to the relevant sections of this tutorial for your work materials and set up. When drawing from photos, use the vertical set up. Drawing with your paper vertical always gives you a better angle; the only reason we’ve used a table in the past is as a place to rest the hand when drawing from life.
Be sure you’re seeing see both your drawing and your model straight on! If you’re seeing either from an angle, shift your setup until you’re seeing them properly.
Stand up while you’re drawing!
Whatever your setup is, it’s always best to stand up while you’re drawing so you can move back and forth to see your work from different distances as it progresses.
Standing up also helps you see both your model and your drawing straight on. When you sit down, you’re almost always seeing your drawing at a slant. This will distort your work. You’ll end up being very upset if you’ve produced something that looks gorgeous from your sitting position, but is skewed when you look at it from any other angle (e. g., when you display it on your wall).
Hand Tutorial #14 video
As you watch the video below, notice the guidelines I’m constantly sketching in. (I usually don’t actually draw most of these guidelines; I simply picture them in my mind.)
{"numImgs":"58","constrain":"height","cvalue":"450","shellcss":"width:609px;padding:4px;margin:14px auto 0;"}
All of the vertical and horizontal lines I make are like a standard grid. But early on, before I have many lines done that I can use for reference, I often begin by looking for triangular shapes at the top of the hand. (The beginning of any drawing is always the most difficult part, because you have no anchors created yet.) So at first my “grid” contains more slanted lines than straight ones.
Late in the drawing, I erase the guidelines. By this point, I usually have the hand completely sketched in, so I can now see its parts in small enough pieces to continue without needing guidelines.
At one point (by Frame 24), you’ll see that I realized I’d made a mistake in my judgment of grids and shapes. This happens all the time! Don’t let it upset you. Just correct your error and keep moving forward.
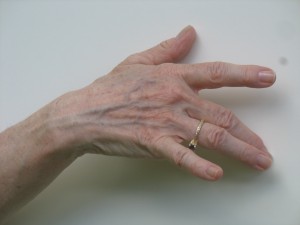
My hand in Tutorial 14 pose.
I realized in Frame 24 that I’d made a mistake somewhere because that pinky was going to be very fat! I didn’t know right away where my error was – on the pinky side of the hand or the forefinger or where. As always, I believe in continuing to move forward sketching other areas, in order to help orient myself to figure out where my mistake happened.
By Frame 37, I’ve decided I’ve placed my middle finger too high (in negative-space terms, I haven’t made the negative space between pointer and middle finger a wide enough triangle). I corrected that, making a big erasure in Frame 39, and moved on to finish the drawing.
How did I figure out where I made my error? In Frame 35, I drew in the bottom line of the pinky. This line intersected the hand in a place that would have shaped the hand incorrectly. I was going to have to do major surgery on my drawing! In Frame 36, I used the shadow along the bottom of my hand to judge the proper placement of all the hand parts, then moved ahead with the surgery in Frames 37-42.
Have fun drawing!















%%
my blog – treating Adhd in adults
high level movers
high level movers
high level movers
best essay writing website
essay writer helper
help writing a narrative essay
%%
Here is my web site; Diagnosing adhd uk
%%
Feel free to surf to my web blog … Adhd Medication
%%
My web-site :: adult adhd specialist london (Tanesha)
%%
Here is my homepage private psychiatrist Near me
%%
my page – Untreated Adhd in adults
%%
Stop by my web page :: How To Get Adhd Diagnosis Uk
original essay writing service
essay writing service law
help me essay
%%
My page … adhd In women
%%
Visit my page :: online Psychiatry uk
%%
My site: adult Adhd Diagnosis Uk
%%
Feel free to surf to my site … best adhd Medication for Adults
%%
My website – how to find A private psychiatrist uk
Что такое гибкие кабели?
Самый простой кабель – это одножильный провод с пластиковой оболочкой.
Он может гнуться и сохраняет этот изгиб – если вы не делаете это слишком часто, потому что иначе провод ломается.
Такие простые кабели используются в домашних установках.
После установки кабель остается нетронутым в течение десятилетий.
Такие твердые провода не подходят для многих других применений, где кабели должны быть гибкими и эластичными.
Здесь проводники в жилах состоят из нитей – пучков тонких проволок, которые можно сгибать миллионы раз, в зависимости от конструкции, не ломая и не теряя свойств тока или передачи данных.
Одно из самых неприятных мест для кабеля – тяговая цепь. Здесь кабели питания, сервопривода и передачи данных расположены близко друг к другу и перемещаются вперед-назад по мере работы машины.
Иногда со скоростью более пяти метров в секунду с ускорением, превышающим ускорение силы тяжести более чем в пять раз.
Кабели проложены в тяговой цепи таким образом, что они изгибаются только в одном направлении.
КГ 2х1
%%
Here is my site: adhd medication uk
%%
My web-site … adhd diagnosis adults Uk
%%
my blog post add women
%%
My blog post: Adhd In Women Test
%%
My page … private consultant psychiatrist
%%
Here is my blog post adhd In adults Online test
%%
Here is my blog post … Add women
%%
Here is my web-site: adhd in Women
best essays
write my law essay
best essay editing service
%%
Feel free to visit my web blog – undiagnosed Adhd in adults (Nmpeoplesrepublick.com)
%%
My website :: best Adhd specialist near me
%%
My homepage … private psychiatrists london
%%
my page Adhd private diagnosis
%%
my web page Assessment For Adhd In Adults
%%
My web-site; medications For adhd
%%
Feel free to surf to my website adhd diagnosis Adults uk
%%
Here is my blog post adult adhd specialist london
Что такое гибкие кабели?
Самый простой кабель – это одножильный провод с пластиковой оболочкой.
Он может гнуться и сохраняет этот изгиб – если вы не делаете это слишком часто, потому что иначе провод ломается.
Такие простые кабели используются в домашних установках.
После установки кабель остается нетронутым в течение десятилетий.
Такие твердые провода не подходят для многих других применений, где кабели должны быть гибкими и эластичными.
Здесь проводники в жилах состоят из нитей – пучков тонких проволок, которые можно сгибать миллионы раз, в зависимости от конструкции, не ломая и не теряя свойств тока или передачи данных.
Одно из самых неприятных мест для кабеля – тяговая цепь. Здесь кабели питания, сервопривода и передачи данных расположены близко друг к другу и перемещаются вперед-назад по мере работы машины.
Иногда со скоростью более пяти метров в секунду с ускорением, превышающим ускорение силы тяжести более чем в пять раз.
Кабели проложены в тяговой цепи таким образом, что они изгибаются только в одном направлении.
КГ 1х150-400
%%
my blog: How To Find A Private Psychiatrist Uk
осаго по временной регистрации
%%
Have a look at my homepage: how to Diagnose adhd In Adults uk
%%
my blog post: adhd medication ritalin (mall.hicomtech.co.kr)
%%
My web page :: Private Psychiatrist Cambridge (https://Autoskola-Barbara.Hr/)
%%
My webpage: nhs Psychiatrist near me (https://www.isisinvokes.com/)
%%
My page – Adhd In Adult Women
double diamond slots free free video slot machines games gsn casino slots
free play free slots online without downloading
%%
Take a look at my site – adhd specialist london
%%
Feel free to surf to my web site: Adult Adhd In Women
%%
My webpage: adhd in adults treatment uk
%%
My blog post: adhd specialist london
%%
Look at my page – assessment for adhd in adults
admission essay editing service
custom essays for sale
writing custom essays