The much-feared foreshortened finger may actually be the most helpful tool to shift you to right-brained seeing. Its shape is so alien to our standardized image of “finger” that we have no other choice but to abstract how we see it.
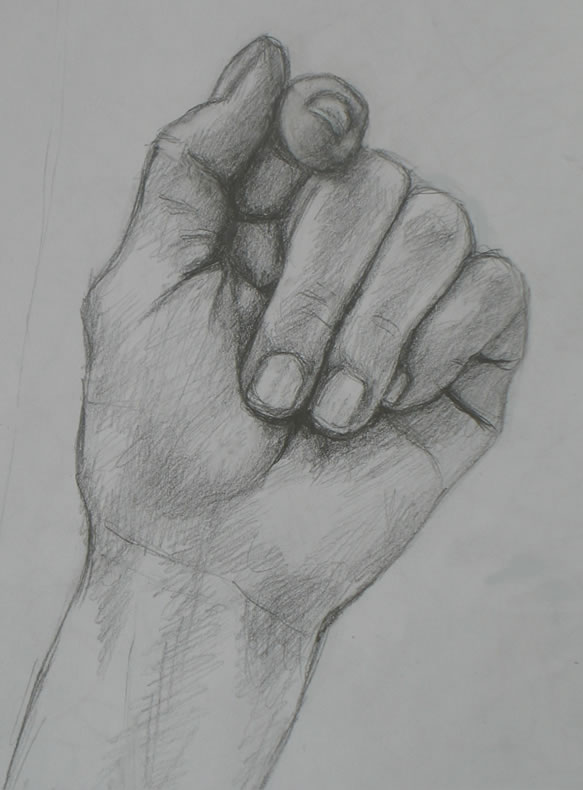
Tutorial #8 hand pose with foreshortened pointer
In this tutorial, we’ll take on the dreaded foreshortened finger (in this case, the pointer). The hand is often considered the most difficult of all subjects to draw, partly because we so often see the fingers from angles that conflict with our mental shorthand of them as tube-shaped.
Through the magic of right-brained seeing, though, the foreshortened finger becomes fairly easy to draw because it’s seen as a shape like any other shape.
In fact, it occurs to me that the much-feared foreshortened finger may actually be the best tool to help shift you to right-brained seeing. Its shape is so alien to our standardized image of “finger” that we have no other choice than to abstract how we see it. Look at the schematic below to illustrate this (with continuing apologies for my blue smashed fingernail).
In the left column is a series of photos of my hand in slightly different positions.
In the middle column, I’ve traced over the shape of the pointer fingertip in red, and the fingernail in pale yellow.
In the right column, I’ve enlarged this shape so you can really see a few of the variety of shapes a foreshortened fingertip can appear to take on. The fingernail also has very different shapes.
The more accurately you draw these shapes, the more realistic your drawing will look.
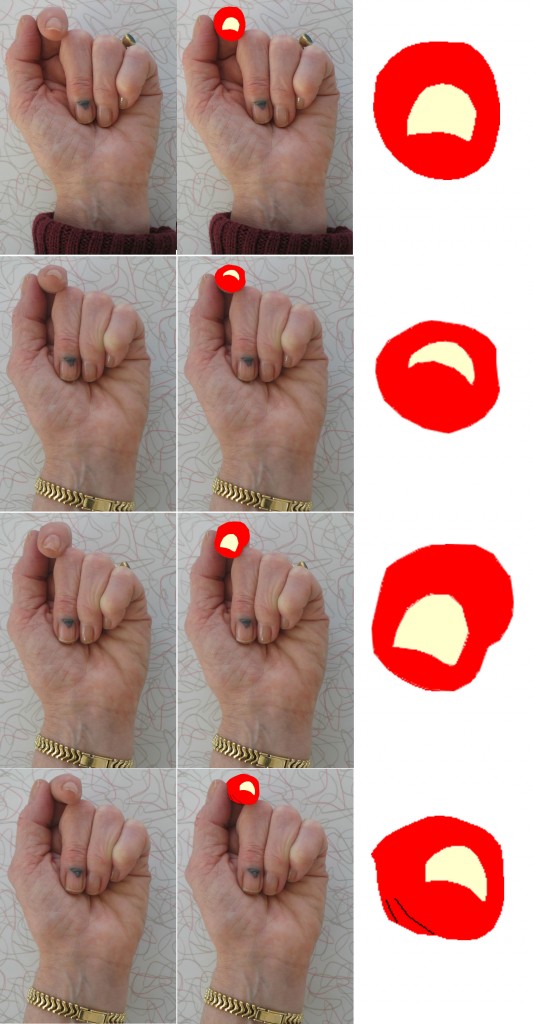
Seeing the foreshortened pointer as a simple shape. Left column: My hand. Middle column: My hand with the shape of the foreshortened pointer outlined in red (the fingernail is pale yellow). Right: Abstracted pointer tip shape, enlarged.
This week’s foreshortened finger pose
This hand pose is identical the one in tutorial #7, with the single exception that the pointer is raised so we see its tip head-on.
The most difficult part of drawing a dramatically foreshortened finger is actually not the drawing itself. It’s keeping your hand completely still so you see it from exactly the same angle throughout your sketch. A slight change in hand position will make you see the finger tip as a dramatically different shape. Look again at the diagram above to demonstrate this.
To help keep your hand in the same position while you draw, the following can help:
- Pay careful attention to how your forefinger looks when you start sketching. Note its exact shape. As you draw, adjust its position very slightly to keep it looking that way throughout.
- Close one eye while you’re drawing the foreshortened finger (the same eye the entire time) because each eye sees from a slightly different angle.
- It’s always important to stand up while you’re drawing so that you’re seeing your work head-on. If you sit down, you’ll distort your perspective and end up with a distorted drawing. When you’re drawing something this foreshortened, it’s doubly important to stand up.
Materials you’ll need and setting up your work
Please look back at the relevant sections of the first tutorial for materials and setting up.
The foreshortened finger jigsaw piece
In the 2-part Tutorial #7, I described right-brain drawing as building a jigsaw puzzle whose pieces all need to fit together to form the whole. You may want to look back on the schematics there, including the video at the end of Part 1 that demonstrates how to create the jigsaw puzzle. You will approach this #8 pose exactly the same way as that one, building your puzzle from shapes of fingers, nails, and negative spaces around each.
The single change this week is that you’ll need to see and draw different jigsaw pieces to form the pointer and the part of the palm revealed beneath it. I think the best way to help you see this isn’t to write more verbiage, but to suggest you spend some time carefully studying the diagram above.
Before you begin drawing your entire hand, practice seeing and drawing your own forefinger tip at slightly different angles. Sketch some of the various shapes it can take on a separate piece of paper. Then add the fingernail shape. You’ll be able to draw the nail accurately if you also observe the shapes of the skin visible around the nail.
Note the jigsaw-piece shapes immediately surrounding your fingertip when it’s placed in different positions. Draw these.
Put this entire mini-jigsaw puzzle together right, and you’ll magically have produced a realistic-looking foreshortened fingertip.
Now turn to drawing your entire hand. Look carefully at the puzzle piece of your own pointer tip. It will be slightly different from mine in my drawing. How is yours shaped?
Video demo of my drawing of Hand pose #7
As you go through video below of my own drawing, you may notice that somewhere around Frame 21, I reshaped my pointer-tip jigsaw piece incorrectly, making it too wide. I think this was the usual result of having moved my vantage point slightly (so do as I say, not as I do….) I was very annoyed at myself! I didn’t notice my mistake for a while, but when I did, I adjusted it.
This kind of error happens all the time. Once you notice it, you just need to work through it, correcting it and the jigsaw pieces around it.
If your drawing has gotten so out of whack that you can’t salvage it without major erasures, don’t feel you’ve wasted your time! You’ve learned a lot from this sketch. Start a new one and see what you can learn from that.
Becoming good at drawing from life is a matter of constant practice. And it’s fun!
{"numImgs":"49","constrain":"height","cvalue":"450","shellcss":"width:332px;padding:4px;margin:14px auto 0;"}

















blackweb official website dark website
dark web market darknet search engine
alphabay market alphabay link
darknet drug links how to access dark web
deep web markets darknet site
bitcoin dark web darkmarket link
darknet sites dark website
dark web links best darknet markets
darkmarkets dark web market list
darknet drug links dark market 2022
alphabay market darknet alphabay darknet market
dark web drug marketplace best darknet markets
dark website deep web drug store
darknet market list the dark internet
alphabay link alphabay market
darknet drug store dark web search engines
deep web links darkmarket list
dark web search engines tor market links
dark web market links darknet links
tor darknet darkmarket 2022
alphabay market link alphabay url
dark market link darknet drugs
darkmarket link darknet market list
tor markets 2022 best darknet markets
drug markets onion deep web drug store
tor dark web dark web market links
deep web sites darknet drug store
darknet seiten dark markets
dark market link dark website
darkmarket darknet links
darkweb marketplace best darknet markets
darknet market lists darknet drug store
darknet links blackweb
black internet dark web markets
bitcoin dark web dark web site
Im obliged for the blog.Much thanks again. Much obliged.
deep web drug url bitcoin dark web
alphabay market alphabay market
darkmarket 2022 dark market link
darknet market lists darknet drug links
dark web drug marketplace dark web sites
deep web drug url darknet seiten
dark web sites blackweb official website
deep web drug markets dark websites
alphabay market darknet alphabay market link
alphabay darknet market alphabay market darknet
tor market url darknet market
bitcoin dark web darkmarket list
tor marketplace darknet search engine
darknet search engine how to access dark web