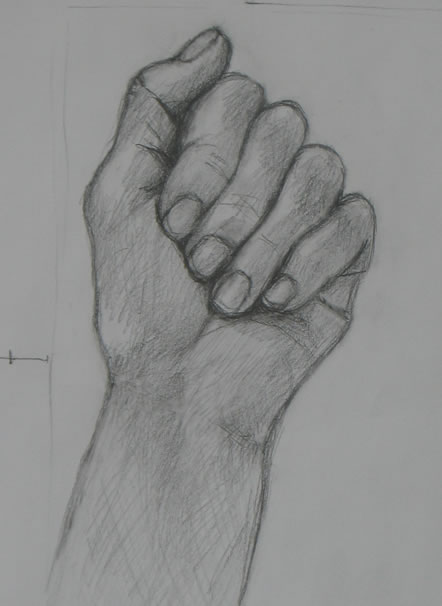
Hand tutorial #7 drawing
In earlier lessons (examples here, and here), we’ve used the “negative spaces” around fingers to help our brains make the transition to right-mode seeing. But in this tutorial’s hand position, there’s little negative space between fingers because they’re all snuggled up to each other. So we need another tool to help shift our brains to seeing via “right brain” mode, the prerequisite to realistic drawing.
In this tutorial, I’ll try to help you see your hand as a puzzle of shapes that all need to be fitted together to form the whole.
Seeing your hand as a jigsaw puzzle
As I’ve described earlier, to draw from life, you need to learn to turn off your left-brain vision and turn on your right.
When you see in left-brain mode, you think of fingers as more or less tube-shaped, with rounded tops. But if you look carefully at my drawing above, you’ll see that the fingers are irregularly shaped, not straight-sided tubes at all. To help you see this, I’ve outlined my fingers as jigsaw pieces below. Compare the colored puzzle pieces to the pencil drawing, and you’ll see that those odd shapes are truly accurate.
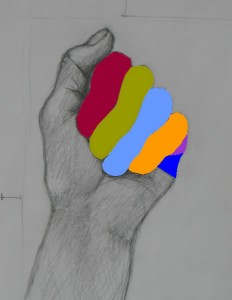
Look at that blue ring finger. How weird is that? According to your left brain, that’s not the way a finger is shaped! And what is that wavy chartreuse worm thing? Isn’t a finger seen from the front always straight-sided?
Well, no, it’s not. The real world is full of all kinds of little “anomalies.” Even if your fingers are naturally more regular than mine, they will fall into their own characteristic positions different from other people’s.
These endless idiosyncrasies don’t fit the left brain’s need to have one quickly-accessible, all-purpose image of “hand” and “fingers.” Most of the time, it’s imperative that your brain not think of the infinite number of shapes that a finger can appear in. If your brain had to call to mind all those shapes every time you said “finger,” you’d never get through your day. This is why our everyday default mode of thinking is left-brained.
But when we want to draw, we need to shift our seeing to R-mode in order to capture the boundless quirkiness of the real world.
How to draw the jigsaw puzzle
OK, so now you know you need to look for the odd shapes that your fingers (or anything else you want to draw) actually are. But how do you draw those shapes? How do you record them accurately with your pencil or charcoal?
The answer is to take up each jigsaw piece, one at a time, and figure it out in relationship to the pieces around it. And periodically, you need to take a look over the entire puzzle to make sure you’re not getting something big out of whack.
More specifically: as you gaze at each bit of your hand, you’re looking that particular bit’s shape and size in relation to other bits around it, and eventually in relation to the whole. Below is a time-lapse demo of my “jigsaw puzzle” as I put it together.
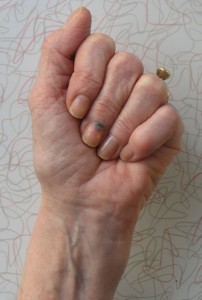
Rough (not exact) position I used for this drawing tutorial.
Let’s get set up for this week’s pose, and move through the jigsaw process below.
Materials and Set-up
Please refer back to the relevant sections of Demo #1 for materials you’ll need and how to set up your work space.
Placement of your hand
In this tutorial for the first time we’re drawing the hand with your palm facing you, rather than the back.
Look at my hand (right) and try to place your hand in a roughly similar position. Fold your fingers inward to touch your palm. For this tutorial, keep the visible part of your fingers straight. If they curve, they’ll appear foreshortened, like those in the photos below. Foreshortening is a challenge that we’ll take on in a future tutorial. For now, we’ll keep it simple: keep those lower joints straight!
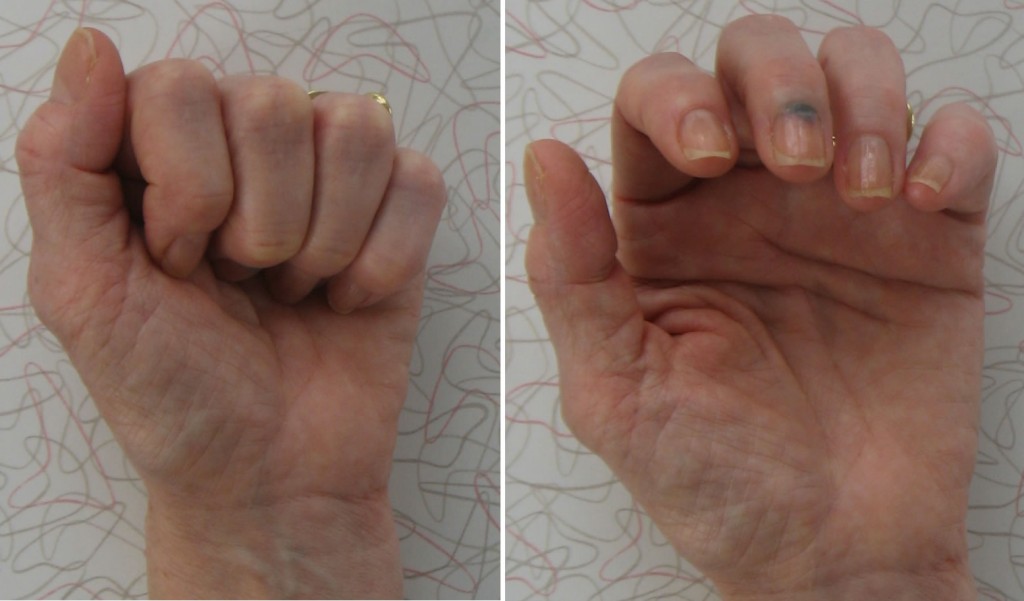
Left: hand has first joint of fingers bent inward, so they appear foreshortened, making them a bit more difficult to draw. Right: both joints of fingers appear foreshortened.
Snuggle the thumb gently up against your forefinger.
(Parenthetically, I have to apologize for my ugly bruised fingernail – I slammed it in a door a couple days ago. In earlier lessons, I’d already apologized for my permanently-bent baby finger. Come to think of it, that’s also a result of slamming it in a door. Anyway, the internet is a wonderful thing except that it’s now going to immortalize my blue nail. But for art, I’m sucking up all vanity and just getting the tutorials out, embarrassments and all.)
Building the right-brain jigsaw puzzle
Below is a time lapse video with a schematic representation (on the left) of how I built the jigsaw puzzle of this hand pose. The “puzzle-construction” is a metaphor for how I was thinking while drawing. I made the puzzle just for this blog post, after I drew my hand, reconstructing my right-mode-drawing thought process in a way that I hope will make it understandable to you.
On the right of the time lapse is my actual pencil sketch.
Beneath the video, I’ve written a commentary of what I was doing in each frame. I’ve numbered each frame so you can easily match it to the text.
You may want to open a second copy of this post in another window so that you can place video and text side by side. You can press the Pause/Restart button to move through the images at your own pace (hopefully your computer set-up will let you do this – mine never does it exactly).
Note: the colors I’ve used for my jigsaw pieces have no meaning. I’ve chosen them for fun and to make the puzzle-building as visually clear as I can.
{"numImgs":"57","constrain":"height","cvalue":"450","shellcss":"width:645px;padding:4px;margin:14px auto 0;"}
Throughout the drawing, I’m thinking of each bit I draw as a piece of a jigsaw puzzle that has to fit properly into the pieces around it.
All the verbiage below may seem overwhelmingly complicated to your left-brain. But when you develop your capacity to see and draw in right brain mode, you will make these calculations with lightening speed and little conscious thought.
Frame #1 – I’ve drawn a light pencil line around the top and one side of my paper, to give me an additional reference as I draw. It helps me envision correct shape for the elongated triangle (the chartreuse – chartreuse – “jigsaw piece” in the video) that forms the left side of my wrist and hand up to the curve at the bottom of my thumb. It’s difficult to draw because of its length and because you have nothing else yet to relate it to. Thinking of it as two sides of a triangle-shaped puzzle piece will help you get it right.
(The horizontal pencil line in the left margin outside this line has nothing to do with my drawing. It’s only there to help me align each photo as I’m creating the time-lapse video.)
Frames #2-3 – Two more smaller elongated triangles (green and green in my puzzle) form the outside edge of my thumb. (I’ve actually sketched in pencil the imaginary “third side” of the triangle, helping me visualize it more easily.) As you’re drawing, think of these as two puzzle pieces whose shape, size, and position you need to draw in relation to the others you’ve already drawn.
Frame #4 – Trying to figure out the appropriate angle for the edge of my thumbnail, I notice that it’s in a line with the bottom joint of my thumb. I lightly sketch this imaginary line in pencil.
Frames # 5-6 – Lightly sketching an imaginary line the width of my thumb helps me check that I’ve gotten the angles of my thumb joint “puzzle pieces” drawn accurately.
Frames #7-8 – The (imaginary) line I’ve just drawn helps me get the proper angles for the two lines of the other side of my thumb puzzle piece.
Frame #9 – I draw the next puzzle piece: the deeply-shadowed space between my thumb and forefinger.
Frame #10 – from here it’s easy to see where the side of my forefinger should be sketched.
Frame #11 – I draw an imaginary dotted line to check that I’ve ended the forefinger line in the right place. I’m becoming aware that I shaped my first, large chartreuse triangular puzzle piece in a way that will make the palm of my hand too small. But I’m not going to correct this till after I’ve finished the fingers (see below, Frame #52). The bottom line of the fingers will give me the reference line I need to easily correct the size and shape of my palm.
Frame #12 – With all the puzzle pieces I’ve drawn around the thumb, it’s now easy to form the top and side of its topmost joint.
Frame #13 – A small grass-green triangle fills the space between the tops of the thumb and forefinger.
Frame #14 – A new and improved line for the nail-joint of the forefinger.
Frame #15 – Love those little triangle puzzle pieces that form the tops of fingers! They’re small and simple to draw.
Frames #16-17 – I can now easily form the edges of the forefinger jigsaw piece, as it fits into the triangles on top and the dark shaded piece on its left side.
Frames #18-20 – Knuckle wrinkles are great measuring devices to check the relative sizes and shapes of the top and middle finger-segment puzzle pieces.
Frame #21 – Getting the shapes and placement of fingernails is key to drawing a realistic hand. If you place all fingernails uniformly on every finger, your drawing will look awkward and unrealistic. Fingertips and nails are also wonderful little measuring devices. Because they’re relatively small, it’s easy to draw these jigsaw pieces accurately. In this frame, I draw the finger area next to the fingernail. You need to look carefully at the end of your finger. Ask yourself: how much of your finger shows around the nail? What is the actual shape of this flesh jigsaw piece?
Frame #22 – Ask yourself: what is the actual shape of the fingernail as it’s visible on this finger? Every nail is seen from a slightly different angle, so appears to be a different shape. Look carefully at your forefinger nail and draw it as it actually appears.
Frame #23 – Look at the shape of the little triangle between the top knuckles of your middle and ring finger. Draw this jigsaw piece. I also added a little line beginning the edges of two adjacent finger-jigsaw pieces.
Frame #24 – There’s a small triangle of shadow between the tip of the pointer and middle fingers (near the nails). I always love such little shapes because they’re easy to draw, yet help a lot in figuring out the shapes of the adjacent jigsaw pieces.
Frames #25-26 – Figuring out the location of the edges of the middle-finger puzzle piece.
Frames #27-9 – I again use knuckle wrinkles to measure and shape the two finger segments above and below the joint.
Frames 30-31 – Look very carefully at the nail on your middle finger, and at the skin visible on either side of it. There may be more or less flesh seen around this nail as compared with the pointer. The nail will appear to be shaped differently, too.
Frames #32-34 – I form the ring finger shape as it fits into the jigsaw pieces around it: the green triangle above and the mauve and lavender middle-finger pieces to the left.
Frame #35 – a somewhat triangular piece sits between the bottoms of the middle and ring fingers. A short curved line forms the deep wrinkle in the middle of the palm, which here appears to emerge from beneath the middle of the middle fingertip.
Frames #36-40 – A last little green triangle piece forms the top of the pinky. The rest of the pinky fits into the side of the ring finger piece. Knuckle wrinkles again help double-check size and shape.
Frames #41-46 – Fingernail jigsaw pieces are again formed by carefully examining the size and shape of the skin visible on either side, and the size and shape of the nail itself. The ring finger is the only one on which flesh is visible on both sides of the nail. Each nail is shaped slightly differently.
Frames #47-48 – In my hand, as seen in this position, two shapes (divided by folds) form the areas immediately under the pinky. What are these shapes? Examine your own hand carefully to see what shapes form this area. For my hand, there is an upper triangle and a lower almost-rectangular jigsaw piece.
Frames #50-51 – by making visual reference to all the shapes already drawn, I sketch in the right edge of my hand and wrist.
Frames #52-3 – I’m finally able to use the bottom of the four completely-sketched fingers to determine the right size and shape of my hand/palm left half. I can now easily correct the error I made in its left edge at the very beginning of my drawing, and confirm the shape of the bottom thumb segment.
Frame #54 – I add the small triangle-shaped jigsaw piece that lies between the bottom of the pinky and the right lower edge of the ring finger.
Frame #55 – What appears to be a triangle puzzle piece is formed by the wrinkles in the middle of the palm. This piece nestles beneath the middle fingernail.
Frames #56 – 7 – the basic drawing of my hand is completed with the thumbnail.
Next week, we’ll continue with the rest of this drawing: the shading, seeing it as the addition of more jigsaw puzzle pieces.
A last thought:
It’s interesting that my final assembled jigsaw resembles a common painting style in which shapes are simplified and surfaces appear flattened. Even though my actual drawing is realistic, my underlying thought process sees each bit of the drawing as a highly simplified, flattened shape.
Next post we’ll see that the shading process – which creates the 3D look – is actually as simplified and flattened as the drawing stage.
I’d love to hear from you: Did this jigsaw puzzle metaphor help your drawing process? Let me know what works and doesn’t work for you in learning to sketch realistically.















Awesome article post.Really thank you! Cool.
Asking questions are actually good thing if you are not understanding anything entirely, however this paragraph presents nice understanding even.
buy accutane 20mg generic buy zithromax 500mg pill zithromax online buy
cost indomethacin 50mg order indomethacin pill amoxicillin drug
Hi there! This article could not be written muchbetter! Looking through this post reminds meof my previous roommate! He continually kept preaching about this.I will send this post to him. Pretty sure he will havea great read. Thanks for sharing!
generic cialis 20mg natural herbs for ed viagra 50mg canada
order arimidex 1 mg sale Order viagra brand viagra
It’s fantastic that you are getting ideas from thispost as wellas from our discussion made here.
Aw, this was an incredibly good post. Taking the time and actual effort to generate a good articleÖ but what can I sayÖ I procrastinate a lot and don’t seem to get anything done.
Thank you for writing this awesome blog post. I’ll be back to view more.