This is the third in a series of online drawing lessons using your hand as your model. The first, most basic lesson is here.
The hand is so complicated visually, so able to move its parts in infinite ways relative to the various other parts, that a small movement creates new shapes and new challenges in drawing. And your hand is always available to “pose” for you!
At the end of this lesson, you’ll find a time lapse photo sequence of my entire Tutorial #3 drawing process, from my first pencil line to the finished sketch.
Setting up
Please refer back to the relevant sections of Tutorial #1 for materials you’ll need and how to set up your work space.
Placing your hand
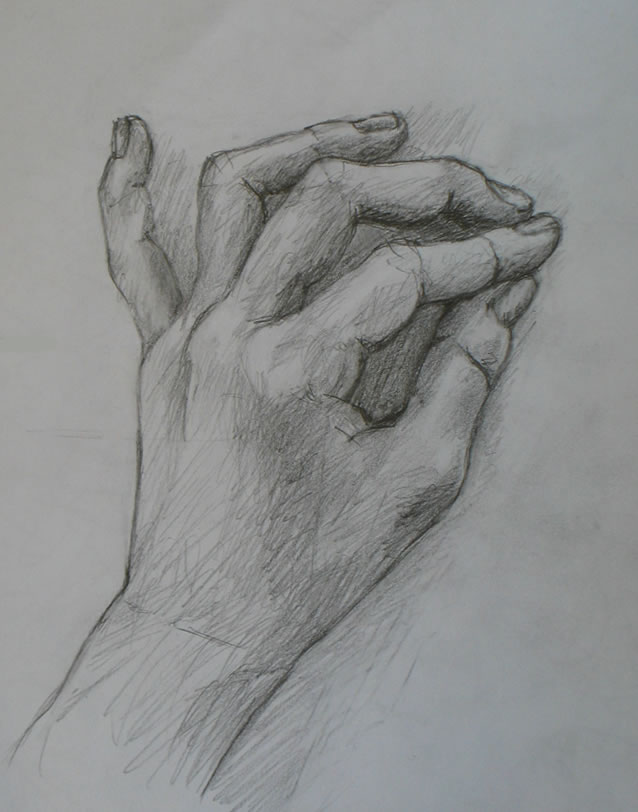
I chose this rather odd position of my hand because it produces an interesting variation in the negative-space shapes (between the fingers) that we’ve been working with so far.
To place your own hand for this drawing, focus on the spaces between your fingers. You may not be able to replicate the shapes of the spaces exactly as I did them, because your hand is probably a different size and shape than mine. Just place your hand in a position close to this. The goal is to create varying shapes in the spaces between your fingers.
That may seem like an odd goal. But remember, I’m trying to get you to switch the way you’re seeing to a different mode – what Betty Edwards calls right-brained mode.
Right-brained seeing is all-important for many artists’ drawing process. But the switch isn’t easy for the human brain to make, as I explain here.
Seeing the negative space between your fingers
To prime your brain to switch to seeing in right-brain mode, look at the different shapes between my fingers (below). Between the ring and middle fingers is a small triangle. Between middle and pointer fingers is a more elongated shape. And between forefinger and thumb is something like a teardrop shape. In addition, there are small triangles between the tips of the fingers.
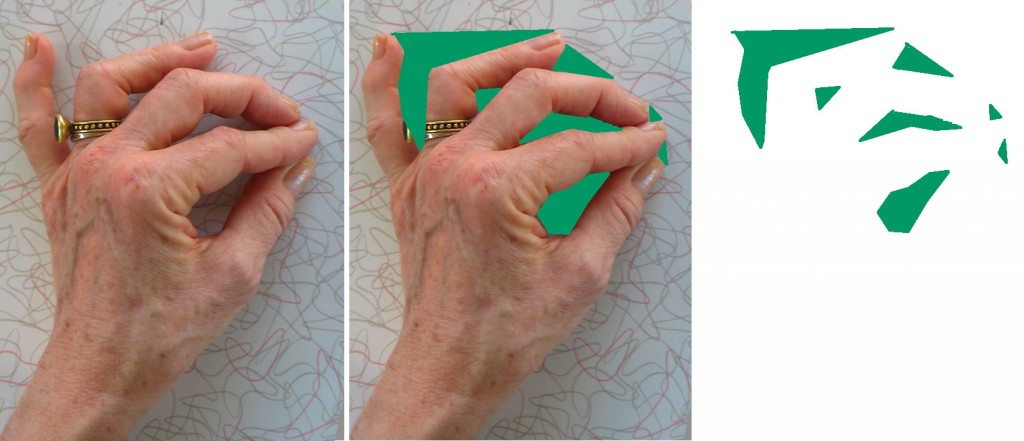
Focus on the space between my fingers, indicated in green in the middle image. On the far right are the green "negative spaces" without a photo underneath. Note the variety in their shapes and positions. This is what you will draw first.
Now look carefully at the spaces between your own fingers. What are the different shapes and sizes of the spaces your fingers create? That’s what you’re going to draw first.
Drawing the negative space between your fingers
The sequence below shows how I began my drawing with the negative spaces between my fingers, moving from left to right. It may also be helpful for you to watch this process in the time-lapse video at the end of this post.
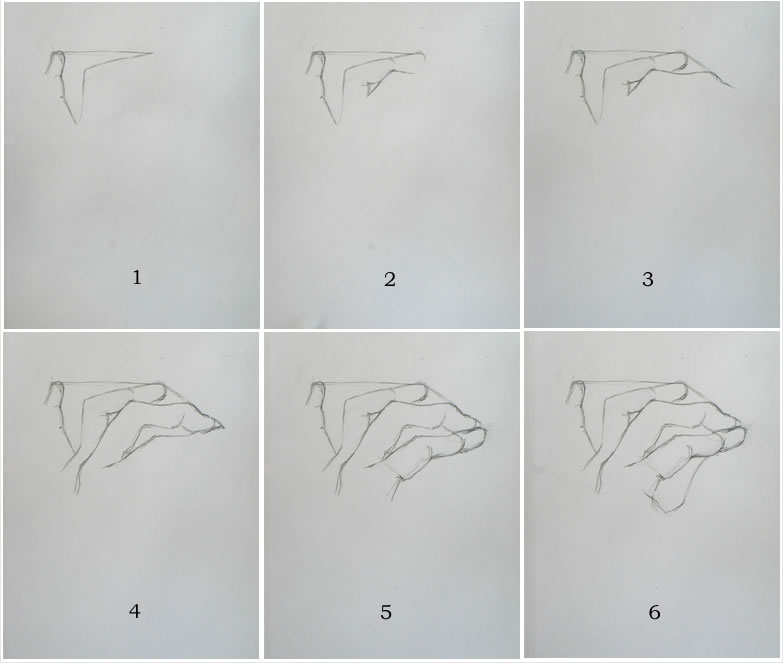
This sequence shows how I first drew the negative spaces between my fingers.
To help you judge where you should draw each line, notice where the sharp angle of each finger “fits into” the previous finger. For example, the sharp bend in the ring finger occurs opposite the middle of the top segment of the pinky (Image 1 above). The sharp bend of the middle finger overlaps the ring finger halfway across the ring finger’s top, straight edge (Image 3 above). The pointer’s sharp bend is very close in shape to the underside of the middle finger’s bend (Image 4 above).
Using finger joints as a measuring device
In this demo I draw more joint details of some fingers, compared to previous, simpler hand position negative-space sketches. At this early stage in the sketch, you don’t want to put in too much detail. You want to first sketch out the basic shapes of your hand. So at this early point, I’m drawing the finger-segment details solely as a measuring device. They help me judge the size and shape of the negative spaces I’m drawing.
Later in the drawing process (see Tutorial #3 video below), I will continue to draw in more of the tiny wrinkles that form each finger-joint. Each time I did this in this particular drawing, my purpose was to use these lines as measuring devices that helped me check whether I was drawing everything around the joint to the appropriate size.
Artists always need ways of judging relative sizes of elements they’re drawing. So with anything you draw, look for the smaller sub-units that make up the whole. You can use them to measure and also to judge whether you’re drawing angles and shapes accurately.
Artists often use grids in drawing. These are another form of measuring device, and they also help you judge whether you’re drawing angles and shapes correctly. It’s always easier to judge the size and angle of a line when it’s short than when you’re trying to draw an entire object all at once. This is exactly how I’m using the joints of the fingers in my drawing.
At the same time, it’s very important to remember that you must not get lost in detail at this stage. Right now, you’re just blocking out very basic shapes. Keep moving forward! Don’t get stuck on one tiny part of the whole. You will make adjustments and add details later.
Some tips on shading your drawing
As you begin shading your drawing (see the video at the end of this post), it’s often easiest to look for the very darkest areas and begin there. As you can see, I use the loosest kind of pencil scribbles to shade these hand drawings. This is fine – you’re practicing. Don’t get too caught up in technique right now.
Squint your eyes to see the lights and darks of your hand. If you’re lucky enough to have strong lighting on your hand, you may not need to squint much. But if the light is more even, you’ll need to squint hard!
Sometimes you’ll find it difficult to see any but the darkest shadows on your hand. To create a fully-rounded appearance, you’ll need to sketch in the more medium-toned shadows as well. If you’re having trouble seeing these, look instead for the highlights on your hand – the very lightest areas. Once you see the pattern of the lightest lights, it will be easier to recognize the paler shadows around them.
Final adjustments
The next day after I did this hand sketch, I noticed that I had made the base of the hand and the large thumb knuckle too wide. So I got out my eraser and pencil and made some adjustments. I also fiddled with the shading around my fingers.
You can continue “fixing” little bits of your drawing as long as you want. But it’s often more helpful to just note where you want to improve next time, and then move on to a new drawing. Keep practicing new drawings all the time!
Hand Drawing Demo #3
You can click through this demo at your own pace. Stop it at frames you want to study longer and move fast through other sequences.
{"numImgs":"42","constrain":"height","cvalue":"450","shellcss":"width:353px;padding:4px;margin:14px auto 0;"}

















buy tadalafil online cheap order generic voltaren order voltaren
order isotretinoin without prescription brand azithromycin 250mg zithromax oral
buy indocin pills terbinafine price buy trimox 500mg
https://cheapestedpills.shop/# ed medications list