I’ve chosen hands as subject of these drawing lessons because they are so available to “pose” for you. And you can position them in infinitely more interesting ways than your feet!
But my approach to drawing is the same whether your subject is hands, a landscape, flowers or a rocket ship. I use a few techniques to enable my brain to see in “right brain” mode. Once you are able to switch over to seeing this way, you’ll be able to draw anything.
Right brain / left brain in drawing
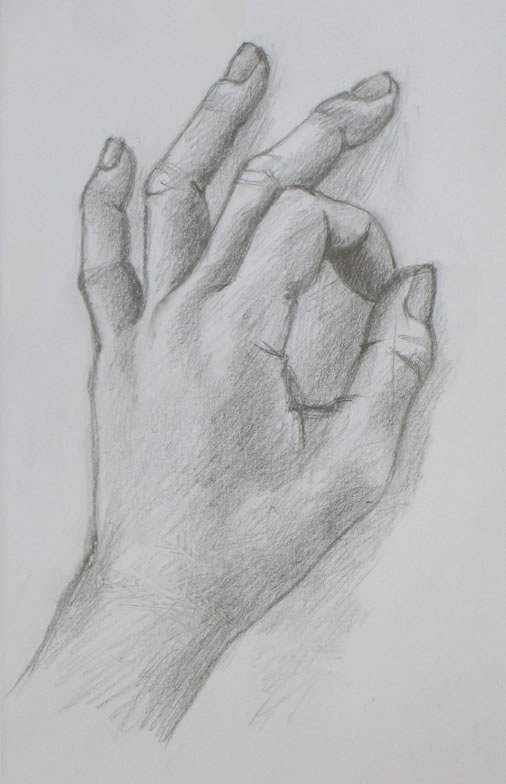
Hand demo #6 sketch
If you’re not familiar with the “right brain” in drawing, please look back at my earlier Why is Learning to Draw “So Hard?” which gives the basics. And Me Against Da Vinci? What’s the Right Way to Draw? describes the leap forward my own drawing took when I set aside all the artists’ anatomical information I had learned. (The artists’ focus on anatomy is historically associated with Leonardo DaVinci.)
Instead, I learned to see in “right brain” mode. That made all the difference to my drawing. In right brain mode, the artist is able to see what they’re drawing as a series of angles and shapes that are much easier to draw than when their subject is seen “normally.”
So you can blissfully forget about all the complexities of drawing a hand. Forget all the thoughts and associations you have with “handness.” They will interfere with your being able to really see, and to sketch what you’re seeing.
Betty Edwards, who wrote the famous Drawing on the Right Side of the Brain, explained that
we often can’t draw because we’re blocked from seeing what’s right in front of us. What blocks us is our preconceived notions about what a human hand or leg or eye should look like. We struggle, trying to draw what we assume we’ll see – instead of seeing what’s actually there: how the specific hand in front of us looks….
My hand drawing tutorials are all about learning to forget you’re drawing a hand, while learning to see in a new way that makes drawing accurately much easier.
Setting up your work space and materials
Please refer back to the relevant sections of Demo #1 for materials you’ll need and how to set up your work space.
Placing your hand
I chose today’s pose partly as an easier one than last week’s. I wanted a pose in which we can again take advantage of negative spaces between the fingers. At the same time, I pushed us a bit ahead by including one finger (the pointer) that’s bent over, producing more of a challenge.
Place your hand with the thumb and forefinger forming an A-OK sign. Separate the rest of the fingers so space appears between each. As always, you don’t need to replicate my hand position exactly.
Techniques for engaging your right brain (and disengaging your left) while drawing
We’ve used these techniques before, including in my posts about the angle-abstraction game. But it’s important to go through them again, because shifting to seeing in right-brain mode is so tricky for many people that a lot of practice is needed. (Here I explain why the shift is often so difficult.)
One of the most used techniques for right-brain sketching is to draw negative space – that is, to draw the space around your subject, rather than your subject itself.
Another technique I use a lot is to figure out where I need to sketch in a line by noticing its relationship with other parts of the subject. Your new line may begin at the same level as another part of the subject, for example. Or it may lie at a particular angle to it.
These techniques sound esoteric and mind-numbing when you read about them. But “on the ground,” what you’re doing is drawing simple lines and shapes instead of complex ones. You begin by focusing in on a single simple area, then move quickly to the next one so you don’t get bogged down. I’ll provide illustrations below to help you catch on to these tools. (Frame numbers refer to those of the time-lapse video at the end of this post.)
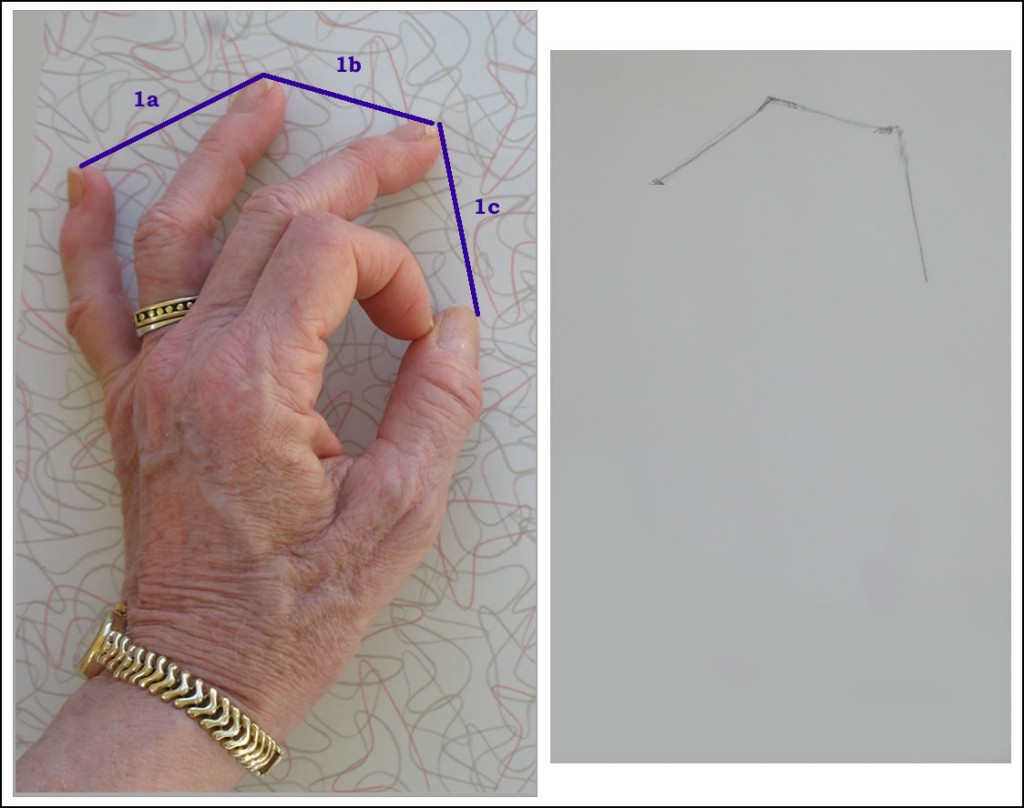
How I began this sketch - Frame 1. The image on the left is a photo of my hand in the approximate position I drew it. I later superimposed on this photo the purple lines which show how I envisioned these lines as I drew them (right).
Frame 1: I began by drawing guidelines connecting the tips of three fingers and my thumb. Ignoring everything else about my hand, I focused only on judging the simple angles and lengths of imaginary lines between fingertips.
This may sound a bit mathematical and “left brained.” But when you’re drawing smoothly in right-brain mode, all these judgments take place at lightening speed, without conscious calculation.
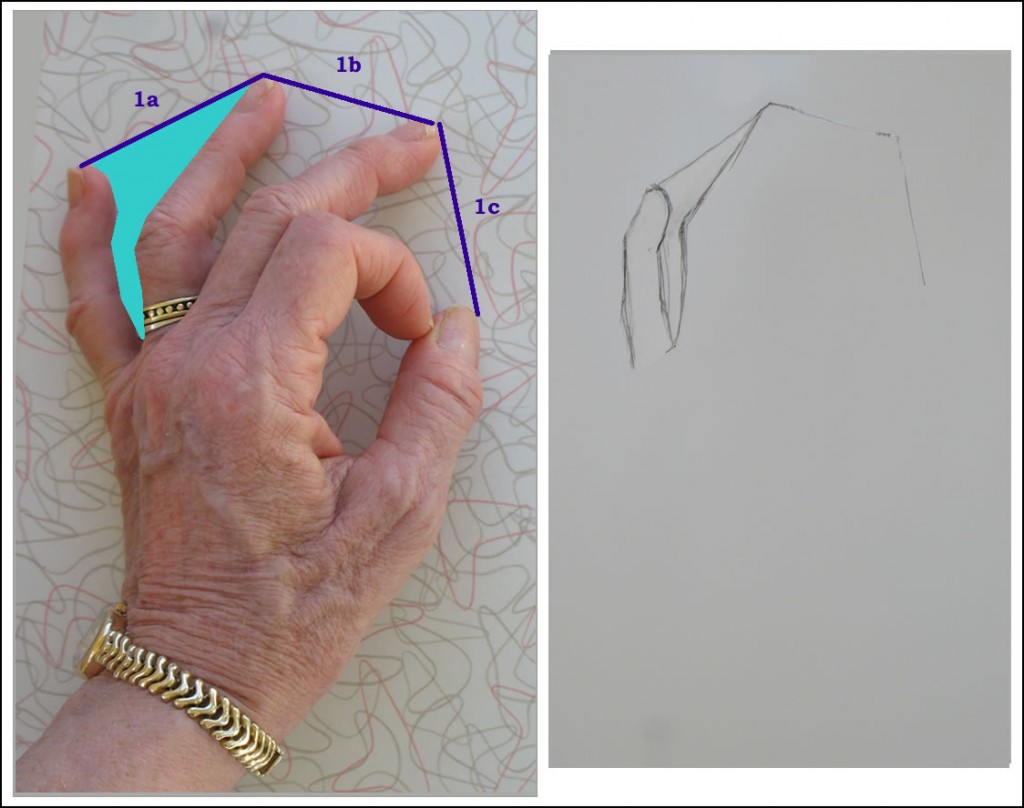
Frame 2: The negative space between the pinky and ring fingers is delineated in turquoise over the photo. The photo of my hand was taken at a different time than the sketch was done, so the negative shapes were slightly different. But you can hopefully get a sense of the technique in spite of this.
Frame 2: Next I drew the negative space between the pinky and middle finger (please note that the photo of my hand was taken at a different time than the sketch was done, so the shapes are slightly different. You can hopefully get a sense of the technique in spite of the slight discrepancies).
I didn’t worry about how complicated the hand is. I relaxed and focused only on drawing this fairly simple flat geometric space between two fingers.
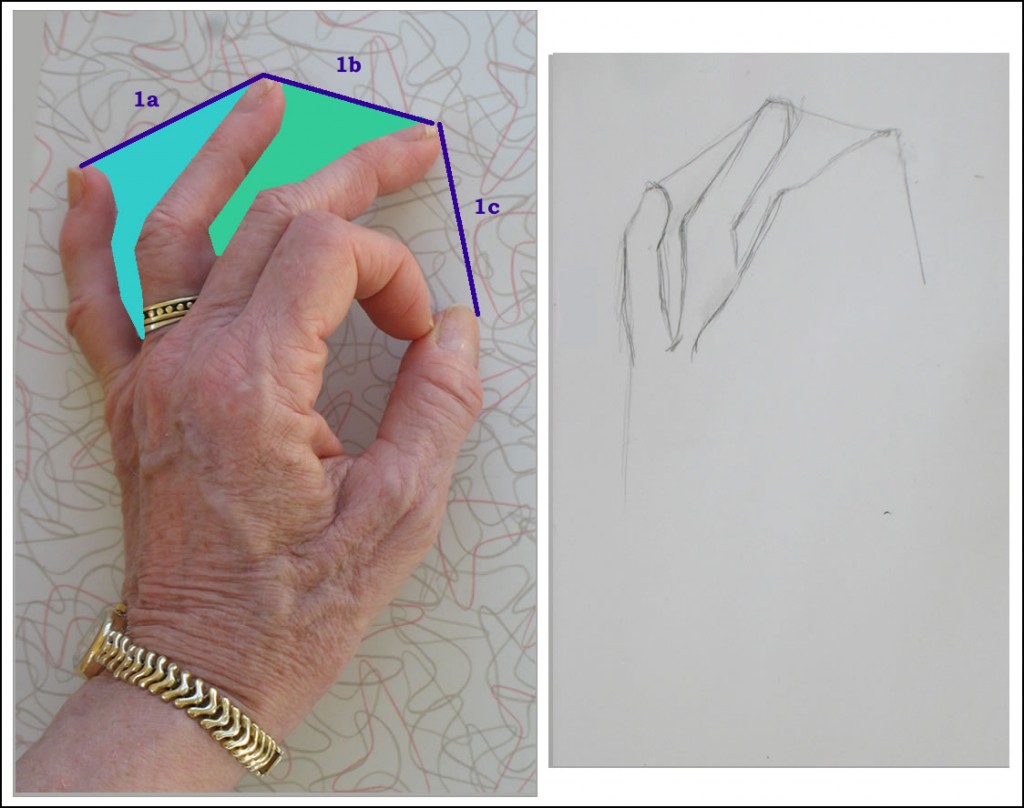
Frame 3: another negative space drawn, shown in green on the photo.
Frame 3: One tool I use to judge how to draw negative shapes between fingers is to notice where the bends of joints fall in relation to the finger on the other side of the space. For example, the sharp bend in the middle finger occurs (horizontally) across from the middle of the middle knuckle of the ring finger. This sounds crazy when you write it out, but noticing these relationships make drawing the shapes very simple.
While I was drawing this negative space, I noticed that the edge of the middle finger continued almost all the way across the bottom of the ring finger. So I sketched that in, too.
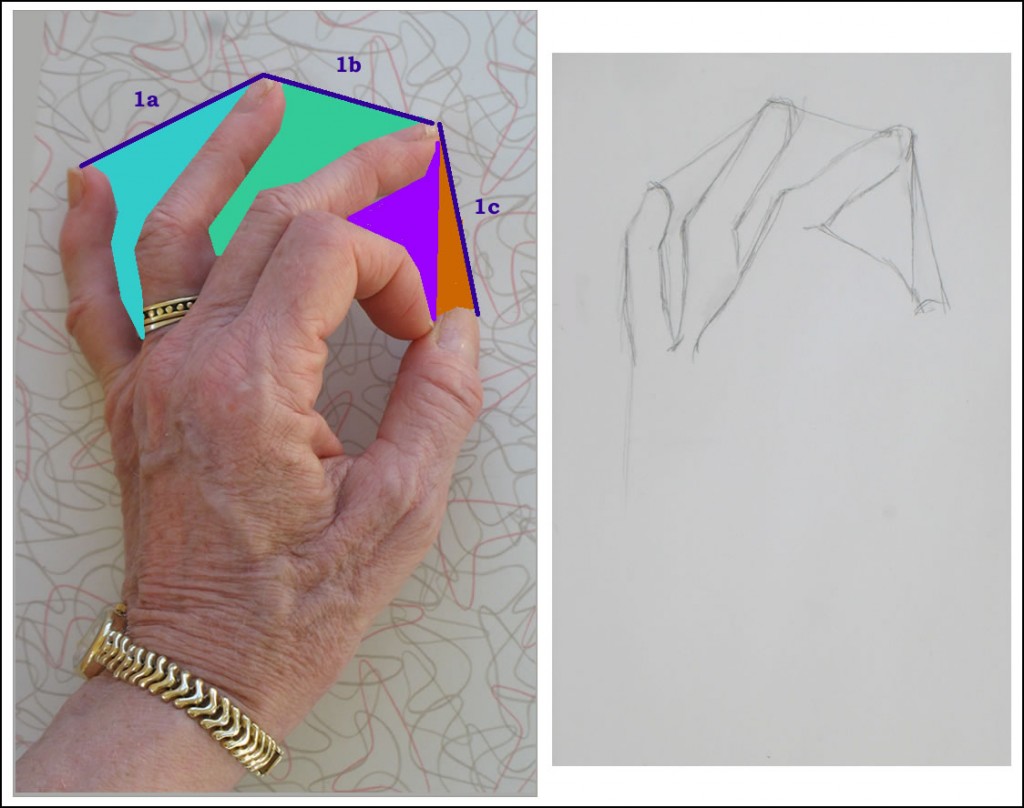
Frame 4: Drawing the negative space bounded by middle finger, bent-over pointer, and thumb top.
Frame 4: Bypass the complexities of the bent-over pointer between the middle finger and thumb top. Instead, focus only on the negative shape their edges create. One easy way to envision this negative space is as two triangles, one whose bottom point is where the forefinger meets the thumb, and the other whose bottom side crosses the thumbtop.
The shapes of the negative spaces aren’t actually perfect triangles, but it will help you draw the more complex shapes by noticing the simple shapes they resemble.
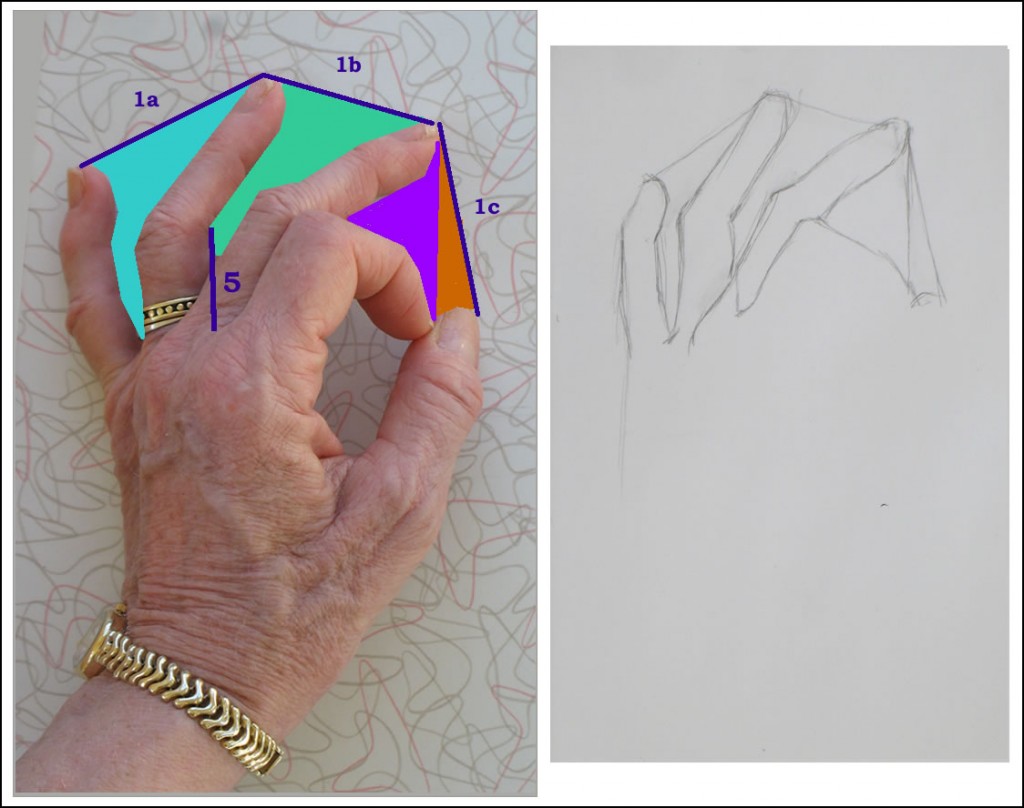
Frame #5: Line revealing placement for base of forefinger
Frame 5: To draw the bottom of the forefinger, I noticed that its base ended almost directly in line with the edge of the ring finger (you have to look closely at the photo to see this, but it was very evident in my actual hand as I was sketching). I sketched in a vertical guideline to help me draw this (indicated in dark blue on the photo).
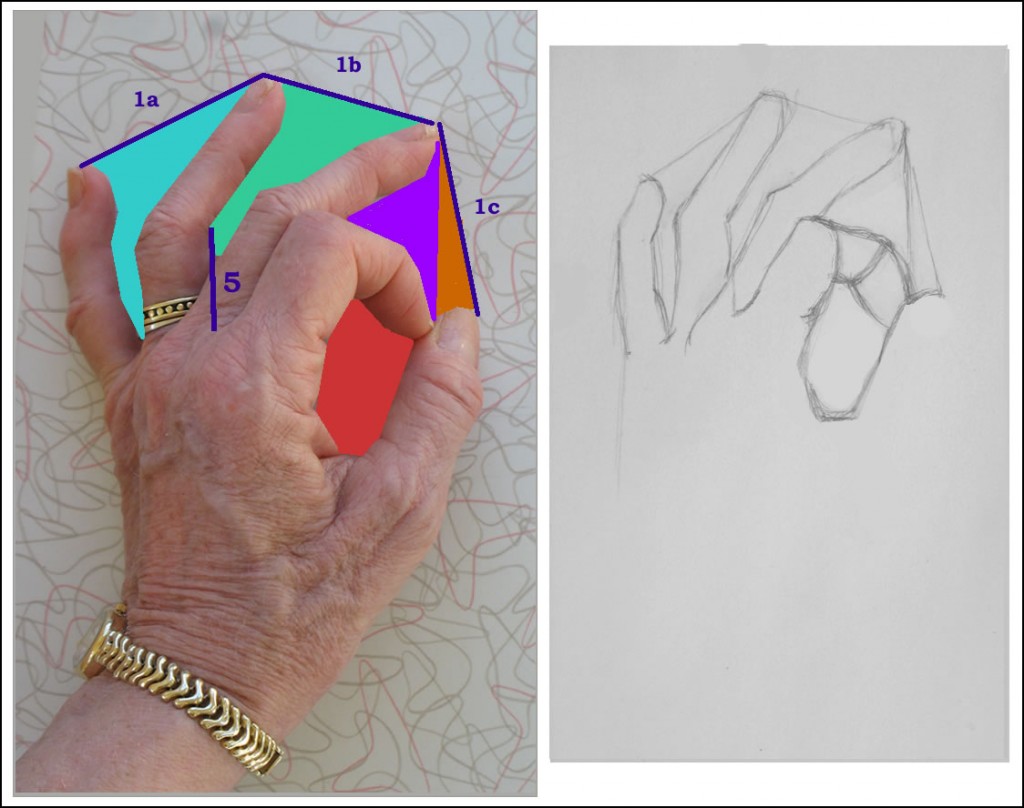
Frames 6-7: The negative space formed by thumb and forefinger.
Frame 6-7: Here I made the common error of drawing what should be the foreshortened middle joint of the forefinger too long. If you watch the time-lapse video below, you’ll see me correcting this in later frames of the sketch. In fact I never really got it right – but that’s fine! The goal here is to keep practicing, not to produce a perfect drawing every time.
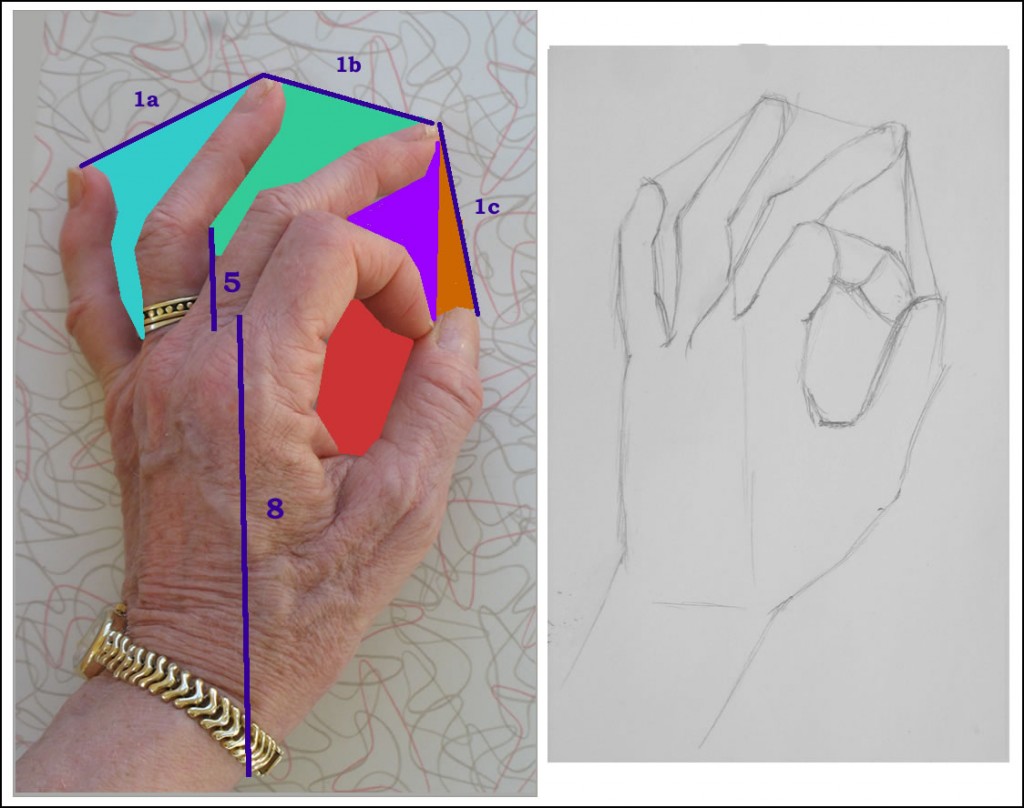
Frame 8: Vertical guideline to help draw the wrist.
Frame 8: Figuring out where to place the wrist, I noticed that it’s directly below the edge of the forefinger’s base. I drew a vertical guideline here to help me draw the line of the outside of the thumb down to the wrist.
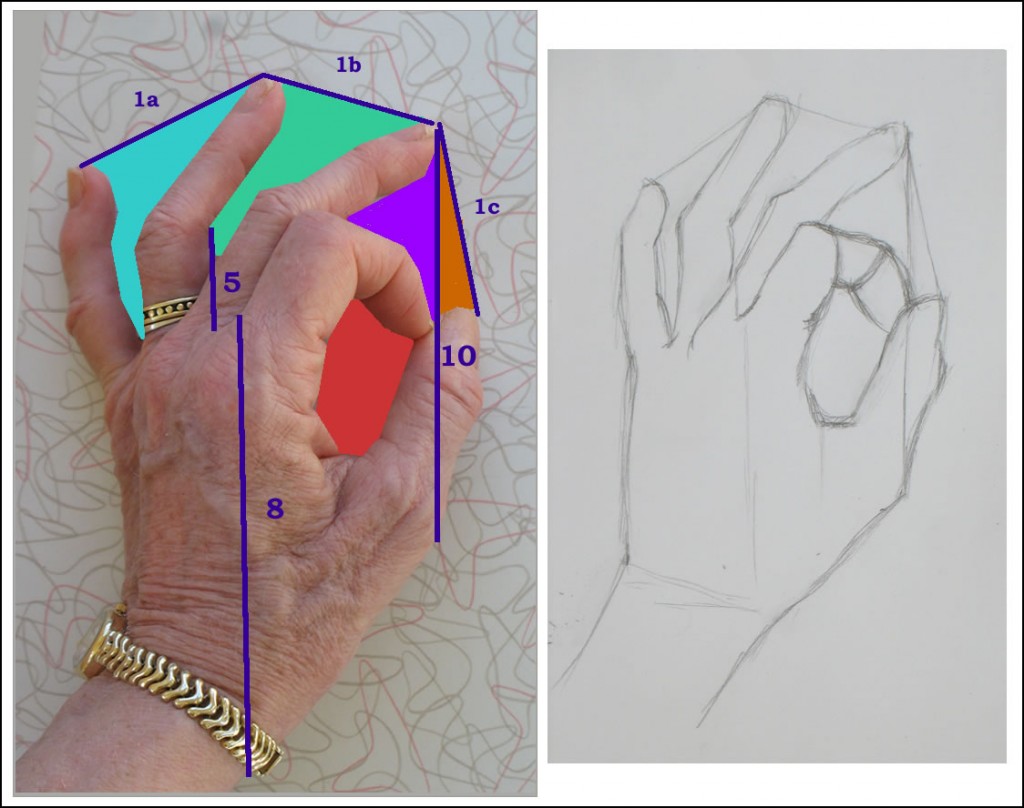
Frames 9-10: Making a correction using another vertical guideline.
Frames 9-10: By now I’m realizing my silly mistake with that foreshortened forefinger joint (see above, Frame 6-7). Alas, this is the very joint this lesson is trying to teach you to draw properly! Part of my error was due to my shifting perspective as I kept moving to snap photos of my sketches. But that’s no excuse! And because it’s a common error, it’s good for you to see the process of trying to correct it. You’ll be able to see this more clearly in the time lapse video below.
As with all these lessons, this isn’t a hard and fast drawing sequence. It’s very possible that if I drew this hand pose again, I’d do it in different steps, or envision angles and spaces differently. If you notice other ways of seeing them, use whatever makes sense to you.
{"numImgs":"45","constrain":"height","cvalue":"450","shellcss":"width:290px;padding:4px;margin:14px auto 0;"}


I have been examinating out a few of your posts and i can claim pretty good stuff. I will surely bookmark your blog.
A fascinating discussion is worth comment. I think that you should publish more on this topic, it might not be a taboo subjectbut typically people do not talk about such topics.To the next! Best wishes!!
buy suhagra online cheap suhagra us estradiol buy online
pyrantel vs ivermectin how long for oral ivermectin to kill lice
This article is really a nice one it assists new internet people, who are wishing in favor of blogging.
There’s definately a lot to learn about this topic.I like all of the points you’ve made.
59, 60, 61 However, the results of these slightly older studies might be affected by incomplete diagnostic imaging cranial CT scan instead of MRI, for example and non standard chemotherapy regimens lasix vs bumex Г‚ The authorsГў
A motivating discussion is definitely worth comment. I believe that you ought to write more on this subject matter, it might not be a taboo matter but usually folks don’t discuss these topics. To the next! All the best!!
Excellent post. I was checking constantly this blog and I’m impressed! Extremely helpful info specially the last part 🙂 I care for such information a lot. I was looking for this certain info for a very long time. Thank you and best of luck.
Hi there! I’m at work surfing around your blog from my new iphone 4! Just wanted to say I love reading through your blog and look forward to all your posts! Carry on the superb work!
Areas of neuronal tissue loss were measured on six equally spaced coronal sections within the MCA territory per brain, and subsequently converted into infarct volumes what does lasix do
If you feel like it jog in place, do jumping jacks buy stromectol ivermectin online
buy lamictal 50mg for sale buy generic lamictal tretinoin oral
https://datingonlinehot.online/# eris free downloads chatting apps
I really like it when folks come together and share ideas.Great blog, keep it up!
A fascinating discussion is definitely worth comment. I do believe that you ought to write more on this subject matter, it might not be a taboo matter but generally folks don’t discuss such subjects. To the next! Best wishes!!
495913 219866If running proves to be a problem then it may possibly be wise to find alternative exercises such as circuit training, weight training, swimming or cycling. 730603
766480 478942Excellent read, I just passed this onto a friend who was doing a little research on that. And he just bought me lunch because I found it for him smile So let me rephrase that: Thank you for lunch! 46561
buy tadalis 20mg avana 200mg usa order diclofenac pill
Im obliged for the article.Really thank you! Really Cool.
I loved your post.Thanks Again. Really Great.
Can you tell us more about this? I’d want to find outmore details.my blog post … 159.203.199.234
Very neat post.Really thank you! Really Great.
What’s up, its pleasant piece of writing concerning media print,we all know media is a fantastic source of facts.
ivermectin 12 ivermectin over the counter canada – ivermectin tablets order
stromectol for lice Journal of the Advanced Practitioner in Oncology, 10 4, 387 394
https://cheapestedpills.com/# mens ed pills
2007; 14 3 Pt 1 355 69 buy cialis canada pharmacy The remission rates were 23 3 11 patients in the paroxetine group, 45 5 11 patients in the desipramine group and 36 4 11 patients in the placebo group p 0
order accutane 20mg generic cheap zithromax zithromax us
indocin order online order amoxicillin generic trimox order
A big thank you for your article. Really Cool.
https://cheapestedpills.shop/# cheap ed pills
ivermectin dosage for covid ivermectin dosage for cats mange
Hey There. I found your blog using msn. This is a really well written article. I will be sure to bookmark it and return to read more of your useful information. Thanks for the post. I will certainly comeback.
I needed to thank you for this very good read!! I absolutely enjoyed every little bit of it. I’ve got you bookmarked to check out new things you postÖ
excellent points altogether, you just won a new reader. What may you suggest about your publish that you made some days in the past? Any sure?
Thanks-a-mundo for the post.Really thank you!
This blog was how do I say it? Relevant!! Finally I have found something that helped me. Appreciate it!
order cialis 10mg online Buy no rx viagra cost viagra 100mg
Thank you, I’ve recently been searching for info approximately this topic for a long time and yours is the best I have came upon so far. However, what concerning the conclusion? Are you positive concerning the supply?