All of my drawing tutorials are based on two fundamentals:
1) It’s always easier to draw a small, simple, flat shape than to draw a large or complicated one.
2) Learning to see in “right-brain” mode enables to see your subject as a series of small, simple, flat shapes that all fit together.
Put these two concepts together, and you may envision something like a jigsaw puzzle….
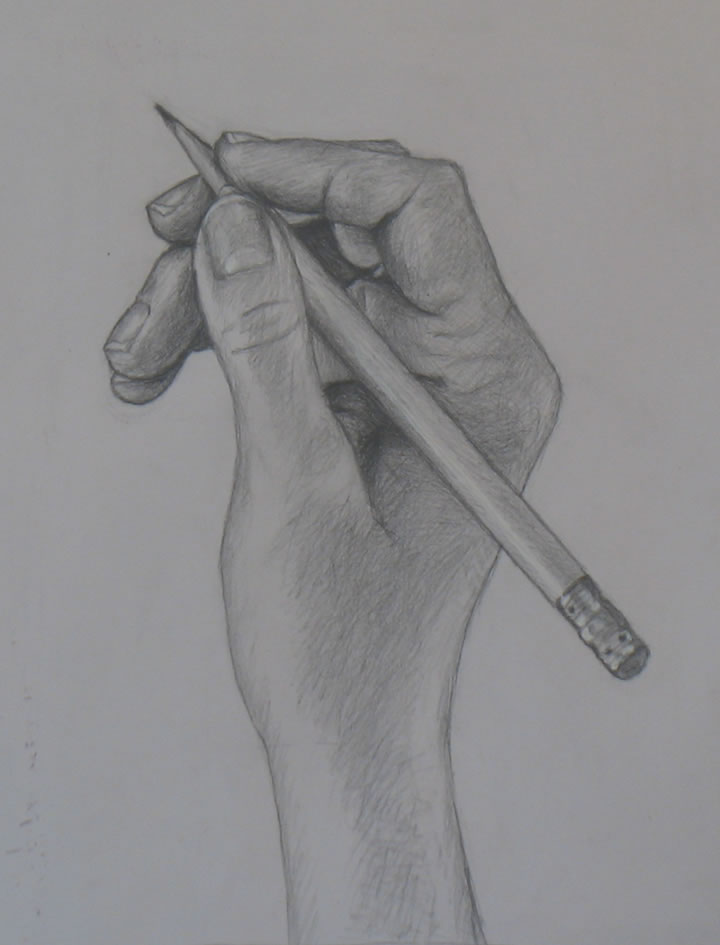
Hand drawing #12: holding a pencil
Note: If you’re beginning these drawing tutorials for the first time, you may want to start with an earlier one – the first is here for example; the third here – and move forward from there.
Hand pose #12: Holding a pencil
For me, knowing how to draw is above all knowing how to see in what Betty Edwards called “right-mode,” or with the “right brain.” So I’m always trying to think through what might show you how to see in this way. If you learn how, it will help you draw easily.
As I was drawing this tutorial’s hand pose, I made a special effort to actually sketch in many of the guidelines I usually envision mostly in my head. I hope this will help you see this hand pose as a series of easily-drawn, small, simple shapes.
Unlike many drawing instructors, when I say “simple shapes,” I don’t mean cones and cylinders. That is, I’m not talking about volume. In my own experience, seeing objects as flat forms, like jigsaw puzzles, is much more helpful than seeing in terms of volumes.
After all, you’re drawing on a flat surface. You’re not sculpting in three dimensions. So it makes sense that you will be most successful if you can see what you’re sketching as a series of flat shapes.
As you’re drawing, think of shapes that make up a jigsaw puzzle whose pieces all need to be drawn accurately in order to fit together snugly. If you form each little piece correctly, and fit it properly into its neighbors, you’ll find that your drawing is a realistic representation of your subject.
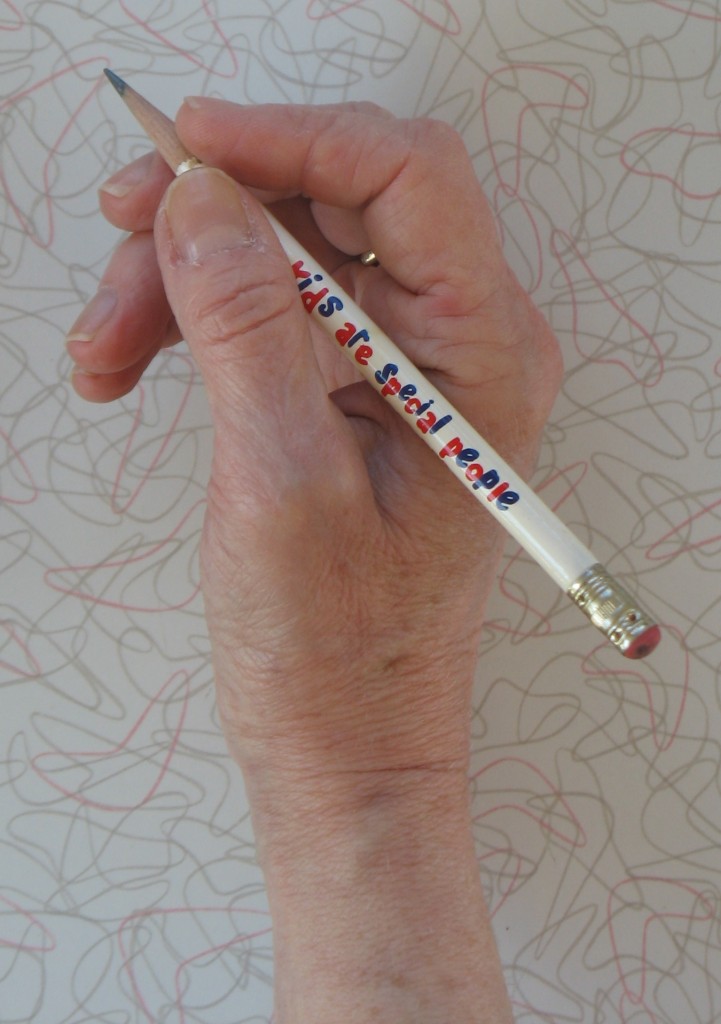
Tutorial 12 hand pose: holding a pencil
Earlier posts, here and here, have presented colored-puzzle videos of my jigsaw puzzle concept. You may want to look at those before or after you go through the video below.
Which type of video helps you more? Or are they both equally useful in your learning to draw? Leave a comment below or email me to let me know.
Set up and work materials
Please see the relevant sections of this tutorial.
While most of my hand tutorials have been drawn from life (that is, my actual hand), this week I worked from a photograph of my hand. I did this partly because I wanted to sketch my hand holding one of its most typical tools, a pencil. I couldn’t hold a pencil in a natural way in my right hand while also sketching it!
I used the vertical setup, with the photo on a computer screen next to my easel. If you try this, be careful that you can see both the photo and your drawing straight on, so your drawing won’t be thrown off by some odd perspective.
Hand tutorial #12 video Part 1: initial outline
There is a written commentary below the video, keyed to each frame by number. You may want to open this post in two windows on your monitor so you can follow the commentary along with the video.
{"numImgs":"33","constrain":"height","cvalue":"450","shellcss":"width:356px;padding:4px;margin:14px auto 0;"}
Frame 1: I sketched in boundary lines along the left side and top of the paper. which enabled me to…
Frame 2: …draw a small rectangle in the upper left corner whose lower point would be the pencil tip. A diagonal line then formed the pencil’s sharpened top. To sketch the pencil at the correct angle, I envisioned where it would intersect my border-line if the line of the pencil were extended (I did extend it as a guideline, to be erased later on) .
Frame 3-4: Several triangles – formed partly by imaginary guidelines – told me where to draw bits of edges of finger tips and pencil top. In Frame 4 I corrected the triangles I’d sketched in Frame 3. Note that I’m using negative space here – the space around the hand and pencil, rather than the objects themselves. “Pieces” of negative space are important parts of the jigsaw puzzle. If you don’t yet know what negative space is, please look back at this tutorial.
Frame 5: I continued the process of envisioning the jigsaw pieces: the fingertip just below the pencil point, for example, had a curved bottom, two straighter sides, and a straight “top.” This is an example of how important it is to envision the shapes you’re drawing as flat bits. If I had been thinking about how to draw the 3-dimensional volume of fingers, I would have had a much harder time. Instead, I easily drew a small, seemingly “flat” shape.
Frame 6-7: I continued the same jigsaw-building process.
Frame 8: In order to properly represent the long sweep of the lower hand, I needed to eyeball over a larger space. I could see that the edge of the base of the thumb was beneath the middle of the forefinger tip I’d already sketched. So I lightly sketched a vertical guideline. I made a horizontal guideline from the bottom of the pinky rightward, to help me see where the most rightward curve of the thumb base should be marked.
Frames 9-11: I’ve said it before and I’ll say it again: fingernails make great measuring devices that you can use to check the accuracy of other bits you’ve already sketched.
Frames 12-14: I formed the side of the thumb and a bit of the fingers next to the pencil from simple, small shapes. Can you identify these jigsaw shapes in the photo above?
Frames 15-16: I darkened the interior shape I’d just sketched, helping me see it more clearly to be sure it was exact. This jigsaw piece is very distinctive and is at the core of the series of bits around it. So drawing it precisely would help me with the rest of the hand.
Frame 17: Knuckle and palm wrinkles make fabulously helpful measuring devices and guidelines. Here I used the thumb knuckle wrinkle to form a bridge to check the accuracy of lines I had drawn on either side of it. The thumb cuticle also helped me refine the whole thumbnail outline.
Frames 18-20: Now that I had the lines on either side of the thumb placed pretty well, I could begin the neighboring triangles that form the palm and – via their negative space – the pencil edge. Note that I used a palm wrinkle as a side for triangles.
Frames 21-22: The forefinger is made up of three jigsaw pieces. Our image of fingers may be that they’re made up of three almost identical rectangles. But look carefully at your pointer in this pose. It’s made up of three shapes that are quite different from each other in size and shape. Draw each of them right, and you’ll have the entire pointer in a pose immediately recognizable as realistic. (My pointer in this pose has a short middle section and a seemingly-fat bottom section.)
Frame 23: Now that I have more drawn, I’m able to correct some palm lines.
Frames 24-26: I used a series of guidelines to form the right side of the hand, which helped me capture the knuckle-triangle properly. I also used a very flat negative-space triangle, whose longest side was a guideline I drew from pointer joint to knuckle.
Frames 27-29: I used a series of vertical “plumb lines” to help me locate the correct placement for the bottom of the hand and the wrist. I was also keeping an eye on the negative-space angle (imaginary triangle) formed by the pencil’s lower line and the wrist.
Frame 30: I began shading the distinctive palm-triangle under the pencil.
Frame 31: I erased a lot of my guidelines because when I’m no longer using them, they can become distracting.
Frame 32: I refined the thumb line and checked the picky using a negative-space triangle with the ring finger.
Frame 33: As I transitioned to the shading phase of the drawing, I began working on the distinctive dark areas of the palm.
I eventually drew the missing fingernails as I was shading the drawing. We’ll take up that phase in the next post.












клининговые компании москва рейтинг
Classes Estrogen Derivatives levitra pueden tomar mujeres Manual of pediatric nutrition
Thank you, I’ve just been looking for info about this topicfor ages and yours is the greatest I have found out till now.But, what concerning the bottom line? Are you positive concerning the source?
https://datingonlinehot.com/# onlinelovedating
Simply a smiling visitor here to share the love (:, btw great design. “Everything should be made as simple as possible, but not one bit simpler.” by Albert Einstein.
We think there are a number of positive aspects toselecting to bet at an esportsbook.
On this site u can buy CAMEL SNUS for very good price!
https://colibricleaning.ru/
A round of applause for your blog post. Much obliged.
I appreciate you sharing this post.Really looking forward to read more. Keep writing.
What’s up i am kavin, its my first occasion to commenting anyplace,when i read this post i thought i could also make comment due to this brilliant paragraph.
Really informative blog article.Really thank you! Keep writing.
I just like the helpful info you provide on your articles. I will bookmark your blog and test once more here regularly. I am moderately sure I will learn lots of new stuff proper right here! Best of luck for the following!
I really like and appreciate your article.Really looking forward to read more. Cool.
what is the difference between hiv and aids healthcare solutionsivermectin for humans walmart stftet
cost tadalis 10mg tadalafil 20mg cost order voltaren 50mg online cheap
Порно комиксы онлайн
nolvadex on cycle But I want to emphasize this again
An interesting discussion is definitely worth comment.I do believe that you need to publish more on thissubject matter, it might not be a taboo matter buttypically people don’t speak about these issues. To the next!Best wishes!!
Ремонт ноутбуков спб
Great, thanks for sharing this post.Really looking forward to read more. Really Cool.
https://cheapestedpills.com/# medicine for impotence
Thanks so much for the article.Really thank you! Really Cool.
порно комиксы онлайн
isotretinoin online buy amoxil 250mg cheap azithromycin 250mg pills
Ремонт ноутбуков в санкт петербурге
brand indocin 75mg lamisil 250mg pills buy trimox pill
priligy review The purpose of this study is to see if JNJ 68284528 is safe and useful for treating patients with relapsed or refractory multiple myeloma
https://spb-center-remont-noutbukov.ru/
Heya i am for the first time here. I found this board and I find It really helpful & it helped me out much. I hope to give something again and help others like you aided me.
806901 957868BTW, and I hope we do not drag this too long, but care to remind us just what kind of weapons were being used on Kurds by Saddams army? Towards the tune of hundreds of thousands of dead Speak about re-written history 267288
Hi there! I’m at work surfing around your blog from my new apple iphone!Just wanted to say I love reading your blog and look forward toall your posts! Carry on the outstanding work!
Thanks-a-mundo for the blog post.Really looking forward to read more. Want more.
I appreciate you sharing this article post.Really looking forward to read more. Keep writing.
Cars came into global use during the 20th century, and developed economies depend on them.
Hello! I could have sworn IÃve been to your blog before but after going through many of the posts I realized itÃs new to me. Anyhow, IÃm certainly delighted I stumbled upon it and IÃll be bookmarking it and checking back often!
Excellent post. I was checking constantly this blog and I’m impressed!Very helpful information specially the lastpart 🙂 I care for such information a lot. I was looking for this particular info for a long time.Thank you and good luck.
порно комиксы онлайн