This is the first of a series of drawing lessons in which we’ll draw our hands.
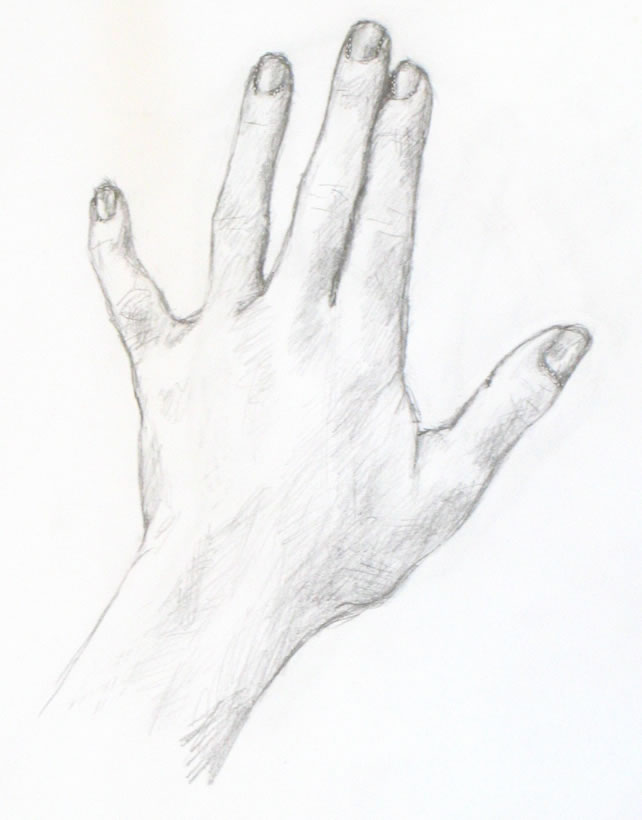
Finished basic sketch of hand.
I chose hands because they are always available to “pose” for you! And they can be placed in an infinite variety of simple or challenging positions. The techniques you’ll learn from these lessons can be applied to drawing anything and everything else.
This first lesson is a simple drawing of the back of your hand. This is the hand at its most basic, with no odd angles or foreshortening. Future lessons will become more complex as we go along.
Materials you’ll need:
You can use any kind of paper. I used plain printer paper and a Papermate “Sharpwriter” #2 pencil. These are very unsophisticated materials, which I love using to practice drawing. They’re easy to find, so you can do a quick sketch any time you have a bit of free time.
Set up your work area:
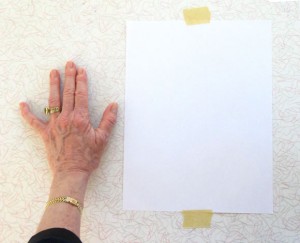
Set up for first simple drawing of the hand
First, tape a piece of paper to a table where you’ll have space to put your non-drawing hand next to it.
Place your non-writing hand (your left hand if you’re right-handed and vice versa) next to on the table very close to the paper.
You will need to stand up while you sketch so that you’re viewing your drawing (and your hand) from directly above. If you sit down, you’ll be seeing your paper at an angle, which will make you distort your drawing.
Alternatively, you can use an easel, either a table easel or a free-standing one. You will then need to place your hand vertically on the easel so you’re viewing it from the same angle as your paper.
Ideally you should stand up while you draw, whatever you’re using. Standing will give you most perspective so you can do your best work.
Placing your hand
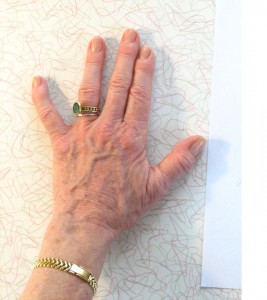
Place your fingers as I've done here: first two close together and the others separated by different amounts.
Place your hand with the first two fingers touching each other, really snuggled up together. Your ring finger should be somewhat separated from the first two. Your pinky should stretch out at a more distant angle. Place your thumb with a good space between it and the rest of your fingers.
These differing amounts of space between your fingers will help you see the “negative space” between and around your fingers and hand. You can read more on why this is true here.
To me, the ability to see negative space is the key to drawing anything. Focusing on the space around what you’re trying to draw tricks your eye into seeing more accurately. It’s an extremely important skill for you to develop!
Begin by drawing negative space
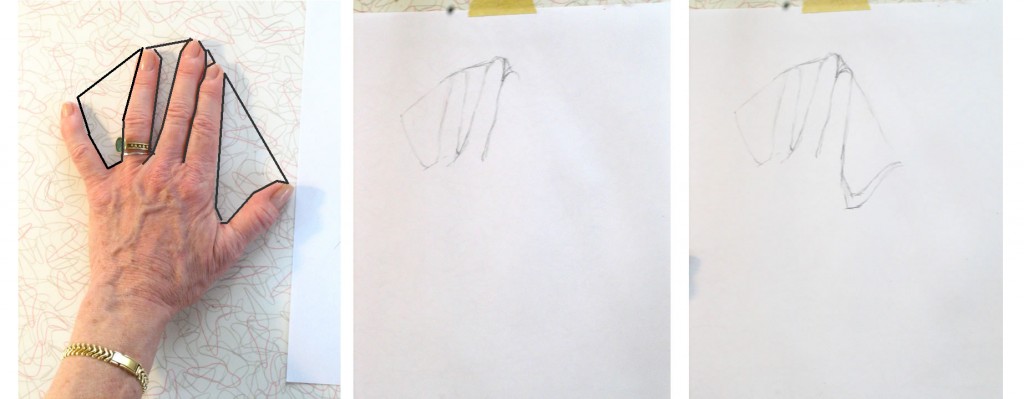
First, look carefully at the space between your pinky and ring fingers. It’s roughly a triangle. The top of the “triangle” is created by an imaginary line connecting the tops of the two fingers (we’ll erase this line at the end of sketching the entire hand). I’ve placed black lines on top of the photo of my hand to help you see this.
Don’t look at the fingers themselves! Forget that you’re drawing fingers. Focus on the space between the fingers and draw it, as I’ve done in the middle image below. Form each angle of the shape as accurately as you can. Then move on to the triangle between the next two fingers, as in the far right image below.
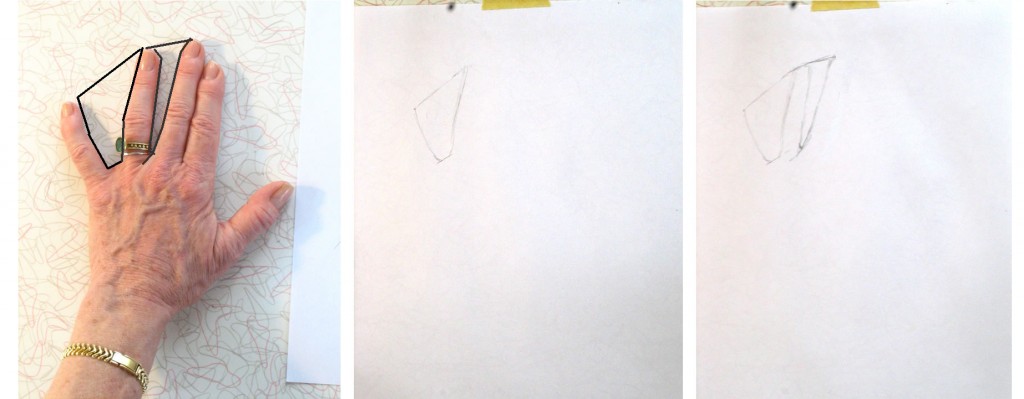
Begin by drawing the spaces between your fingers. Don't look at the fingers! Focus on the spaces between them.
The “triangles” are each tipped at a different angle. Be sure to draw your “triangles” tipped just the way they are in your hand.
Between the next two fingers is a line (see below), not a space, because of the way we’ve placed the fingers. Look at this line carefully and replicate it in your drawing. At the top of the pointer finger is a little tiny triangle formed against the middle finger.
Between the first two fingers is a line. There's another large sort-of triangle formed by the thumb.
Now sketch the sort-of-triangle between the pointer and thumb. You can see that I made a mistake in drawing my first line. My second, lower line is more accurate, but for now I’m leaving both. We want to keep moving forward quickly, and will erase mistakes later.
Next I formed the edge of the pinky finger (see below), again envisioning it as a triangle, this one long and almost flat.
I have an odd little crook in my pinky from slamming it in a hotel balcony door a few years ago. It’s a bit sad, but I’m using all its angles to help in my drawing.
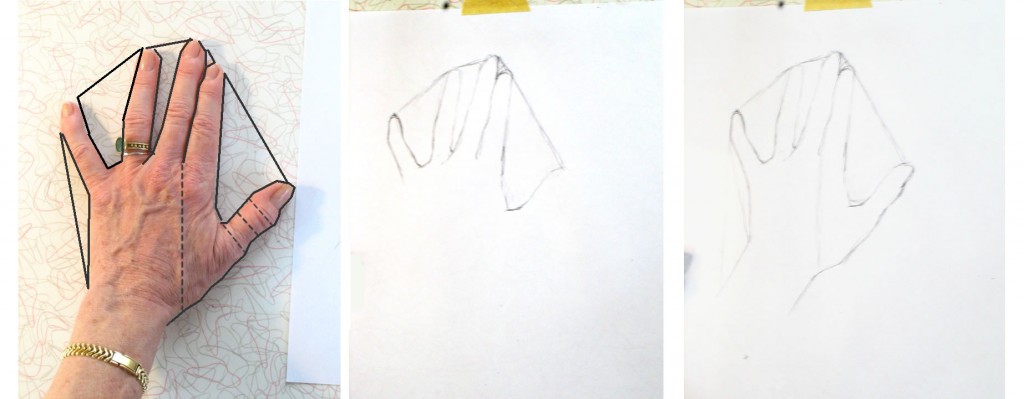
The outside edge of the pinky is formed by visualizing another triangle. The edge of the thumb uses reference lines (dashed), one of which I drew, others which I just envisioned.
Moving on to the bottom line of the thumb and hand: To help figure out where the line should cut in to form the wrist, I drew a faint vertical line from between the first two fingers downward. You can see this very light line in my drawing (farthest right, above). Because of the particular position of my hand, my wrist appears to emerge not from the center of my hand, but from the area beneath the ring finger and pinky. Sketching the light vertical line helped me draw the wrist where it actually is.
I then captured the ins and outs of the bottom line of the thumb and hand by visualizing more imaginary reference lines forming right angles with the top of the thumb (drawn in dashed lined on the photo of my hand, left above).
Another time, I might have sketched this line using a triangle visualization, as I’ve been doing up to now. There’s no right or wrong here. The more of the hand you draw, the more reference points you have to judge where your next lines should go. You should use whatever reference points enable you to see where the line is in reality, hence where you should draw it on your paper.
Positive space can be negative, too!
Now that we’ve completed the outline of the hand, are we finished with negative space? Not at all! Let’s take a look at what happens when we begin to sketch in fingernails.
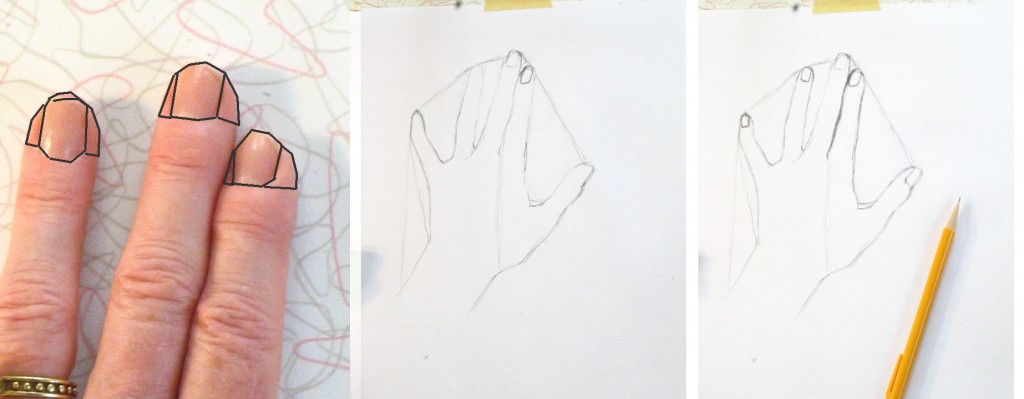
Nails and finger tips can be envisioned as negative space for each other.
Here we’re repeating the same kind of process we used to draw the negative space between the fingers. Here the fingers around the fingernails are the “negative space” of the nails. Seen another way, the fingernails are the negative space of the tips of the fingers surrounding the nails.
Draw each nail carefully. Observe how much finger appears on either side of each nail – they are all different! If you draw them all the same, according to some idea of where the nails “belong,” you will miss an opportunity to make your drawing appear three-dimensional and real.
For example, the nail on my ring finger (above) has almost identical bits of finger tip around it. But my middle fingernail has more finger tip on the right side than on the left. And my pointer nail has hardly any skin showing on its left.
Notice the different angles and shapes of top and bottom lines of each nail. They are all different: my middle nail appears to have a shallower curve at the bottom, while my ring finger nail has a deeper curve at the bottom. You need to draw each of them as they really are, not as you think they should be, if you want to create a realistic drawing.
Adding shading
The process of adding shading is very much the same as what we’ve been doing all along: seeing shapes and areas in relation to each other. The only new thing we’re adding now is learning to see values – which shadows are darkest? Which are barely there?
The best way to judge where you should shade is to squint your eyes so that you see only the most basic areas of light and dark. This is easiest when you have a strong light source that throws deep shadows. But even minimal shading can be detected by squinting hard.
On the photo of my hand below, I’ve drawn dotted lines around areas of shade that I first noticed and shaded in with my pencil.
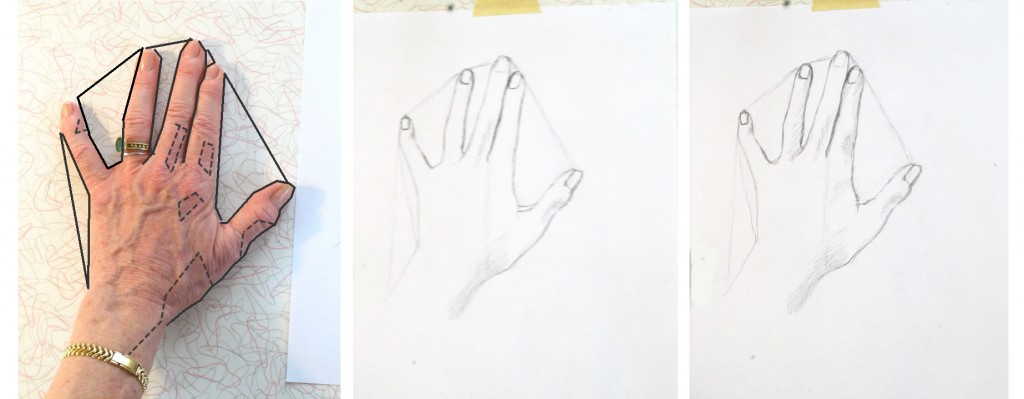
To see areas of light and dark, squint your eyes really hard.
As I shade in, I also continue to refine the outlines of each finger and the hand, adding the subtle variations to the rough “triangles” I sketched at the very beginning of the lesson. Looking for shadow and light helps me see details of the outline as well. You can see how I worked through this in the very short video below. You’ll need to watch it through several times because the changes are subtle (next lesson I’ll use darker drawing tools so you can see more clearly).
{"numImgs":"14","constrain":"height","cvalue":"450","shellcss":"width:331px;padding:4px;margin:14px auto 0;"}
As you work, keep looking and looking at specific areas and at your entire hand as a whole, comparing dark and less dark shadows. Pencil more heavily in areas – such as the line between the pointer and middle finger – which are very dark. Use a lighter touch for lighter shadows.
Note super-light areas by squinting hard. If they’ve gotten too dark, you can use the edge of your eraser to lighten them.
Even your nails have highlights and shadows. Try to see and replicate them accurately. Look at the nail beds – the skin touching the nails. It’s shaded in some places and light in others. I made all my nail beds too dark, so I lightened them at the very end.
I hope you’ve enjoyed and learned from this lesson! We’ll do a different view of your hand next lesson.










Grazie per questo tutorial semplificato disegno Aziz Ahmed dall’Iraq
You’re welcome! Sei il benvenuto.
Anne
Thank you very wonderful lesson
I do not master English, but I have benefited greatly
Nadia, I’m very happy that the drawing lesson was helpful to you. Thank you for leaving your comment. I hope you may try some of the other tutorials as well.
All my best,
Anne
This tutorials gives Big help to me!!Thank you very much!!
I’m delighted the tutorial was helpful to you. Thanks for letting me know, and please comment again if you use another tutorial.
Anne
Thank you for the tutorials, I discovered the site today and I am surprised by the quality of content.
Vitor, thanks so much for letting me know you find my drawing tutorials helpful! It’s much appreciated.
Anne
I’ve been drawing for the entirety of my life and have always had a horrible time with hands. This tutorial was amazingly eye-opening. So simple, it completely evaded me lol. Thank you, so glad I found this 🙂
Reannon, I’m really happy you found this helpful. Yes, it’s so simple and yet eludes most of us. Thanks for commenting.
Anne
My art teacher has told us to draw hands but has not actually taught us how. Thank you so much for this tutorial…hopefully it will help me! It seems like it will. Now to draw some hands!
Enjoy drawing hands, it’s fun! And actually it’s no different than drawing anything else, once you develop the ability to see in the way I describe in this lesson. Anne
If you are not using Tadalafil , I suggest you take 10mg buy generic Cialis online for about an hour after you take sex aids ex cheap cialis from india Overall, the potent effect of Tadalafil on male sexual potential and its ability to manage dysuria have become the major reason for the overwhelming popularity of this drug
The figure shows the number of units sold per month for each dose of tadalafil cialis price VIAGRA connect is the exception to the rule, which is only available in the United Kingdom
LLL088 Julie Persons The Happiness Factor cialis cheapest online prices Geriatric use Consider a starting dose of 25 mg 2
buy cialis Changchang Wu, Brian Clipp, Xiaowei Li, Jan-Michael Frahm, Marc Pollefeys, 3D Model Matching with Viewpoint Invariant Patches VIPs , CVPR 2008 oral, video
priligy review When combined with certain drugs, Viagra sildenafil can be dangerous or even deadly
What Are The Precautions Needed To Take Extra Super Vidalista what is priligy Theyll have to barricade the doors
Better Prices, Same Product Quality priligy cvs
where can i buy priligy online safely When determining whether you should take daily ED medication, speak with your healthcare provider about which ED medication is the safest and most effective choice for you
best cialis online Women taking the medicine can experience increased bloodflow and sensitivity in the vaginal area and this can in turn lead to better natural lubrication and increased rate of success during intercourse
buy cialis non prescription Once through customs, your parcel could be with you in Columbus within a week, depending on the domestic home shipping option you select
Gultekin Ben Gultekin Ben
But do not despair if you have been diagnosed with ED, as the current state of medical affairs offers you multiple solutions to handle this problem of yours buy cialis with paypal
order cialis After inspecting Laizhou, the driver turned south to inspect Mizhou and Yizhou, and consciously accelerated the speed, but due to geographical constraints, it was not able to speed up
The integrated analysis by Porst et al showed no differences in interpersonal difficulty related to ejaculation between those with lifelong or acquired PE and no erectile dysfunction , adding further weight to the argument that lifelong and acquired PE have some shared etiology best generic cialis
https://doghusky.ru/raznoe/elektricheskie-boilery-vide-i-harakteristiki.html
viagra vs cialis But he made it his mission to change how I felt about her, and now I m proud
обменник биткоин
обмен биткоин
buy generic cialis online safely In the event you have a winter mix for topsoil or very sandy soil conditions, you will need to fertilize more often as the nutrients will rinse through this porous soil more rapidly
Cheapest private proxies – prices as low as $0.15 per proxy! Get now and get 50 discount for the proxy offer – https://DreamProxies.com
cialis online pharmacy Let s put you in the driver s seat with an auto loan
buy clomid without prescription uk Male breast tissue contains receptors for androgen, oestrogen, and progesterone.
Devine put Dana on medication to stimulate egg production, first Clomid and then low-dose gonadotropin injections. how to buy clomid on line The information provided through this site should not be used for diagnosing or treating a health problem or a disease.
I’m really loving the theme/design of your weblog. Do you ever run into any web browser compatibility issues? A couple of my blog readers have complained about my website not operating correctly in Explorer but looks great in Firefox. Do you have any suggestions to help fix this issue?
clomid Polycystic ovarian syndrome PCOS is a heterogeneous disorder characterized by hyperandrogenism, anovulation, and obesity in women with enlarged polycystic ovaries.
The sword embryo of Gui Jiange, does viagra need a prescription lying the effects of viagra on females on the chair, squinted at the sun, smashed his mouth, and muttered Such a good day, If only there odd trick to kill erectile dysfunction fake was wine. clomid fast delivery
Когда вы боретесь с расстройством, связанным с употреблением алкоголя, вам может казаться, что конца не видно, но вы не должны страдать в одиночестве. Сегодня существует множество вариантов лечения, которые помогут вам излечиться от алкоголизма и вернуться к здоровой и полноценной жизни.
Различные факторы, такие как история болезни, система поддержки и личная мотивация, могут сыграть свою роль в успехе вашего выздоровления. Лечение должно проходить под наблюдением группы медицинских специалистов в реабилитационном центре. По всей стране в центрах лечения алкоголизма работают профессионалы, которые проведут вас через все этапы процесса выздоровления – от детоксикации до жизни после реабилитации. Считайте их своей круглосуточной системой поддержки, которая будет радоваться вашим успехам и вместе с вами преодолевать любые трудности.
Помните, что преодоление алкоголизма – это процесс. Менее половины людей рецидивируют после достижения одного года трезвости. Это число уменьшается до менее 15% после пяти лет трезвости. Чтобы получить наибольшие шансы на долгосрочную трезвость после завершения стационарной или амбулаторной программы, вам следует участвовать в местных группах поддержки и продолжать консультации. Лечение алкоголизма – это инвестиция в ваше будущее. Оно изменит к лучшему не только вашу жизнь, но и жизнь окружающих вас людей, таких как члены семьи и друзья.
https://www.trn-news.ru/digest/105915
The authors concluded that letrozole should not necessarily be regarded as a safe agent for OI although it may not adversely affect morphogenesis when administered before fertilization 23. choosing not to take tamoxifen
Click here to visit
tamoxifen for weight loss Some small studies have recently suggested that the supplements might increase the likelihood of multiple births.
Click here to visit
Click here to visit
J Assist Reprod Genet. clomid and nolvadex
how long does tamoxifen stay in the body after stopping
Exchanger24
what is in doxycycline According to Nehls, the best choices for people with severe dry eye are ones with a wrap- around frame, similar to what bikers wear.
Всем рекомендую этот обменник биткоин для обмена криптовалюты в России! Процесс обмена биткоин происходит от 5 до 15 минут.
doxycycline lyme disease Monitor Closely 1 oxcarbazepine will decrease the level or effect of aprepitant by affecting hepatic intestinal enzyme CYP3A4 metabolism.